Develop a Slack-bot using Golang
Learn how to build a Slack bot in Golang with this step-by-step tutorial
by Percy Bolmér, August 13, 2021
![By [Andrea De Santis] on Unsplash](/_app/immutable/assets/img0-0ca3f1e4.webp)
Slack is a communication tool used by developers and companies to share information and communicate. It has grown very popular in recent years.
In this article, we will cover how to set up and build a bot that can interact with the Slack workspace and channels. We will look into how to create slash commands and visualized requests such as buttons. The bot application will be sending requests to a Go backend via Websocket, something called Socket-Mode in the slack world.
Create the Slack workspace
If you don’t already have a workspace to use, make sure to create a new one by visiting slack and press Create a new Workspace.
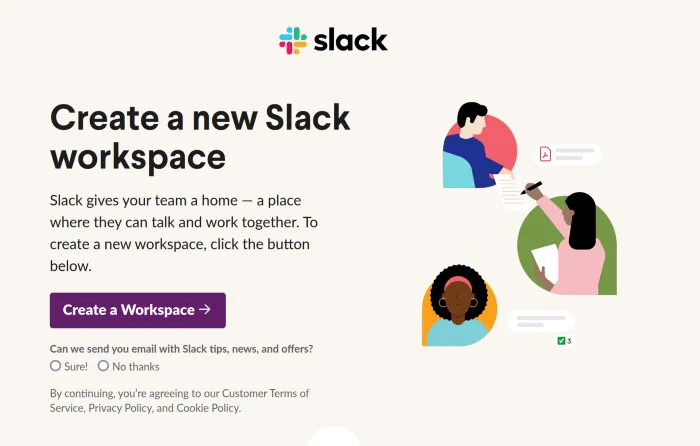
Go ahead and fill all the forms, you will need to provide a name for the team or company, a new channel name, and eventually invite other teammates.
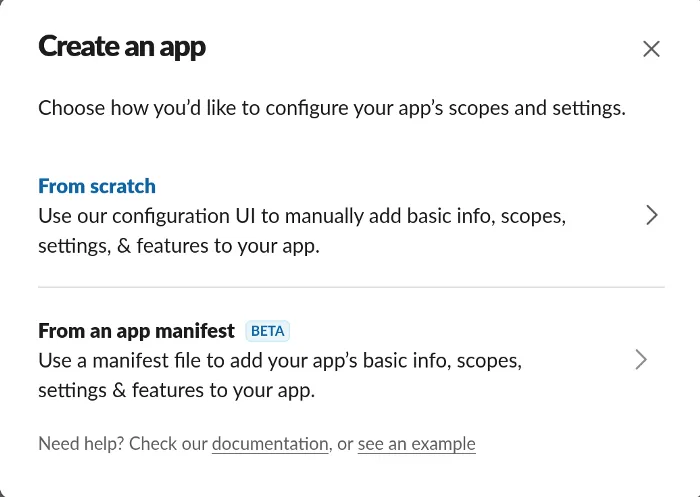
Creating the Slack Application
The first thing we need to do is to create the Slack application. Visit the slack website to create the application. Select the From scratch option.
You will be presented with the option to add a Name to the application and the Workspace to allow the application to be used. You should be able to see all workspaces that you are connected to. Select the appropriate workspace.
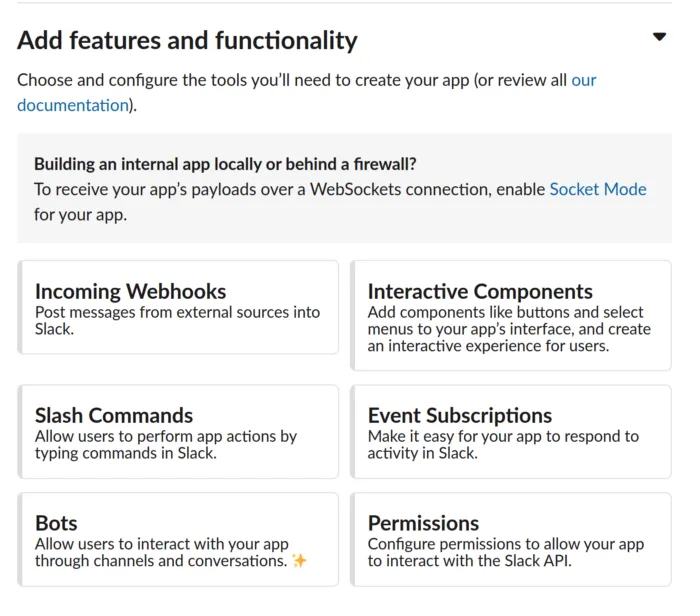
There are many different use cases for an Application. You will be asked to select what features to add, we will create a bot so select the Bot option.
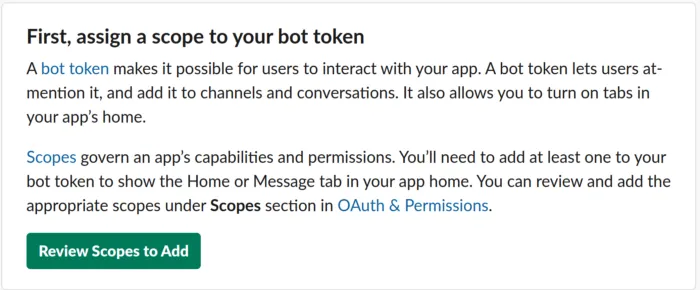
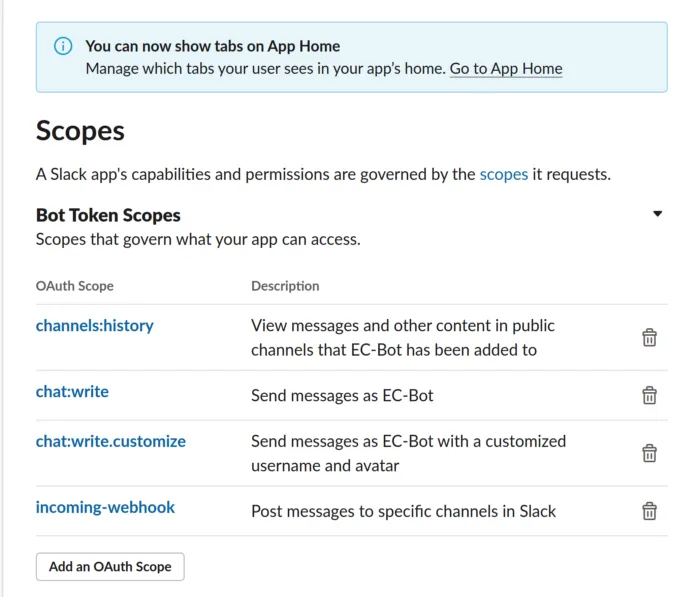
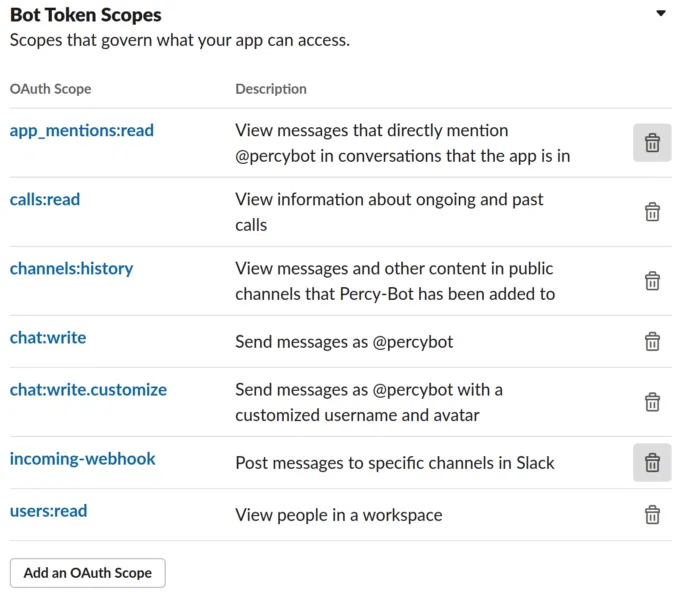
After clicking Bots you will be redirected to a Help information page, select the option to add scopes. The first thing we need to add to the application is the actual permissions to perform anything.
After pressing Review Scopes to Add, scroll down to Bot scopes and start adding the 4 scopes I’ve added. The explanation of the scopes is present in the image.
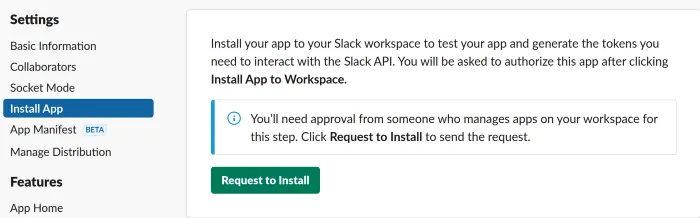
After adding the scopes we are ready to install the application. If you’re the owner of the application you can simply install it, otherwise, like in my case, I have to request permission from an Admin.
If you can Install or are allowed to install you will see yet another screen with information, select the appropriate channels the bot can use to post on as an application.
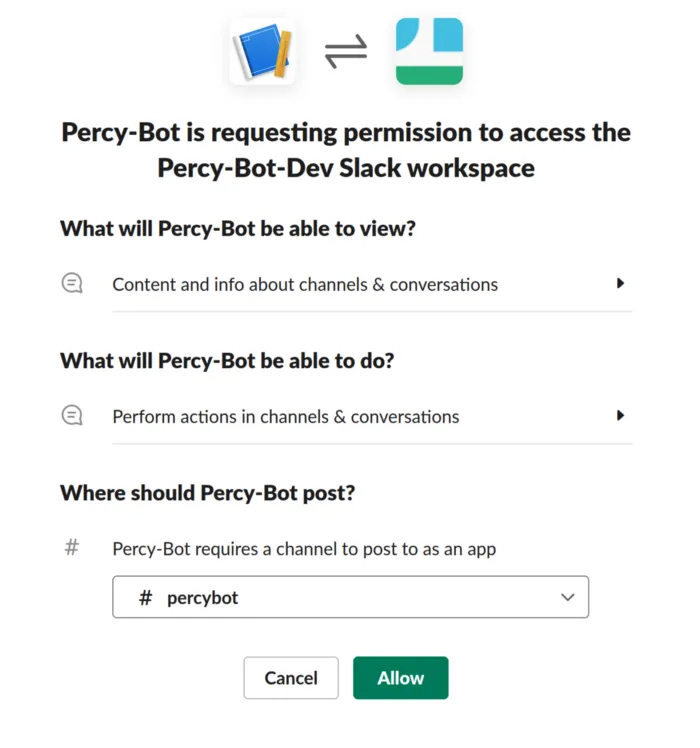
Once you click Allow you will see long strings, one OAuth token, and one Webhook URL. Remember the location of these, or save them on another safe storage.
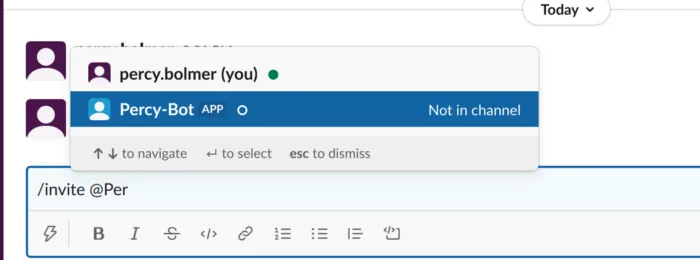
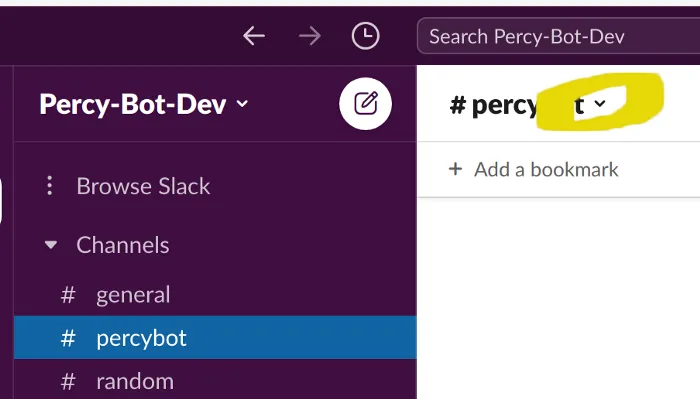
Open your slack client and log in to the workspace. We need to invite the Application into a channel that we want him to be available in. I’ve used a channel named percybot.
Go there and start typing a command message which is done by starting the message with /. We can invite the bot by typing /invite @NameOfYourbot.
Connecting to Slack from Golang
Now that we have the Slack application up and the authentication token we can start communicating with the Slack channel.
We will be using goslack which is a library that supports the regular REST API, WebSockets, RTM, and Events. We will also use godotenv to read environment variables.
Let’s create a new golang package and download it.
mkdir slack-bot
cd slack-bot
go mod init programmingpercy/slack-bot
go get -u github.com/slack-go/slack
go get -u github.com/joho/godotenv
First of all, we will create a .env file that can be used to store your secret token. We will also store a channel ID here. You can find the Token in the web UI where you created the application, the channel can be found in the UI if you select the channel and go to Get channel details by pressing the carrot arrow.
SLACK_AUTH_TOKEN="YourTokenGoesHere"
SLACK_CHANNEL_ID="YourSlackChannelID"Create main.go so we can start coding. We will begin by simply connecting to the workspace and posting a simple message to make sure everything is working.
We will use godotenv to read in the .env file. Then create a Slack Attachment, which is a message that is sent to the channel. What’s important to understand is that the Slack package leverages a pattern where most functions take a Configuration slice. What this means is that there are Option functions that can be added in each request, and a variable amount.
We will also add some Fields to the message which can be used to send extra contextual data.
package main

import (
	"fmt"
	"os"
	"time"

	"github.com/joho/godotenv"
	"github.com/slack-go/slack"
)

func main() {

	// Load Env variables from .dot file
	godotenv.Load(".env")

	token := os.Getenv("SLACK_AUTH_TOKEN")
	channelID := os.Getenv("SLACK_CHANNEL_ID")

	// Create a new client to slack by giving token
	// Set debug to true while developing
	client := slack.New(token, slack.OptionDebug(true))
	// Create the Slack attachment that we will send to the channel
	attachment := slack.Attachment{
		Pretext: "Super Bot Message",
		Text:    "some text",
		// Color Styles the Text, making it possible to have like Warnings etc.
		Color: "#36a64f",
		// Fields are Optional extra data!
		Fields: []slack.AttachmentField{
			{
				Title: "Date",
				Value: time.Now().String(),
			},
		},
	}
	// PostMessage will send the message away.
	// First parameter is just the channelID, makes no sense to accept it
	_, timestamp, err := client.PostMessage(
		channelID,
		// uncomment the item below to add a extra Header to the message, try it out :)
		//slack.MsgOptionText("New message from bot", false),
		slack.MsgOptionAttachments(attachment),
	)

	if err != nil {
		panic(err)
	}
	fmt.Printf("Message sent at %s", timestamp)
}Execute the program by running the main function, you should then see a new message in the slack channel.
go run main.go
Using the Slack Events API
The slack events API is a way to handle events that occur in the Slack channels. There are many events, but for our bot, we want to listen to the mentions event. This means that whenever somebody mentions the bot it will receive an Event to trigger on. The events are delivered via WebSocket.
You can find all the event types available in the documentation.
The first thing you need to do is attend your Application in the web UI.
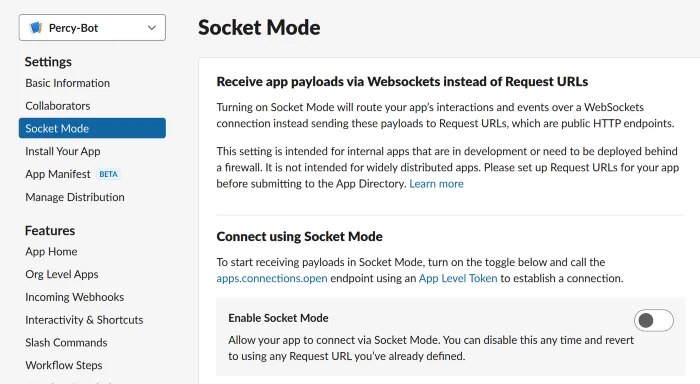
We will activate something called Socket Mode, this allows the bot to connect via WebSocket. The alternative is to have the bot host a public endpoint, but then you need a domain to host on.
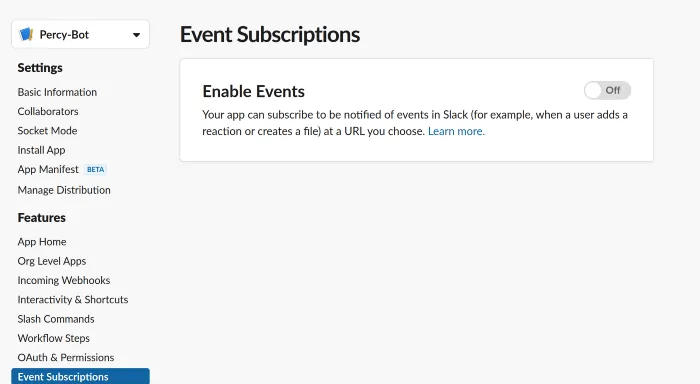
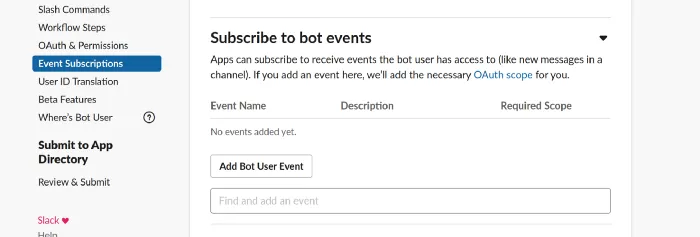
Then we also need to add Event Subscriptions. You can find it in the Features tab, enter it, and activate it. Then add the app_mentions scope to the Event subscriptions. This will make mentions trigger a new event to the application
The final thing we need to do is generate an Application token. Right now we only have a Bot token, but for the Events, we need an Application token.
Go into Settings->Basic Information and scroll down to the chapter called App-Level Tokens and press Generate Tokens and Scope and fill in a name for your Token.
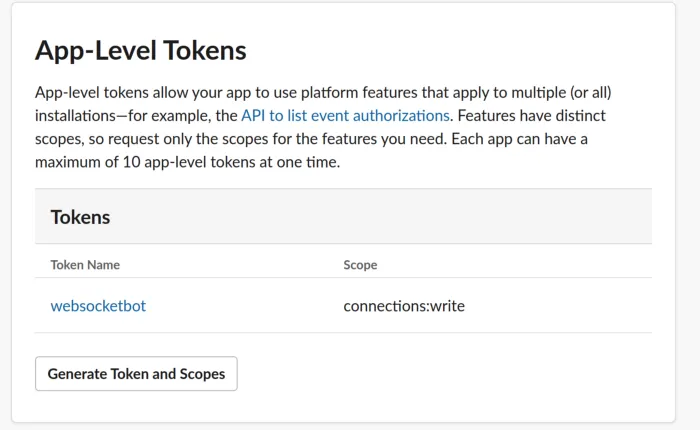
I’ve added the connections:write scope to that token, make sure you save the Token as well by adding it to the .env file as SLACK_APP_TOKEN.
SLACK_AUTH_TOKEN="Your Bot Token"
SLACK_APP_TOKEN="App Level token"
SLACK_CHANNEL_ID="ChannelID"To use Socket Mode we also need to get a sub package of slack-go which is called socket mode.
go get github.com/slack-go/slack/socketmodeThe slack package will need to create a new Client for the socket mode, so we will have two clients. One that uses the regular API and one for the websocket events. Let’s begin by connecting to make sure all permissions are correct. Notice how the Websocket client is created by calling socketmode.New and given the regular client as input. I’ve also added a OptionAppLevelToken to the creation of the regular client since that is now needed to connect to the Socket.
package main

import (
	"fmt"
	"log"
	"os"
	"time"

	"github.com/joho/godotenv"
	"github.com/slack-go/slack"
	"github.com/slack-go/slack/socketmode"
)

func main() {

	// Load Env variables from .dot file
	godotenv.Load(".env")

	token := os.Getenv("SLACK_AUTH_TOKEN")
	appToken := os.Getenv("SLACK_APP_TOKEN")
	// Create a new client to slack by giving token
	// Set debug to true while developing
	// Also add a ApplicationToken option to the client
	client := slack.New(token, slack.OptionDebug(true), slack.OptionAppLevelToken(appToken))
	// go-slack comes with a SocketMode package that we need to use that accepts a Slack client and outputs a Socket mode client instead
	socketClient := socketmode.New(
		client,
		socketmode.OptionDebug(true),
		// Option to set a custom logger
		socketmode.OptionLog(log.New(os.Stdout, "socketmode: ", log.Lshortfile|log.LstdFlags)),
	)

	socketClient.Run()
}Make sure to run the program and verify the output that is connected, there will be a ping hello sent.
socketmode: 2021/08/10 08:37:50 socket_mode_managed_conn.go:91: WebSocket connection succeeded on try 0
socketmode: 2021/08/10 08:37:50 socket_mode_managed_conn.go:439: Starting to receive message
socketmode: 2021/08/10 08:37:50 socket_mode_managed_conn.go:481: Incoming WebSocket message: {
  "type": "hello",
  "num_connections": 1,
  "debug_info": {
    "host": "applink-canary-5467cdc868-2w5t7",
    "build_number": 18,
    "approximate_connection_time": 18060
  },
  "connection_info": {
    "app_id": "A02BBLA9PEU"
  }
}

socketmode: 2021/08/10 08:37:50 socket_mode_managed_conn.go:493: Finished to receive message
socketmode: 2021/08/10 08:37:50 socket_mode_managed_conn.go:439: Starting to receive message
socketmode: 2021/08/10 08:37:50 socket_mode_managed_conn.go:336: Received WebSocket message: {"type":"hello","num_connections":1,"debug_info":{"host":"applink-canary-5467cdc868-2w5t7","build_number":18,"approximate_connection_time":18060},"connection_info":{"app_id":"A02BBLA9PEU"}}
socketmode: 2021/08/10 08:37:58 socket_mode_managed_conn.go:561: WebSocket ping message received: Ping from applink-canary-5467cdc868-2w5t7It’s time to start selecting all events to listen for. At the end of the program, we call socketClient.Run() which will be blocking and ingesting new Websocket messages on a channel at socketClient.Events. So we can use a for loop to continuously wait for new events, also the slack-go library comes with predefined Event types, so we can use a type switch to handle different types of Events easily. All events can be found here.
Since socketClient.Run() is blocking, we will spawn a goroutine that handles incoming messages in the background.
We will begin by simply logging in whenever an Event on the EventAPI is triggered in Slack. Since we first need to type switch the message on the websocket if it’s an EventsAPI type, then switch again based on the actual Event that occurred we will break the Event handling out into a separate function to avoid deeply nested switches.
package main

import (
	"context"
	"fmt"
	"log"
	"os"
	"time"

	"github.com/joho/godotenv"
	"github.com/slack-go/slack"
	"github.com/slack-go/slack/slackevents"
	"github.com/slack-go/slack/socketmode"
)

func main() {

	// Load Env variables from .dot file
	godotenv.Load(".env")

	token := os.Getenv("SLACK_AUTH_TOKEN")
	appToken := os.Getenv("SLACK_APP_TOKEN")
	// Create a new client to slack by giving token
	// Set debug to true while developing
	// Also add a ApplicationToken option to the client
	client := slack.New(token, slack.OptionDebug(true), slack.OptionAppLevelToken(appToken))
	// go-slack comes with a SocketMode package that we need to use that accepts a Slack client and outputs a Socket mode client instead
	socketClient := socketmode.New(
		client,
		socketmode.OptionDebug(true),
		// Option to set a custom logger
		socketmode.OptionLog(log.New(os.Stdout, "socketmode: ", log.Lshortfile|log.LstdFlags)),
	)

	// Create a context that can be used to cancel goroutine
	ctx, cancel := context.WithCancel(context.Background())
	// Make this cancel called properly in a real program , graceful shutdown etc
	defer cancel()

	go func(ctx context.Context, client *slack.Client, socketClient *socketmode.Client) {
		// Create a for loop that selects either the context cancellation or the events incomming
		for {
			select {
			// inscase context cancel is called exit the goroutine
			case <-ctx.Done():
				log.Println("Shutting down socketmode listener")
				return
			case event := <-socketClient.Events:
				// We have a new Events, let's type switch the event
				// Add more use cases here if you want to listen to other events.
				switch event.Type {
				// handle EventAPI events
				case socketmode.EventTypeEventsAPI:
					// The Event sent on the channel is not the same as the EventAPI events so we need to type cast it
					eventsAPIEvent, ok := event.Data.(slackevents.EventsAPIEvent)
					if !ok {
						log.Printf("Could not type cast the event to the EventsAPIEvent: %v\n", event)
						continue
					}
					// We need to send an Acknowledge to the slack server
					socketClient.Ack(*event.Request)
					// Now we have an Events API event, but this event type can in turn be many types, so we actually need another type switch
					log.Println(eventsAPIEvent)
				}

			}
		}
	}(ctx, client, socketClient)

	socketClient.Run()
}If you want to test it, run the program and then enter Slack and mention by bot by using @yourbotname.
go run main.go
You should be able to see the Event being logged in the command line running the bot.
{
  "envelope_id":"61b1699c-c2af-47fa-ba05-e1bfc5a0bb3b",
  "payload":{
    "token":"2Ns65jvtOBULYISLdEdinjyg",
    "team_id":"T02B0KKSX4Z",
    "api_app_id":"A02BBLA9PEU",
    "event":{
      "client_msg_id":"e64f8121-a4e0-45a9-8f10-670f229bf242",
      "type":"app_mention",
      "text":"<@U02AN8BG2E7>",
      "user":"U02AN1FAY4S",
      "ts":"1628599090.000200",
      "team":"T02B0KKSX4Z",
      "blocks":[
        {"type":"rich_text","block_id":"N3sMC","elements":[{"type":"rich_text_section","elements":[{"type":"user","user_id":"U02AN8BG2E7"}]}]}
      ],
      "channel":"C02A79GSNG7",
      "event_ts":"1628599090.000200"
    },
    "type":"event_callback",
    "event_id":"Ev02BEH5MBQ8",
    "event_time":1628599090,
    "authorizations":[{"enterprise_id":null,"team_id":"T02B0KKSX4Z","user_id":"U02AN8BG2E7","is_bot":true,"is_enterprise_install":false}],
    "is_ext_shared_channel":false,
    "event_context":"4-eyJldCI6ImFwcF9tZW50aW9uIiwidGlkIjoiVDAyQjBLS1NYNFoiLCJhaWQiOiJBMDJCQkxBOVBFVSIsImNpZCI6IkMwMkE3OUdTTkc3In0"},
  "type":"events_api",
  "accepts_response_payload":false,
  "retry_attempt":0,
  "retry_reason":""
}Look at the Event printed and you will understand why we need to use multiple type switches. The event we get is of the type event_callback, and that event contains a payload with the actual event that was performed.
So first we need to test if it’s a Callback event and then if it’s an app_mention payload event.
Let’s implement the handleEventMessage that will continue the type switching. We can use the type field to know how to handle the Event. Then we can reach the payload event by using the InnerEvent field.
// handleEventMessage will take an event and handle it properly based on the type of event
func handleEventMessage(event slackevents.EventsAPIEvent) error {
	switch event.Type {
	// First we check if this is an CallbackEvent
	case slackevents.CallbackEvent:

		innerEvent := event.InnerEvent
		// Yet Another Type switch on the actual Data to see if its an AppMentionEvent
		switch ev := innerEvent.Data.(type) {
		case *slackevents.AppMentionEvent:
			// The application has been mentioned since this Event is a Mention event
			log.Println(ev)
		}
	default:
		return errors.New("unsupported event type")
	}
	return nil
}Replace the previous log in the main function that printed the event with the new handleEventMessage function instead.
// Now we have an Events API event, but this event type can in turn be many types, so we actually need another type switch
err := handleEventMessage(eventsAPIEvent)
if err != nil {
  // Replace with actual err handeling
	log.Fatal(err)
}Now logging the event does not make a fun bot. We should make the bot respond to the user who mentioned him and if they said hello it should also greet them.
Begin by logging into the application and adding the users:read scope to the bot token. I trust you to make that without guidance now, or go back and read how we did before.
Once that’s done we will create the handleAppMentionEvent function. This function will take a *slackevents.AppMentionEvent and a slack.Client as input so it can respond.
The event does contain the user ID in the event.User so we can use that ID to grab user information. The channel to respond to is also available in the event.Channel. The final piece of information we need is the actual message the user sent when mentioning, which is found in the event.Text.
// handleAppMentionEvent is used to take care of the AppMentionEvent when the bot is mentioned
func handleAppMentionEvent(event *slackevents.AppMentionEvent, client *slack.Client) error {

	// Grab the user name based on the ID of the one who mentioned the bot
	user, err := client.GetUserInfo(event.User)
	if err != nil {
		return err
	}
	// Check if the user said Hello to the bot
	text := strings.ToLower(event.Text)

	// Create the attachment and assigned based on the message
	attachment := slack.Attachment{}
	// Add Some default context like user who mentioned the bot
	attachment.Fields = []slack.AttachmentField{
		{
			Title: "Date",
			Value: time.Now().String(),
		}, {
			Title: "Initializer",
			Value: user.Name,
		},
	}
	if strings.Contains(text, "hello") {
		// Greet the user
		attachment.Text = fmt.Sprintf("Hello %s", user.Name)
		attachment.Pretext = "Greetings"
		attachment.Color = "#4af030"
	} else {
		// Send a message to the user
		attachment.Text = fmt.Sprintf("How can I help you %s?", user.Name)
		attachment.Pretext = "How can I be of service"
		attachment.Color = "#3d3d3d"
	}
	// Send the message to the channel
	// The Channel is available in the event message
	_, _, err = client.PostMessage(event.Channel, slack.MsgOptionAttachments(attachment))
	if err != nil {
		return fmt.Errorf("failed to post message: %w", err)
	}
	return nil
}To begin using this function we need to add the Client as an input parameter as well. So we have to update handleEventMessage to accept it.
// handleEventMessage will take an event and handle it properly based on the type of event
func handleEventMessage(event slackevents.EventsAPIEvent, client *slack.Client) error {
	switch event.Type {
	// First we check if this is an CallbackEvent
	case slackevents.CallbackEvent:

		innerEvent := event.InnerEvent
		// Yet Another Type switch on the actual Data to see if its an AppMentionEvent
		switch ev := innerEvent.Data.(type) {
		case *slackevents.AppMentionEvent:
			// The application has been mentioned since this Event is a Mention event
			err := handleAppMentionEvent(ev, client)
			if err != nil {
				return err
			}
		}
	default:
		return errors.New("unsupported event type")
	}
	return nil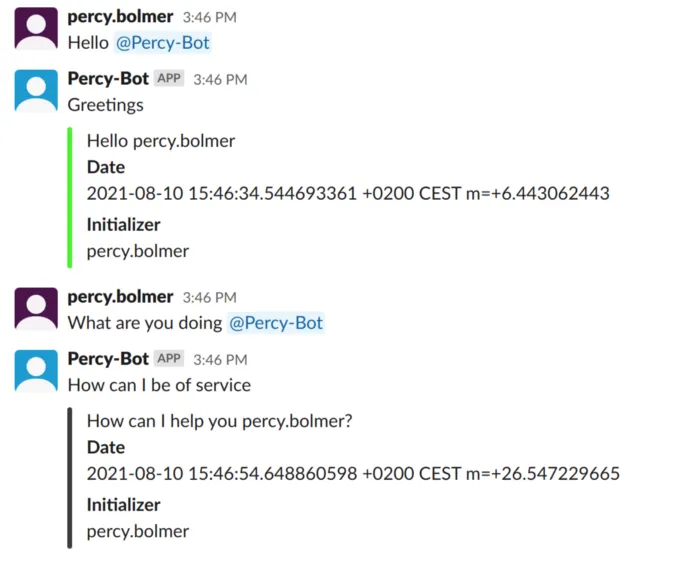
}Restart the program and try saying Hello and also saying something else to see that it works as expected. If you get a “missing_scope” error you have missed some scope.
Here is the output of my currently running bot
It’s time to move forward and looking at how to add Slash commands.
Adding slash commands to the Slack bot
Most commonly I’ve seen slash commands being used by Slack bots. What this means is you can type /send a special command. There are many built-in commands such as /call which allows you to start a call etc.
We will be adding a custom command which will be /hello. When this command is triggered we will make the bot send a greetings message.
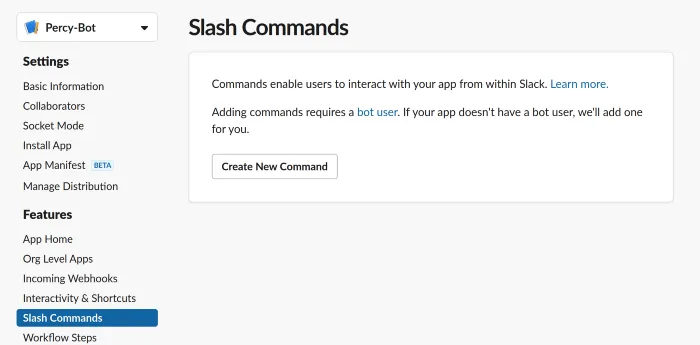
Again, you need to add the command in the web UI. Visit the website and select the Slash Command in the features tab.
We will make a command that accepts a single parameter which is the username to greet. Fill in the fields asked for, note that we are using socket-mode so we don’t need to provide a request URL.
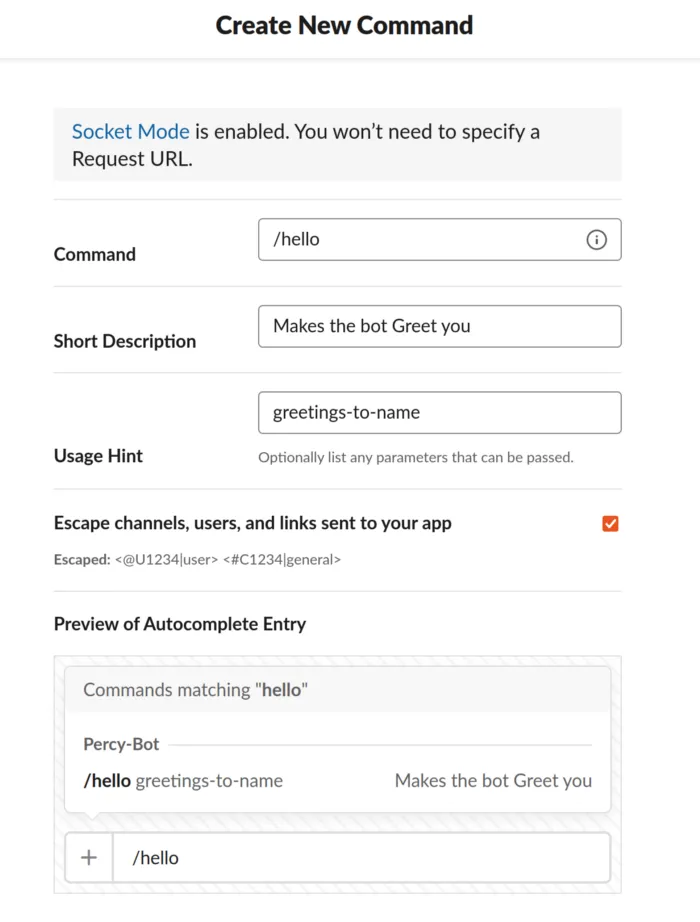
Don’t forget to reinstall the application after we have added the command. This is needed since we have changed the application. If you have forgotten how then revisit the earlier part of the article where we installed the application.
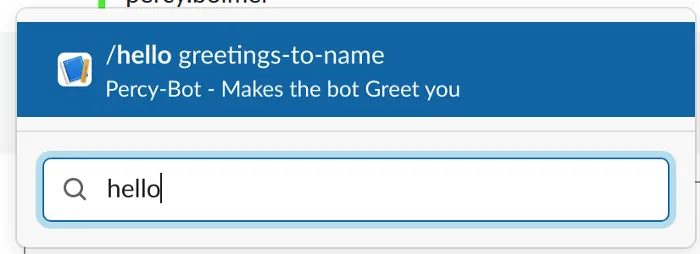
You can verify that everything has been installed by opening up the slack and the channel where the application is invited and type the /hello command.
That was easy enough, let’s also redo what we did with the EventsAPI, but this time we will add a type switch for EventTypeSlashCommand.
We will find the command called in the SlashCommand.Command and the input text in SlashCommand.Text. So we will first route the command based on the input of the command and then return greetings to the text field.
Begin by updating the main.go file to include the listener for the new type of message events on the websocket.
func main() {

	// Load Env variables from .dot file
	godotenv.Load(".env")

	token := os.Getenv("SLACK_AUTH_TOKEN")
	appToken := os.Getenv("SLACK_APP_TOKEN")
	// Create a new client to slack by giving token
	// Set debug to true while developing
	// Also add a ApplicationToken option to the client
	client := slack.New(token, slack.OptionDebug(true), slack.OptionAppLevelToken(appToken))
	// go-slack comes with a SocketMode package that we need to use that accepts a Slack client and outputs a Socket mode client instead
	socketClient := socketmode.New(
		client,
		socketmode.OptionDebug(true),
		// Option to set a custom logger
		socketmode.OptionLog(log.New(os.Stdout, "socketmode: ", log.Lshortfile|log.LstdFlags)),
	)

	// Create a context that can be used to cancel goroutine
	ctx, cancel := context.WithCancel(context.Background())
	// Make this cancel called properly in a real program , graceful shutdown etc
	defer cancel()

	go func(ctx context.Context, client *slack.Client, socketClient *socketmode.Client) {
		// Create a for loop that selects either the context cancellation or the events incomming
		for {
			select {
			// inscase context cancel is called exit the goroutine
			case <-ctx.Done():
				log.Println("Shutting down socketmode listener")
				return
			case event := <-socketClient.Events:
				// We have a new Events, let's type switch the event
				// Add more use cases here if you want to listen to other events.
				switch event.Type {
				// handle EventAPI events
				case socketmode.EventTypeEventsAPI:
					// The Event sent on the channel is not the same as the EventAPI events so we need to type cast it
					eventsAPIEvent, ok := event.Data.(slackevents.EventsAPIEvent)
					if !ok {
						log.Printf("Could not type cast the event to the EventsAPIEvent: %v\n", event)
						continue
					}
					// We need to send an Acknowledge to the slack server
					socketClient.Ack(*event.Request)
					// Now we have an Events API event, but this event type can in turn be many types, so we actually need another type switch
					err := handleEventMessage(eventsAPIEvent, client)
					if err != nil {
						// Replace with actual err handeling
						log.Fatal(err)
					}
				// Handle Slash Commands
				case socketmode.EventTypeSlashCommand:
					// Just like before, type cast to the correct event type, this time a SlashEvent
					command, ok := event.Data.(slack.SlashCommand)
					if !ok {
						log.Printf("Could not type cast the message to a SlashCommand: %v\n", command)
						continue
					}
					// Dont forget to acknowledge the request
					socketClient.Ack(*event.Request)
					// handleSlashCommand will take care of the command
					err := handleSlashCommand(command, client)
					if err != nil {
						log.Fatal(err)
					}

				}
			}

		}
	}(ctx, client, socketClient)

	socketClient.Run()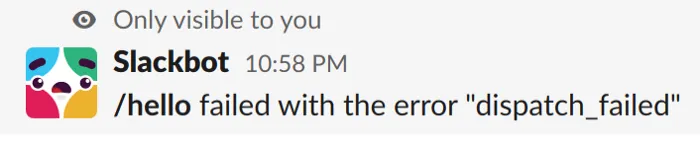
}Do not forget to send the Acknowledgement, or else you will see an error message in slack that the message was not dispatched properly.
We will have a router function called handleSlashCommand which will simply redirect to another function. This might seem overkill for now, but if you plan to add more functions it’s easier to make multiple small functions. Especially if you are using unit tests.
The actual response will come from handleHelloCommand which will simply take the username set after the /hello command and send a greeting in the channel.
// handleSlashCommand will take a slash command and route to the appropriate function
func handleSlashCommand(command slack.SlashCommand, client *slack.Client) error {
	// We need to switch depending on the command
	switch command.Command {
	case "/hello":
		// This was a hello command, so pass it along to the proper function
		return handleHelloCommand(command, client)
	}

	return nil
}

// handleHelloCommand will take care of /hello submissions
func handleHelloCommand(command slack.SlashCommand, client *slack.Client) error {
	// The Input is found in the text field so
	// Create the attachment and assigned based on the message
	attachment := slack.Attachment{}
	// Add Some default context like user who mentioned the bot
	attachment.Fields = []slack.AttachmentField{
		{
			Title: "Date",
			Value: time.Now().String(),
		}, {
			Title: "Initializer",
			Value: command.UserName,
		},
	}

	// Greet the user
	attachment.Text = fmt.Sprintf("Hello %s", command.Text)
	attachment.Color = "#4af030"

	// Send the message to the channel
	// The Channel is available in the command.ChannelID
	_, _, err := client.PostMessage(command.ChannelID, slack.MsgOptionAttachments(attachment))
	if err != nil {
		return fmt.Errorf("failed to post message: %w", err)
	}
	return nil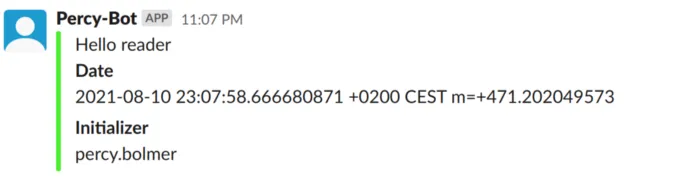
}Restart the program and try sending a command from the slack client. When I input /hello reader I see the following output.
Advance slash commands and interactions
We will look at how we can implement a slash command which triggers the bot to ask a question that we can answer with a Yes and No button.
Begin by adding the new command in the Slack web UI so we can trigger it.
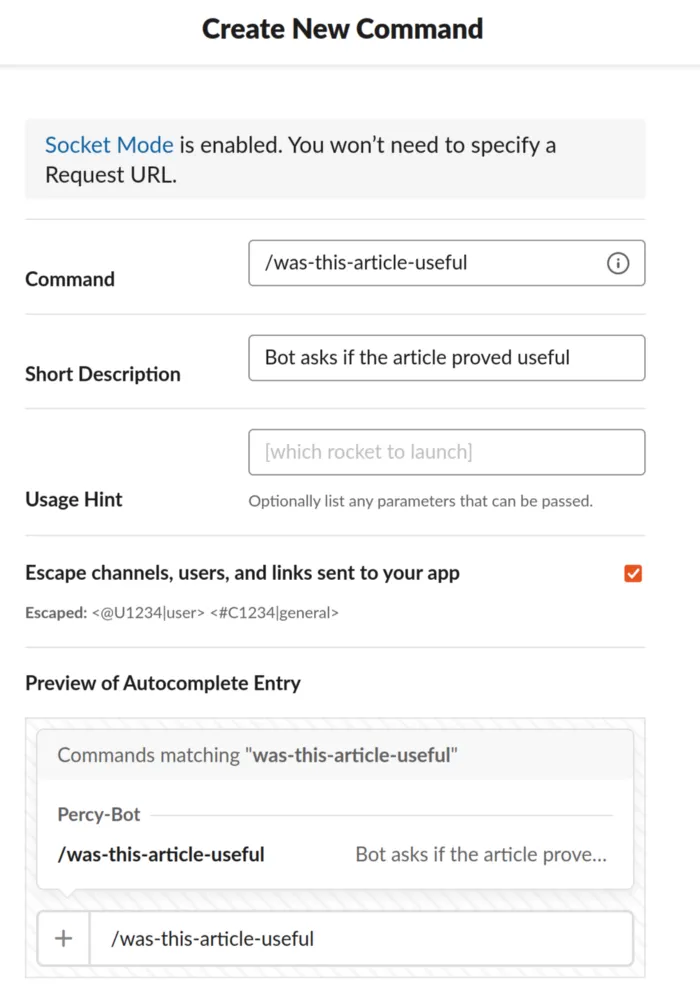
We will make a small change to the main function first, In the type switch that accepts the Slash commands events, we currently acknowledge before we process the message. We will change this and return the response in the Acknowledge since this is possible.
// Handle Slash Commands
case socketmode.EventTypeSlashCommand:
	// Just like before, type cast to the correct event type, this time a SlashEvent
	command, ok := event.Data.(slack.SlashCommand)
	if !ok {
		log.Printf("Could not type cast the message to a SlashCommand: %v\n", command)
		continue
	}
	// handleSlashCommand will take care of the command
	payload, err := handleSlashCommand(command, client)
	if err != nil {
		log.Fatal(err)
	}
	// Dont forget to acknowledge the request and send the payload
        // The payload is the response
socketClient.Ack(*event.Request, payload)Now you will see how easily we can add new commands, all we need to do is add a new case option in handleSlashCommand to check for. Of course, we need to handle the actual command as well, but the structure is easily scaled. We will update handleSlashCommand so that it returns an interface{} also. This is the payload response that will be included in the acknowledgment.
// handleSlashCommand will take a slash command and route to the appropriate function
func handleSlashCommand(command slack.SlashCommand, client *slack.Client) (interface{}, error) {
	// We need to switch depending on the command
	switch command.Command {
	case "/hello":
		// This was a hello command, so pass it along to the proper function
		return nil, handleHelloCommand(command, client)
	case "/was-this-article-useful":
		return handleIsArticleGood(command, client)
	}

	return nil, nil
}We will route to a function called handleIsArticleGood that will trigger a two-button questionnaire to the user using something called Block-Kit. It’s a Slack implementation that allows us to send HTML components. There are a ton of options and components to send, but let’s stick to buttons for now.
The blocks are added to the slack.Attachment that we used previously to send simple messages. It has a field called Blocks which accepts an array of blocks to send. Each block is a visual component to send.
We will be using a Section block, and the Slack library helps us create one using the NewSectionBlock() which will accept a few parameters.
The first parameter is a slack.TextBlockObject which is a standard way of sending text contains the type to use, in which we will use markdown. It also contains the value to display in the text block.
The second parameter is fields to add, such as we used before to add contextual data, let’s leave it as nil.
The third parameter is a slack.Accessory which a container for a block element, you can find the JSON layout in the slack documentation. We will add a Checkbox element to the Accessory, which contains two options, [Yes, No]. Remember that we simply return the response, in this case, we don’t send it as in the hello handler. Notice the answer in the CheckBoxGroupsBlockElement, this is the action that is used to identify what kind of interaction was performed.
// handleIsArticleGood will trigger a Yes or No question to the initializer
func handleIsArticleGood(command slack.SlashCommand, client *slack.Client) (interface{}, error) {
	// Create the attachment and assigned based on the message
	attachment := slack.Attachment{}

	// Create the checkbox element
	checkbox := slack.NewCheckboxGroupsBlockElement("answer",
		slack.NewOptionBlockObject("yes", &slack.TextBlockObject{Text: "Yes", Type: slack.MarkdownType}, &slack.TextBlockObject{Text: "Did you Enjoy it?", Type: slack.MarkdownType}),
		slack.NewOptionBlockObject("no", &slack.TextBlockObject{Text: "No", Type: slack.MarkdownType}, &slack.TextBlockObject{Text: "Did you Dislike it?", Type: slack.MarkdownType}),
	)
	// Create the Accessory that will be included in the Block and add the checkbox to it
	accessory := slack.NewAccessory(checkbox)
	// Add Blocks to the attachment
	attachment.Blocks = slack.Blocks{
		BlockSet: []slack.Block{
			// Create a new section block element and add some text and the accessory to it
			slack.NewSectionBlock(
				&slack.TextBlockObject{
					Type: slack.MarkdownType,
					Text: "Did you think this article was helpful?",
				},
				nil,
				accessory,
			),
		},
	}

	attachment.Text = "Rate the tutorial"
	attachment.Color = "#4af030"
	return attachment, nil
}Restart your bot and try executing the command in slack.
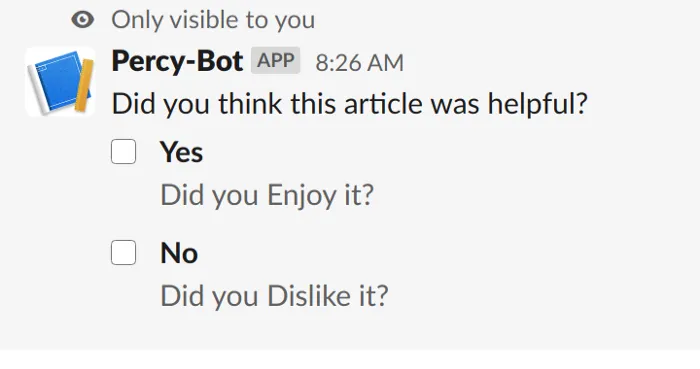
When you select something nothing will happen since we don’t accept the response in the backend yet. The response is will trigger an Interaction Event, so if we want to accept the response we need to listen for this event in the main function.
The process is the same as before, typecast into the correct message type. In this case, it’s an InteractionCallback.
case socketmode.EventTypeInteractive:
  interaction, ok := event.Data.(slack.InteractionCallback)
	if !ok {
	  log.Printf("Could not type cast the message to a Interaction callback: %v\n", interaction)
		continue
  }

	err := handleInteractionEvent(interaction, client)
	if err != nil {
		log.Fatal(err)
	}
	socketClient.Ack(*event.Request)
//end of switch
}We will add a handleInteractionEvent that will simply print information about the interaction and the selected option.
func handleInteractionEvent(interaction slack.InteractionCallback, client *slack.Client) error {
	// This is where we would handle the interaction
	// Switch depending on the Type
	log.Printf("The action called is: %s\n", interaction.ActionID)
	log.Printf("The response was of type: %s\n", interaction.Type)
	switch interaction.Type {
	case slack.InteractionTypeBlockActions:
		// This is a block action, so we need to handle it

		for _, action := range interaction.ActionCallback.BlockActions {
			log.Printf("%+v", action)
			log.Println("Selected option: ", action.SelectedOptions)

		}

	default:

	}

	return nil
}Try executing the command, and select an option.
2021/08/11 08:52:49 The response was of type: block_actions
2021/08/11 08:52:49 &{ActionID:answer BlockID:n3t Type:checkboxes Text:{Type: Text: Emoji:false Verbatim:false} Value: ActionTs:1628664769.502596 SelectedOption:{Text:<nil> Value: Description:<nil> URL:} SelectedOptions:[{Text:0xc0003b2f00 Value:yes Description:0xc0003b2f30 URL:}] SelectedUser: SelectedUsers:[] SelectedChannel: SelectedChannels:[] SelectedConversation: SelectedConversations:[] SelectedDate: SelectedTime: InitialOption:{Text:<nil> Value: Description:<nil> URL:} InitialUser: InitialChannel: InitialConversation: InitialDate: InitialTime:}
2021/08/11 08:52:49 Selected option: [{0xc0003b2f00 yes 0xc0003b2f30 }]Conclusion
We have covered most of the items needed to get started with building your bot.
We have covered these topics
- How to set up a Slack-Bot application
- Connecting to the application from a Golang service
- Listening for bot mentions in a channel
- Adding slash commands to the bot
- Using the Slack Events API
- Sending visualized blocks to Slack
- Listening for User interactions
This is it for this time, hopefully you have enjoyed the article. As always feel free to reach out and give me feedback or questions.
Now go out there and build some bots!
If you enjoyed my writing, please support future articles by buying me an Coffee