Docker Skyrocketed My Teams Productivity
Docker this, docker that, docker everything.
by Percy Bolmér, January 13, 2021
![By [Guillaume Bolduc] on Unsplash](/_app/immutable/assets/img0-cabdcf87.webp)
About two years ago I started hearing more and more about Docker. Eventually, I had heard so much talk about Docker that I had to dive deeper into it and learn what the fuzz was about.
My only regret is that I didn’t learn it sooner. It has helped me in my daily work so much, I truly believe Docker is something every developer should learn.
Let’s begin by talking about what Docker is, what it’s used for, and how to use it. We will also build our own image to demonstrate usage. We will also try using our own image in docker-compose. Hopefully it will convince somebody out there to start using Docker.
What is Docker?
Docker is used for creating containerized software . What this means is that we can create a standardized set of software that can be deployed and run anywhere that has a docker-engine. The result of this is that if somebody has gone through the trouble of installing some software we want inside a docker image, we won’t have to redo it.
That’s the easiest way I can think off to explaining docker, a pre-installed set of software installed in a container. And that’s all you need to know to start experiencing and learning docker.
If you’re interested in more in depth knowledge about what docker is and the internal workings it’s best to read on Dockers website.
Let’s talk about some words that needs to be understood in the Docker world.
Image
An image is a preset setup of files that the container should contain. Someone has made an Image containing software that’s preinstalled. It can an installation of Elasticsearch on a CentOS image, or anything. Then this software is buildt into an image, which can be deployed to anyone who wants an Elasticsearch installed.
A Docker container image is a lightweight, standalone, executable package of software that includes everything needed to run an application: code, runtime, system tools, system libraries and settings.
There are two kinds of Images
- Base Image — A reserved minimal image that docker provides. A base image is defined by using the FROM “scratch”. When we say minimal, its really minimal. If you create a new Image based on scratch and don’t add anything to it, it’s 0B.
- Parent Image — When we use another already created image as a base for our new Image.

Showing the Base, its 0 B in size.
Images are built using the docker build command. An image is given a name and an tag. The name is whatever the Image is called, like postgresql. A tag is a version or other information appended by a semicolon.
An example of building an Image could look like
sudo docker build -t customImage:0.1 .What we see is the command docker build being run, the -t flag specifies the tag. In our case its a image named customImage, with version 0.1.
Container
The container is when a user has started an image, what files are on this container is based on the Image used.
Container images become containers at runtime
Containers are created using the docker run command. So to turn our customImage:0.1 into a container, we would run it like so.
sudo docker run customImageDocker-Hub
Docker hub is a repository for docker images. Here we will find images created by other people, ready to be used by us.
Think GitHub for Docker.
It’s a great place to scout anytime you need a new software. There are a massive amount available, and all for free!
Imagine my surprise that Postgres is the most popular image. Seriously, have you ever tried installing it? I’ve done it probably 20–30 times, and always had trouble.
But no longer, I’ve got my beautiful Docker now.
Why docker?
I best like to use real-life scenarios to explain this. Before I started using Docker in basically all my projects, I spent a lot of time installing and configuring different software . At the time I worked on many small projects, and depending on the project I had to install all needed software. Or if another project already was using a piece of software I needed to reconfigure things.
Time consumption
So one week I was on a project that used Elasticsearch, the next week I needed PostgreSQL, the third week it was Redis. This kept going, and the worst part, each time I had a new project I had to reconfigure . One project needed PostgreSQL to be configured in this way, or that way. I spent a lot of time just managing setups for each project. It wasn’t for nothing, my bash and makefile skills increased drastically, but it still consumed much time. Let’s not talk about environment variables and port management on my development server.
Docker solves all this in a super simple, easily managed, and awesome way.
I can’t remember the last time I had to install a piece of software. I’ve gone full out docker everything.
Need PostgreSQL?, Great here you go.
Need anything else, great, somebody probably beat you too it and uploaded a Image on Dockerhub. And I don’t need to manage configurations for multiple PostgreSQL or any software instances when switching between projects, It’s all in my docker files. And they won’t conflict since they all run in their container environment.
Testing
I love unit tests. They are awesome for testing low level functions and exact lines of codes.
But I also love testing against a real environment, something about it just calms my nerves. I might know that this certain SQL query will work when it reaches an database, but I love testing my applications in a “real environment”.
It’s also easier, I know we can mock our database in the tests. But it’s a lot easier to run a real database and actually perform real queries against it. I would not recommend that if I hadn’t used Docker. Before Docker I’d recommend mocking, but now it’s so simple to just run a test database, no point in not doing it. (I’ve braced myself for hateful mails and death threats for saying this)
Docker allows us to easily and swiftly copy the real environment our application will live in.
I’ll discuss this more later.
Deployment
This could go under time-consuming, but it’s worth an extra chapter.
Before my docker fanaticism, I usually stored a vendor catalog in my projects. This directory contained all needed dependencies, correct versions of drivers, libraries. That’s how I found solving many deployment problems. But it didn’t always help, some customers wanted the software to run on Windows, some Linux, and another one on mac. So either we supported that by adding more dependencies inside the vendor, or created cross builds in complicated CI/CD pipelines .
Now you should still run a CI/CD but they become a lot easier, at least in my opinion they did.
Why do you ask? Well as mentioned earlier, an docker image can be ran on any computer as long as they have a docker engine. And they are available for many OS.
An example of this is my workflow, I use centOS and I tend to use it for my docker images as a base.
So we build our application on a docker image based on centOS. This image can be distributed to a windows computer and started via docker, and it will just work. It will work because our image contains all the software needed.
Scalability
Not only are containers easy to deploy, they are very lightweight and easy to scale. Seriously I’ve seen docker images with the size if 50–100MB for fully running applications.
There are great tools out there that allow us the scale the application.
There is docker-swarm , and Kubernetes. And also many more, but I mention those two because I’ve battle-tested them both and was happy with the results.
Awesomeness
Did I mention that Docker is awesome?
How to Docker?
So now we know all we need about docker to begin using it. First, you need to install docker . Find your current OS in that link and follow the instructions. I’m going to use CentOS in my examples.
sudo yum install -y yum-utils
sudo yum-config-manager --add-repo https://download.docker.com/linux/centos/
sudo yum install docker-ce docker-ce-cli
sudo systemctl start docker
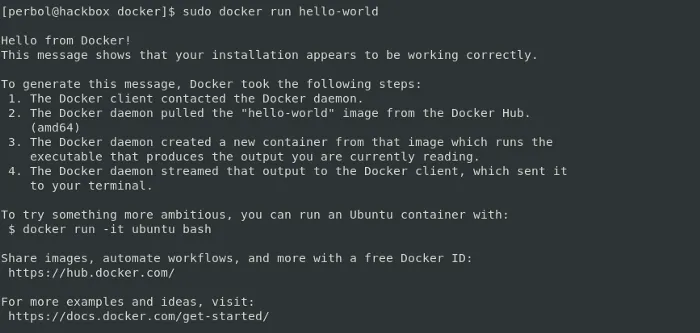
sudo systemctl enable dockerMake sure you’re installation works by running the following.
sudo docker run hello-world
Understanding Dockerfile
Dockerfile is a plain text file with instructions on what our Image should do while building the Image. There is a lot to learn about this, but I’ll only go over the essentials in this post.
Images in docker are built in layers. Each command that runs during a build adds an extra layer. So our Images are actually just a series of layers. The Dockerfile defines those layers.
A Dockerfile uses the path that it’s located in as something referred to as a context . The context is all the files or directories in the location of the Dockerfile. If there are files or directories that you don’t want your Dockerfile to include in the context, you can create a file called .dockerignore (kinda like gitignore). .dockerignore is a text file, each row containing a filename or a regexp of file patterns to avoid.
Docker actually warns users to never store a Dockerfile in the root of your host, as the whole hard drive will be included in the context. This doesn’t mean that the whole hard drive will be inserted into the built image, only into the build context, making all files available during build.
All Dockerfiles start building their Image based on a FROM statement. FROM defines what Image to use as a base, meaning any commands ran after FROM will add layers to our Image.
Let’s review some of the most common commands available in a Dockerfile. A full list is available at dockers website .
- RUN — Run is used to execute a command based on the OS the image is based off. For Linux it’s Bash, for windows its cmd.
- ENV — Used to assign environment variables inside the container.
- LABEL — Used to add metadata to an container. Labels from parent images are inherited.
- COPY — Copies a file from the host to the container. Can only copy files from the host.
- ADD — Very similar to COPY, it also copies files into our container. The difference is that ADD can also use files from remote, by URL. It can also extract local TARs into the container.
- ARG — Variabels that can be set at build time by the person building the image. ARGS can be used inside the Dockerfile during the build, but after the image is built they cannot be used or changed, unless rebuilding the image.
- VOLUME — Adds a mount point between the host and the container. Syntax is VOLUME path. This is often used when persisting data between container restarts, such as databases. The actual data is stored on the host but used in the container.
- EXPOSE — Tells the Docker engine that the container is listening on a specific port and protocol. Format is port protocol (udp/tcp)
- CMD — Defines the command and parameters that the Docker container should run when started. This usually points to a binary with a default set of values. CMD should be used when users are allowed to change the command.
- ENTRYPOINT — Often said to be used when the container is suppose to be run as a executable. It does the same as CMD, but if using ENTRYPOINT the user is not allowed to change the command.
- WORKDIR — Sets the path where the commands running after setting it should be. So if setting it to /app, it’s like running cd /app.
Building our first image
Let’s begin by building our first image.
Begin by making a new folder and a file called Dockerfile . Docker will search for file named Dockerfile in your current directory if nothing else is specified.
mkdir docker
touch Dockerfile
Now you will need to decide what your starting point will be. By starting point I mean what Image we will use as the foundation for our new image. Everything from the base will be copied into our image. We can also start from scratch if we want to really have full control. I don’t recommend starting from a base image, but rather use something called a multi build instead, I’ll show that at the end. The reason I don’t recommend it is that the scratch doesn’t have ANY thing available, not even bash. This is fine if your whole application is a single binary though.
In this example we will be building a super simple application that will print hello-world when we visit a URL. We want to focus on the docker functionality, not the amazing application we will build. We will base our image of golang:1.5, This is a image containing the programming language golang, which we will use to just print hello world when we visit a certain URL.
We can inspect the golang:1.5 with docker inspect too see what the image is. Inspect will print information about the Image. It’s a lot of information that’s printed, so it will take some understanding to read. Reading the information we can see that the image is a Linux OS, they set some environment variables, and they put a Golang binary into /usr/local/bin.
sudo docker inspect golang:1.5Open up the Dockerfile in any text editor, lets start building something. We will use the LABEL to add metadata about who the maintainer is. Next we need to create a folder with RUN where we will store our application, copy the files needed from our host machine into the container with COPY And move into that directory with WORKDIR and compile our application with RUN. And lastly we need to execute our application with CMD .
My Dockerfile looks like this
FROM golang:1.5
LABEL maintainer="PercyBolmer@medium"

RUN mkdir /app
COPY main.go /app
WORKDIR /app
RUN go build -o helloer .

CMD [ "/app/helloer" ]
My current Dockerfile, we continue building on the Golang image and add our application to it. Lets build the Image running docker build, I’ll name my image learndocker:0.1.
sudo docker build -t learndocker:0.1 .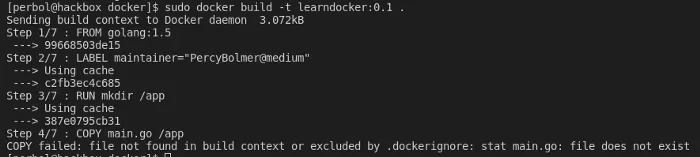
Did it work? Of course not , We are trying to copy a file named main.go from our HOST into our directory. That file doesn’t exist, so create one and copy the following Gist into it. The gist is a super slim Hello world HTTP server written in Go. Don’t worry if you don’t have Go installed, your Docker image does .
package main

import (
	"fmt"
	"net/http"
	"os"
	"log"

)

func main() {

	port := fmt.Sprintf(":%s", os.Getenv("PORT"))
	http.HandleFunc("/", HelloWorld)
	log.Fatal(http.ListenAndServe(port, nil))
}

func HelloWorld(w http.ResponseWriter, r *http.Request) {
	fmt.Fprintln(w, "Hello from Docker")
}
Slim HTTP server that prints Hello from Docker
Lets rerun the build command and see what happens, I will also print all our current images with the images command.
sudo docker build -t learndocker:0.1 .
sudo docker images
Perfect, lets run it. I will use the name flag when I build. I like being able to delete my containers by name instead of along ID. Right now we don’t need to delete any containers, since we are going to use the rm flag. The rm flag makes the container self delete upon exit.
sudo docker run --rm --name learndocker learndocker:0.1
# If you dont run --rm, make sure to delete the container after exit
sudo docker rm -f learndocker
You see that the container prints an error to the console. We see this because we run the container attached to our terminal. If you add the -d flag, the container will run in the background. This is very common, and we will miss the output of the container. That’s why I also run the docker logs to examine the errors. Docker logs is a way to see what a container is printing to stdout. I usually setup a Filebeat that reads my docker logs to output them into an Elasticsearch.
So, lets fix the error. To do this we need to learn about environment variables.
In the Go code, we are using the environment variable PORT to determine what port to host the HTTP server. Since the Docker container doesn’t have that set, it won’t work. So we need to add it using the ENV command.
We can add this to our run command by setting the -e flag.
sudo docker run --name dockerlearn -e PORT=8080 dockerlearn:0.1This isn’t very user friendly as it requires our users to know about this, so lets instead add a default to the Dockerfile. That way only if we need to customize it we need to configure it.
Let’s add the ENV command and the ARG command to the Dockerfile. We will allow the maintainer of the image set a default port when building the application, but also allow users to override the default port with an environment variable. ARG are used to provide build variables, ENV are used for runtime variables.
FROM golang:1.5
LABEL maintainer="PercyBolmer@medium"

#ARG is used during the Image build
ARG port=8080
# Assign Environment variabel PORT the value of port. The user running the container can then override this with the -e flag
ENV PORT=${port}

RUN mkdir /app
COPY main.go /app
WORKDIR /app
RUN go build -o helloer .

CMD [ "/app/helloer" ]
In this Dockerfile we set a default value for the PORT to host on
Now rebuild the image and run it again. You should no longer see an error.
You can change the default port by adding the build-arg flag
sudo docker build -t learndocker:0.1 --build-arg port=8080 .Try visiting localhost:8080 in your browser. If you changed the port, remember the change the port in the URL.
Auch, didn’t work?
That’s because the HTTP server is only serving for the containers own localhost . Working with Docker in the beginning might be confusing, but I find it helpful to always think of the container as another server/computer. It’s not technically correct, but it helps with understanding why things doesn’t work.

We need to map the port that we will host on with a port on our host to be able to reach it. If you paid attention during the Dockerfile chapter, you might want to go running off to the Dockerfile and add a EXPOSE 8080 . We will do that, except we will expose the environment variable set.
FROM golang:1.5
LABEL maintainer="PercyBolmer@medium"

#ARG is used during the Image build
ARG port=8080
# Assign Environment variabel PORT the value of port. The user running the container can then override this with the -e flag
ENV PORT=${port}

RUN mkdir /app
COPY main.go /app
WORKDIR /app
RUN go build -o helloer .

EXPOSE ${PORT}

CMD [ "/app/helloer" ]
This is our new Dockerfile where we expose the port. Rebuild the application and start it.
sudo docker build -t learndocker:0.1 --build-arg port=8080 .
sudo docker run --rm --name learndocker -e PORT=8080 -d learndocker:0.1
Still doesn’t work? That’s because EXPOSE command actually only is used to document for the docker engine what ports the container is listening on. To access an EXPOSED port we need to map it when running our container. Bind the host port to the container using the -p flag when running the container. No need to rebuild the image, we changed nothing in it. Only modify the run command to the following. The -p command takes the HOSTPORT:CONTAINERPORT and binds them.
sudo docker run --rm --name learndocker -p 8082:8080 -e PORT=8080 -d learndocker:0.1We can see the ports 8080/tcp being exposed, but only for the container itself.

After adding the -p flag we can see its actually mapping my hosts 8082 ->8080

This time, no tricks , visit localhost:8082 and it will work.
Optimize our image with multi build
So here comes a really cool feature of Docker. We can optimize and minimize our image using multi staged builds. The idea is that you use one parent image, perform some actions, then you can use your new image and copy anything needed from it into another image.
This sounds complex but is surprisingly easy.
What we will do here is use the Golang image to build our binary HTTP server, then copy that binary into the Docker base image. The image that was 0B big, called Scratch.
The following Gist shows our updated Dockerfile. I’ll explain what’s going on for all new lines, in the comments of the gist.
# We add as builder to name our build stage. This is needed so that our second build can refer to it
FROM golang:1.15 as builder
LABEL maintainer="PercyBolmer@medium"
#ARG is used during the Image build
ARG port=8080
# Assign Environment variabel PORT the value of port. The user running the container can then override this with the -e flag
ENV PORT=${port}
RUN mkdir /app
COPY main.go /app
WORKDIR /app
RUN go build -o helloer .
EXPOSE ${PORT}
# Build a second Image based on our first Image, but only copy our needed files
# Removing all necessary files, commands etc is not only saving memory, but
# also good for security reasons.
FROM scratch
# copy the compiled binary named helloer
COPY /app/helloer .
# arguments that can be overridden
CMD [ "./helloer"]An multistaged build example
Let’s build our new Image and review it. I’ve placed the updated Docker configuration into a new Dockerfile to separate things, I’m also going to update the version tag this time.
sudo docker build -t learndocker:0.2 --build-arg port=8080 --file MultiBuildDocker.docker .
sudo docker images
You can see the size difference using multi-build or not.

You’ve now got a container with the whopping size of 6.44MB. Belive it or not, there are tricks to make it even smaller, but they are very Golang related. We could change the compiler to remove unnecessary dependencies like CGO but we wont cover that here. You can try running the new learndocker:0.2 image. This time you’re on your own though, should be simple enough.
Clean up unused images
If you’ve followed along what I’ve done until now, we will have a few unused Images taking up unnecessary space.
sudo docker images
As you can see running the images commands shows you all Images that are built or downloaded on the host. We can see images named
Lets make sure no containers are running, and then delete the un-used images.
sudo docker container ps
This shows us any running containers and some information about them. Lets remove it using the ID or the Name field.
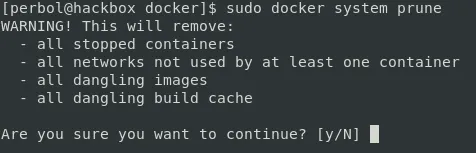
sudo docker container rm learndockerdocker container rm removes a single container, use -f to force. This will delete even running containers. If you have alot of containers running, or many images lying around, you can use the system prune. System prune will remove any unused Images, any networks created, great for cleaning up our mess.
sudo docker system prunePrune is fast to clear unused containers and images, but use with care!
Docker-compose
I suggest running one software per container. The overhead of running multiple containers is low, so no need to not separate.
Only running one container is useful, but we will often need more for a full scale application. Many times it’s safe to assume we will need more than one container, say a database and an application. This is where docker-compose comes into play.
Docker-compose is used to run several containers. It helps with setting up shared networks between the containers if wanted, an many extra things. It also helps us with running build commands and running containers becomes easier. Actually I use docker compose many times even when I only have one container. It also makes using Docker easier, it’s a lot easier storing configurations that modifying command line arguments.
Install docker-compose using this link .
When using docker-compose you only need to run two commands. sudo docker-compose up, It will create containers, run your configuration, create networks, mount files, anything you can do with Docker. But it will all be based on a simple YAML.
sudo docker-compose down to close and clean up everything needed.
Let’s build an new docker-compose.yaml which will serve our HTTP image and a PostgreSQL. I choose PostgreSQL because I really need to show how easy it is setup with docker.
# This compose is for demonstration how to serve our custom image and a prebuilt image
version: "3.0"
#Services defines what containers to run
services:
    #server is the name for our custom image, this can be anything and is used by other services to refer to this.
    server:
      #the image to run the container from
      image: "learndocker:0.2"
      # set environments
      environment:
        - PORT=8080
      # bind ports to our host
      ports:
        - 8082:8080
      # connect this container to the database container by settting them on the same virutal network
      networks:
        - amazing_network
    # Name our service database, this can be anything. The name is used to refer to this service from others, such as reaching their IP
    database:
      # Use the postgres image, this will be donwloaded for you automatically from Dockerhub
        image: "postgres"
        ports:
          # Expose and bind our ports
            - 8083:5432
        environment:
          - POSTGRES_USER=percybolmer
          - POSTGRES_PASSWORD=topsecret
          - POSTGRES_DB=mydatabase
        #env_file:
          # Read in a file called database.env
        #    - database.env
        #volumes:
        #    - ./api/db-data:/var/lib/postgresql/data/ # persist data even if container shuts down
        networks:
            - amazing_network


networks:
  # Create the network amazing_network
    amazing_network:
        driver: bridge
The gist shows a docker-compose setup that runs our image and a postgres on the same network If you copy paste the gist and then start docker-compose. Wait for it to build and setup everything, then you can visit localhost:8082.
sudo docker-compose upEasier than running docker build and docker run right? Also you can see that we dont recreate unnesseary images if you run
sudo docker-compose down
sudo docker images
That will be it for docker-compose. Use it, it’s amazing and it helps. Also, dont forget how easily you setup that PostgreSQL. Now we didn’t really try it out, you can do that yourselfs, or trust me. It’s easily accessible by the exposed port 8083.
Conclusion
That’s the essentials I think you’ll need to start exploring and using Docker. Hopefully you’ve found this article at least a little helpful. There is a lot more to explore in Docker, but I think it’s best to get familiar with the basics, and use their very well documented docs when trouble arises. So, what are you waiting for?
Get out there and dockerize the world!
If you enjoyed my writing, please support future articles by buying me an Coffee