Learn How To Use NeoVim As an IDE
A Step By Step Tutorial On How to Set up And Use NeoVim, For Complete Beginners
by Percy Bolmér, December 21, 2022

Many years ago I tried NeoVim, I was horrified by the amount of setup needed and I ran.
I ran to the comfort of my regular VS Code. An IDE that worked, looked good and had the most features I wanted.
Now, I thought I was effective in VS Code, but then I decided to give NeoVim a try again.
Some might ask, why spend a few hours setting up an IDE when you can have a complete working one in a minute, I agree. But let’s face it if we are going to work daily in our IDE, a few hours to configure is not really a bad thing.
The reason to use NeoVim is that it is super customizable, you can really make this editor look the way you want, and make it behave the way you want.
The con of NeoVim is also the customization abilities, it requires some time to set up and modify in the future. But once you know how to it isn’t really that hard or time-consuming, for the ability to add ANY feature that you want.
This tutorial won’t hand you a perfect IDE configuration for NeoVim, for that you can google after people’s dotfiles. This tutorial aims to help you understand NeoVim and learn how to manage it, allowing you to build whatever you want after. I won’t expect any previous knowledge in either Vi or NeoVim. You know what they say
Hand a developer an IDE, and he will code.
Hand a developer the ability to customize his IDE, and he will be a god.
Installing NeoVim And Packer The Plugin Manager
Begin by installing NeoVim by following the instructions on GitHub. I don’t recommend using apt-get install if you are using ubuntu as it is an old version.
curl https://github.com/neovim/neovim/releases/download/stable/nvim-linux64.tar.gz
tar -xvf nvim-linux64.tar.gzMove the unpacked folder somewhere where you store your software, or add the binary found at ./nvim-linx64/bin/nvim to your $PATH.
You can then open it up by running nvim
nvimDoing this will open up NeoVim and a splash screen. Remember, NeoVim is more of a terminal instead of a regular editor with a fancy UI.
You’re terminal should look like the following
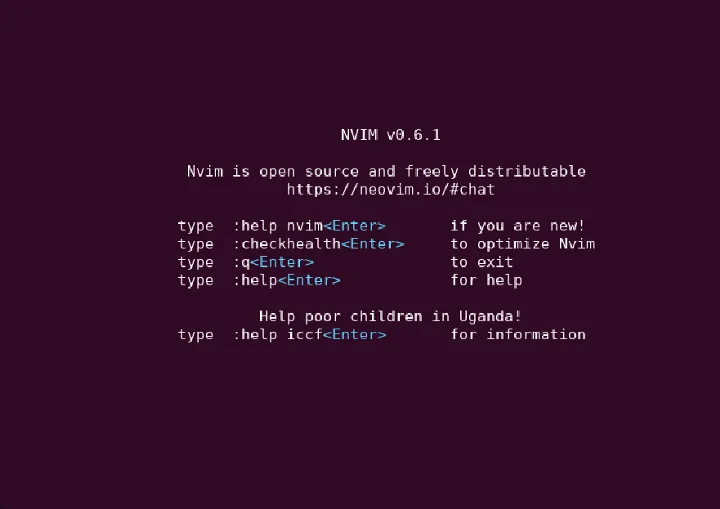
NeoVim Is nothing special at all if we don’t start adding a few plugins. This is the part that scares most people away when they first start using NeoVim. So Let’s try to make it easy.”
You can now close NeoVim by pressing SHIFT+: which opens the command prompt and then write q in the tab that appears at the bottom, and press enter.
Pressing SHIFT+: will open up the command tab, which allows us to pass in commands.
We need a Plugin Manager, a popular one that we will use is Packer.
We can install it using a one-liner in bash, it will fetch the repository and place it at the ~/.local/share/nvim path that is the second parameter. Don’t modify that path unless you know what you are doing, it is using a default path to something named PackPath in Vim/NeoVim.
git clone --depth 1 https://github.com/wbthomason/packer.nvim
~/.local/share/nvim/site/pack/packer/start/packer.nvimNow that we have Packer installed we need to make a first visit to the Plugin configuration file.
All configurations go into an LUA file which is by default stored at ~/.config/nvim/lua/. At that location, we can specify configuration files.
Writing The First Configuration & Importing Plugins & Navigating
Everything in NeoVim is almost handled by a Plugin, for instance, if we are going to use NeoVim as an IDE we will need Language Servers to understand code.
We will go ahead and create the first configuration file, which will be ~/.config/nvim/lua/plugins.lua.
If the folder does not exist then create it and create the file by opening it up with NeoVim.
mkdir -p ~/.config/nvim/lua
nvim ~/.config/nvim/lua/plugins.luaPacker can be imported in the Lua file by passing the name to the require function. We will then run a function on that called startup which will be performed on startup on NeoVim, which means we add the plugins and capabilities whenever NeoVim is started.
Enter Insert Mode by pressing Insert or i and then add the following
return require('packer').startup(function(use)
  -- Configurations will go here soon
 use 'wbthomason/packer.nvim'
end)What we do is that we are making Packer run on start, we then import all the plugins we want to use, and we include the packer plugin also. This allows Packer to self-manage itself and update etc.
Press ESC to leave Insert Mode, Save the file by opening the command tab SHIFT+: and passing in w which is short for write.
If you restart NeoVim now, nothing will have changed, bummer huh?
We need to also tell NeoVim to find this configuration file and load it.
This can be done inside ~/.config/nvim/init.lua which is a second configuration file, this file is executed by NeoVim when started up, we will require our configuration scripts inside Lua from here.
Open the plugins.lua file again, and let us learn how to navigate (for now) inside NeoVim so we don’t need to jump out all the time.
Once NeoVim is opened, type in the command Explore which will open up a text-based explorer for us. It is called Netrw, and I won’t go into details, but it can even fetch remote files, etc.

From here, you can see the files in the current directory, and also the default Linux path indicators ./ and ../. A single dot is a current directory, two dots is the parent directory.
We want to create the init.lua file in the parent directory, so press enter once you select the ../ and then press SHIFT+%. Shift+% will open an input bar at the bottom asking for a file name, enter init.lua. It will open the file after creating it.
We will add a single line to it, or create the file if it does not exist. That line will make sure plugins are added.
require('plugins')Save using the w command and restart NeoVim and we should have Packer installed, which we can control by running commands.
If Packer was installed correctly we should be able to use its commands, one of them is PackerStatus which prints a list of all used Plugins.

You can print the status bar down by pressing q.
In Short what we have done so far.
- Learned how we can use Packer for importing Plugins, ~/.config/nvim/lua/plugins.lua which is related to that.
- ~/.config/nvim/init.lua allowed us to tell NeoVim to respect our Packer file upon startup.
- Running commands using SHIFT+: such as PackerStatus.
- Learned how to navigate using the Explore command.
Now it might not seem very impressive so far, and I agree. Let us add more plugins.
We are going to code, so we will need plugins for language servers and debuggers, etc. There is a great plugin called Mason that can be used for this, let us update the Packer configuration, you know which file by now! We will also fetch the neovim/nvim-lspconfig which enables us to fetch different configurations for different LSPs, check out the docs for a full list.
Update the plugin configuration to the following.
return require('packer').startup(function(use)
        -- Configurations will go here
        use 'wbthomason/packer.nvim'
        use 'williamboman/mason.nvim'
        use 'williamboman/mason-lspconfig.nvim'
        use 'neovim/nvim-lspconfig'

end)Once that is done, save the file by opening the command bar SHIFT+: and then run the command w which will write down any changes you’ve made.
We have saved the file, but we need to reload it for these changes to be noticeable by Packer, so open the command bar and type in the following command which will reload the currently opened lua file.
:luafile %Then execute the PackerInstall command to download the new plugins.
:PackerInstall
Please note that the plugins we installed now only help us set up and configure the LSP. It does not download them for us if we want GOPLS for instance we still need to install that separately.
Enabling Language Server Protocol Support
Using the nvim-lspconfig requires us to install a third-party language server that can then be connected to NeoVim. This is how I enable GOPLS for instance with the help of Mason.
We begin by enabling Mason, this is done in the same way Packer was done, we create a lua script to enable it, then require that script in the init.lua.
Let’s begin by creating the lua file to manage mason.
touch ~/.config/nvim/lua/mason-config.luaThen open the file and fill in the code below to require the plugins and call their setup function.
require("mason").setup()
require("mason-lspconfig").setup()Save the file using w.
Then we update init.lua to require that script, by using the prefix of the name mason-config. Remember to use Explore when you switch between the files.
require('plugins')
require('mason-config')Once that is done, opening NeoVim should have the new Mason command which will open a setup manager for us.
If you are using a NeoVim version older than 0.7 you can get an error when opening NeoVim, press enter and run the command
:checkhealthThis is a super useful command to test things out and detect anything that is wrong.

Running :Mason will bring up all the available LSPs, locate the one you have, and remember the name. I will install gopls.
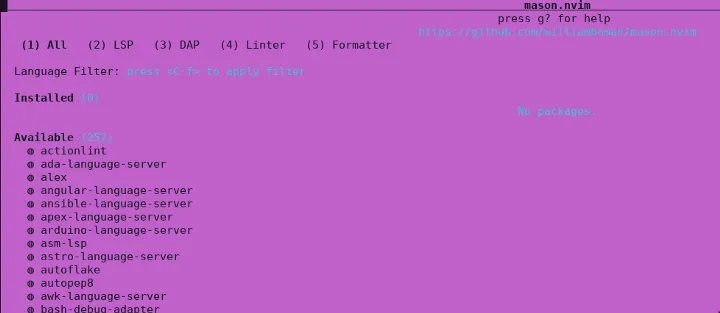
To install it, run the command, add any packages you want, and if you add many then separate them by space.
MasonInstall goplsNote that each installation might require you to have software installed like gopls installation requires go.
Now that gopls is installed we need to make NeoVim attach it.
This is really simple, and the process should now feel familiar, we are going to create a gopls.lua file inside the lua folder, and then we are going to require that script in the init.lua.
The gopls.lua will import the lspconfig package, which allows us to attach gopls to neovim.
You can configure gopls to do many things, we will use the simple example from the gopls documentation, each server has its own set of configurations that you need to check on their documentation on what to specify.
-- Require LSP config which we can use to attach gopls
  lspconfig = require "lspconfig"
  util = require "lspconfig/util"
-- Since we installed lspconfig and imported it, we can reach
-- gopls by lspconfig.gopls
-- we can then set it up using the setup and insert the needed configurations
  lspconfig.gopls.setup {
    cmd = {"gopls", "serve"},
    filetypes = {"go", "gomod"},
    root_dir = util.root_pattern("go.work", "go.mod", ".git"),
    settings = {
      gopls = {
        analyses = {
          unusedparams = true,
        },
        staticcheck = true,
      },
    },
}If you are using go you will want to add more analysis etc, but we are here how to learn how to set things up, and then customization is up to you.
I do recommend ray-x for go, which should be easy to install after following this tutorial.
Make sure to require the new lua script in the init.lua.
require('plugins')
require('mason-config')
require('gopls')Now create a main.go and see if it can detect errors, here is an image showing my errors.

Code Completion & Suggestions
We are on a step in the right direction, we are seeing errors. I don’t know if you noticed that there was no code completion or suggestions.
That is a super must-have in an Editor, so let’s add it.
To add that, we need, a ….. drum roll, wait for it, a PLUGIN!
We will be leveraging hrsh7th plugin for this or plugins.
He has a whole suite of plugins, I will put links here to the ones used, but I won’t cover them all in detail
- nvim-cmp - A completion engine plugin for Neovim
- cmp-nvim-lsp - nvim-cmp source for neovim’s built-in language server client.
- cmp-nvim-lsp-signature-help - nvim-cmp source for displaying function signatures with the current parameter emphasized:
- cmp-nvim-lua - nvim-cmp source for neovim Lua API.
- vim-vsnip - Ability to Create and Use VSCode Snippets.
- cmp-path - nvim-cmp source for filesystem paths.
- cmp-buffer- nvim-cmp source for buffer words.
We can add all those plugins to the lua/plugins.lua file.
-- Hrsh7th Code Completion Suite
    use 'hrsh7th/nvim-cmp'
    use 'hrsh7th/cmp-nvim-lsp'
    use 'hrsh7th/cmp-nvim-lua'
    use 'hrsh7th/cmp-nvim-lsp-signature-help'
    use 'hrsh7th/cmp-vsnip'
    use 'hrsh7th/cmp-path'
    use 'hrsh7th/cmp-buffer'
use 'hrsh7th/vim-vsnip'Then save the file by running the :w command, reload the lua file with :luafile % , then sync the packages with :PackerSync which will delete any unused plugins, and install new ones.
Once that’s done, we need to write a new configuration file in lua/code-completion.lua that we use to manage the plugins and configure them to act as we want.
We will want a small popup dialog to appear with code suggestions, this can be done using one of the many configurations available in NeoVim, all of the configs are found here.
The one we are after is vim.opt.completeopt which is used to make a menu appear with suggestions. All the available configurations are in the docs, I will only leave comments above each one to explain it.
After that, we will require cmp which allows us to configure the plugin. We will call the setup function to have a few settings applied when it is set up.
The file will look like this at the beginning
-- completeopt is used to manage code suggestions
-- menuone: show popup even when there is only one suggestion
-- noinsert: Only insert text when selection is confirmed
-- noselect: force us to select one from the suggestions
vim.opt.completeopt = {'menuone', 'noselect', 'noinsert', 'preview'}
-- shortmess is used to avoid excessive messages
vim.opt.shortmess = vim.opt.shortmess + { c = true}

local cmp = require'cmp'
cmp.setup({
  -- Configurations will go here
})The first thing we need to configure is sources, what we do here is that we set the installed plugins as sources for code suggestions.
-- sources are the installed sources that can be used for code suggestions
 sources = {
      { name = 'path' },
      { name = 'nvim_lsp', keyword_length = 3 },
      { name = 'nvim_lsp_signature_help'},
      { name = 'nvim_lua', keyword_length = 2},
      { name = 'buffer', keyword_length = 2 },
      { name = 'vsnip', keyword_length = 2 },
}After that, we will want to add mappings!
Mappings are all the fun, it means that we can create keyboard shortcuts for executing certain commands. In case the Code suggestion dialog presents options, how do we select the one we want, how do we confirm, and what should happen when we do?
Mappings are easy to set up, the first thing we do is declare the Keys to activate the action. The syntax is <Key-Key2-Key3>, it can take a while to learn what keys are available, but the docs got us covered.
I want the have the same mappings that I use in VS Code, but you can set it up however you want! I will be using CTRL which is shortened as C. An example of how to trigger the code completion dialog upon pressing CTRL+SPACE would look like this.
['<C-Space>'] = cmp.mapping.complete(),The cmp package we use has a few available functions that can be called and they are all present here.
I will put comments above each Mapping, here is how my code-completion.lua looks after the mappings.
-- completeopt is used to manage code suggestions
-- menuone: show popup even when there is only one suggestion
-- noinsert: Only insert text when selection is confirmed
-- noselect: force us to select one from the suggestions
vim.opt.completeopt = {'menuone', 'noselect', 'noinsert', 'preview'}
-- shortmess is used to avoid excessive messages
vim.opt.shortmess = vim.opt.shortmess + { c = true}

local cmp = require'cmp'
cmp.setup({

  mapping = {
    -- Shift+TAB to go to the Previous Suggested item
    ['<S-Tab>'] = cmp.mapping.select_prev_item(),
    -- Tab to go to the next suggestion
    ['<Tab>'] = cmp.mapping.select_next_item(),
    -- CTRL+SHIFT+f to scroll backwards in description
    ['<C-S-f>'] = cmp.mapping.scroll_docs(-4),
    -- CTRL+F to scroll forwards in the description
    ['<C-f>'] = cmp.mapping.scroll_docs(4),
    -- CTRL+SPACE to bring up completion at current Cursor location
    ['<C-Space>'] = cmp.mapping.complete(),
    -- CTRL+e to exit suggestion and close it
    ['<C-e>'] = cmp.mapping.close(),
    -- CR (enter or return) to CONFIRM the currently selection suggestion
    -- We set the ConfirmBehavior to insert the Selected suggestion
    ['<CR>'] = cmp.mapping.confirm({
      behavior = cmp.ConfirmBehavior.Insert,
      select = true,
    })
  },

  -- sources are the installed sources that can be used for code suggestions
 sources = {
      { name = 'path' },
      { name = 'nvim_lsp', keyword_length = 3 },
      { name = 'nvim_lsp_signature_help'},
      { name = 'nvim_lua', keyword_length = 2},
      { name = 'buffer', keyword_length = 2 },
      { name = 'vsnip', keyword_length = 2 },
 }
})Open up init.lua and add code-completion.lua to the file.
require('plugins')
require('mason-config')
require('gopls')
Once that is in the configuration, save it and open a new .go file and try it out! You should see code suggestions and be able to use the key mappings to navigate the suggestions.

If you want to enable vsnip plugin we also need to add the following code to the code-completion.lua.
snippet = {
    expand = function(args)
        vim.fn["vsnip#anonymous"](args.body)
    end,
},We can make it look a little bit better by adding some borders to the windows.
window = {
      completion = cmp.config.window.bordered(),
      documentation = cmp.config.window.bordered(),
  },
Sometimes it might make sense to edit the formatting, we can for instance add icons depending on the source that the suggestion comes from. The following snippet adds formatting depending on the name of the source.
-- completeopt is used to manage code suggestions
-- menuone: show popup even when there is only one suggestion
-- noinsert: Only insert text when selection is confirmed
-- noselect: force us to select one from the suggestions
vim.opt.completeopt = {'menuone', 'noselect', 'noinsert', 'preview'}
-- shortmess is used to avoid excessive messages
vim.opt.shortmess = vim.opt.shortmess + { c = true}

local cmp = require'cmp'
cmp.setup({
  -- Required by vsnip
  snippet = {
    expand = function(args)
        vim.fn["vsnip#anonymous"](args.body)
    end,
  },
  -- Add Mappings to control the code suggestions
  mapping = {
    -- Shift+TAB to go to the Previous Suggested item
    ['<S-Tab>'] = cmp.mapping.select_prev_item(),
    -- Tab to go to the next suggestion
    ['<Tab>'] = cmp.mapping.select_next_item(),
    -- CTRL+SHIFT+f to scroll backwards in description
    ['<C-S-f>'] = cmp.mapping.scroll_docs(-4),
    -- CTRL+F to scroll forwards in the description
    ['<C-f>'] = cmp.mapping.scroll_docs(4),
    -- CTRL+SPACE to bring up completion at current Cursor location
    ['<C-Space>'] = cmp.mapping.complete(),
    -- CTRL+e to exit suggestion and close it
    ['<C-e>'] = cmp.mapping.close(),
    -- CR (enter or return) to CONFIRM the currently selection suggestion
    -- We set the ConfirmBehavior to insert the Selected suggestion
    ['<CR>'] = cmp.mapping.confirm({
      behavior = cmp.ConfirmBehavior.Insert,
      select = true,
    })
},

  -- sources are the installed sources that can be used for code suggestions
  sources = {
      { name = 'path' },
      { name = 'nvim_lsp', keyword_length = 3 },
      { name = 'nvim_lsp_signature_help'},
      { name = 'nvim_lua', keyword_length = 2},
      { name = 'buffer', keyword_length = 2 },
      { name = 'vsnip', keyword_length = 2 },
  },
  -- Add borders to the windows
   window = {
      completion = cmp.config.window.bordered(),
      documentation = cmp.config.window.bordered(),
  },
  -- add formating of the different sources
    formatting = {
      fields = {'menu', 'abbr', 'kind'},
      format = function(entry, item)
          local menu_icon ={
              nvim_lsp = 'λ',
              vsnip = '⋗',
              buffer = 'b',
              path = 'p'
          }
          item.menu = menu_icon[entry.source.name]
          return item
      end,
  },
})After applying that you should see small Icons or text depending on the source.

We now have Code completion in place, but we can do more!
FileTree & Easy Traversal & First Custom Key Mapping
Up until now, we have used the Explore command to switch files. I can’t recommend that in a dev environment if you want to keep your sanity.
Luckily there is an easy solution in NeoVim. There is a very popular plugin called nvim-tree which can be found on GitHub.
Installing it by now should be a breeze.
Open up the Packer configuration file plugins.lua and add the Nvim plugin. We will add nvim-web-devicons it to make the new file explorer a little nicer.
This time, you will see a new syntax in the Packer configuration, we won’t import the plugin using a string, but rather an object with a requirement inside of it.
What this means is that we will require the nvim-tree plugin, but also require the devicons. This can be used to make sure we have all the needed plugins and not only one.
return require('packer').startup(function(use)
 -- Configurations will go here
 use 'wbthomason/packer.nvim'
 use 'williamboman/mason.nvim'
 use 'williamboman/mason-lspconfig.nvim'
 use 'neovim/nvim-lspconfig'
 -- Hrsh7th Code Completion Suite
 use 'hrsh7th/nvim-cmp'
 use 'hrsh7th/cmp-nvim-lsp'
 use 'hrsh7th/cmp-nvim-lua'
 use 'hrsh7th/cmp-nvim-lsp-signature-help'
 use 'hrsh7th/cmp-vsnip'
 use 'hrsh7th/cmp-path'
 use 'hrsh7th/cmp-buffer'
 use 'hrsh7th/vim-vsnip'
 -- File explorer tree
 use {
  'nvim-tree/nvim-tree.lua',
    requires = {
      'nvim-tree/nvim-web-devicons', -- optional, for file icons
    },
 }
end)Note, for the devicons to work you need Nerd Fonts installed, Simply skip the requirement if you don’t want them. Nerd Fonts are easily installed by scrolling to the bottom of that webpage and installing their patcher software.
Download a font, I use the Go-Mono and then add it as a font, I recommend using font-manager, see how to use it here.
Once that is done, save the file :w and then reload luafile % and then update the plugins with PackerSync.
We want to configure NvimTree at startup, and we will grab the configuration from their docs, but add it so that the tree is opened on start.
Create a new lua script and name it appropriately, I will name mine file-explorer.lua.
-- disable netrw at the very start of your init.lua (strongly advised)
vim.g.loaded_netrw = 1
vim.g.loaded_netrwPlugin = 1

-- set termguicolors to enable highlight groups
vim.opt.termguicolors = true

-- empty setup using defaults
require("nvim-tree").setup({
  open_on_setup = true,
  ignore_buffer_on_setup = true,
})And let’s require that script inside init.lua
require('plugins')
require('file-explorer')
require('mason-config')
require('gopls')
require('code-completion')
Restarting NeoVim will now show us a new nice tree with the files so we can navigate.

Navigating in the tree is easy either using the mouse or many of the default mappings it comes with. I recommend this guide which is nice for learning.
You can use the shortcuts CTRL+w to enter navigation mode which allows you to jump between opened panels, Press either the left or right key to jump in that direction. You can also use CTRL+w+w to jump to the next panel fast.
There are a few nice commands you will probably need to know. Once you are inside the NvimTree, pressing a will allow you to create a file, d will delete a file.
Pressing q will close the tree, and to open it we can run the command :NvimTreeToggle which is long and unnecessary.
I like having the tree open when I press ctrl+n so I will add that mapping.
Using NvimTree I will go to the lua directory and create a custom-keys.lua file where I will store my personal key mappings. I can create the file by pressing a.
-- fetch keymap
local map = vim.api.nvim_set_keymap

-- map the key n to run the command :NvimTreeToggle
map('n', 'n', [[:NvimTreeToggle<CR>]], {})In the script, we use vim.api.nvim_set_keymap which is part of the nvim api to create custom key mappings. See their docs for all available settings and modes.
The first parameter specifies the mode to enable the key mapping, I want it in normal mode. You can also have it in other modes, such as the Insert mode.
We then set that pressing n will trigger the :NvimTreeToggle command, and we append <CR> to auto-trigger the command, we don’t want to press enter each time.
Then, of course, we need to update init.lua to include the custom-keys file.
require('plugins')
require('file-explorer')
require('mason-config')
require('gopls')
require('code-completion')
require('custom-keys')
Reopen NeoVim and pressing n will now open the NvimTree, you should set it to the key that you feel comfortable with.
Debugging using DAP & DapUI
We now have a file tree, we have code completion, and a language server that tells us when something is wrong.
One important thing when developing is testing and debugging code, so we need to add that.
We can again use the Mason Plugin, we want to install a DAP, and since I focus on Go, I want Delve.
Run the command
:MasonInstall delveAfter that, we need to install a plugin called nvim-dap which is used to manage DAPs for multiple languages.
Add it to the plugins.lua, save the file and reload it, you remember how to right? Then execute PackerSync.
return require('packer').startup(function(use)
 -- Configurations will go here
 use 'wbthomason/packer.nvim'
 use 'williamboman/mason.nvim'
 use 'williamboman/mason-lspconfig.nvim'
 use 'neovim/nvim-lspconfig'
 -- Hrsh7th Code Completion Suite
     use 'hrsh7th/nvim-cmp'
     use 'hrsh7th/cmp-nvim-lsp'
     use 'hrsh7th/cmp-nvim-lua'
     use 'hrsh7th/cmp-nvim-lsp-signature-help'
     use 'hrsh7th/cmp-vsnip'
     use 'hrsh7th/cmp-path'
     use 'hrsh7th/cmp-buffer'
     use 'hrsh7th/vim-vsnip'
 -- File explorer tree
     use 'nvim-tree/nvim-web-devicons' -- optional, for file icons
 use 'nvim-tree/nvim-tree.lua'
 -- DAP for debugging
 use 'mfussenegger/nvim-dap'
end)Depending on the language you want to debug, we need to configure it. You can find a full list of examples for different languages in the docs.
We begin by requiring dap, and then you can target the DAP using the dap.adapters followed by the adapter name. In my example, I will target delve it will be dap.adapters.delve. The configurations to set should be checked for each adapter, I will simply make delve run the currently opened file.
I will create a new configuration script, surprise!
This one will be named debugging.lua.
-- fetch the dap plugin
local dap = require('dap')
-- Add adapter to delve
dap.adapters.delve = {
  type = 'server',
  port = '${port}',
  executable = {
    command = 'dlv',
    args = {'dap', '-l', '127.0.0.1:${port}'},
  }
}

-- https://github.com/go-delve/delve/blob/master/Documentation/usage/dlv_dap.md
dap.configurations.go = {
  {
    type = "delve",
    name = "Debug",
    request = "launch",
    program = "${file}"
  },
  {
    type = "delve",
    name = "Debug test", -- configuration for debugging test files
    request = "launch",
    mode = "test",
    program = "${file}"
  },
  -- works with go.mod packages and sub packages
  {
    type = "delve",
    name = "Debug test (go.mod)",
    request = "launch",
    mode = "test",
    program = "./${relativeFileDirname}"
  }
}And as always, update init.lua to include the script
require('plugins')
require('file-explorer')
require('mason-config')
require('gopls')
require('code-completion')
require('custom-keys')
require('debugging')
nvim-dap does not come with any preset mappings. And using it is a pain without mappings.
To set a breakpoint we need to execute the command :lua require’dap’.toggle_breakpoint().
Or to start debugging the current file we need :lua require’dap’.continue().
As you might understand, this is a bit too much. Let us fix the key mappings, as we already know how to!
I am going to add two mappings first, the first one is to start the debugger when I press F5, and the second is to toggle breakpoints using CTRL+b.
Inside custom-keys.lua add the following
-- nvim-dap keymappings
-- Press f5 to debug
map('n', '<F5>', [[:lua require'dap'.continue()<CR>]], {})
-- Press CTRL + b to toggle regular breakpoint
map('n', '<C-b>', [[:lua require'dap'.toggle_breakpoint()<CR>]], {})Restarting NeoVim and pressing CTRL+B in a file will now set the breakpoint, as indicated by the B on the left side.
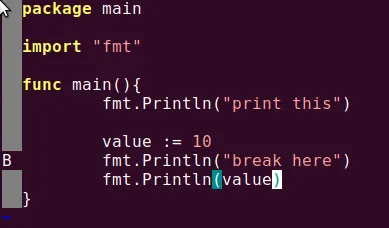
Pressing F5 should bring up the configuration selection and show all the different configurations we created. You can add many different configurations, such as a launch.json. If you have one from VS Code.
If you select 1 the debugger will run, and it will stop at the breakpoint. Indicated by an arrow.
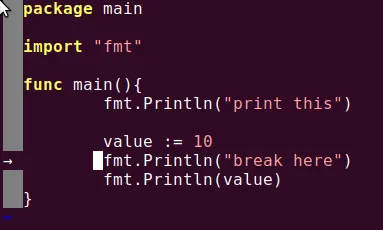
As you probably understand by now, we can configure the icons and more. See the plugin docs
We can then open a REPL window to use delve to find values etc.
Run the following command to explore REPL
:lua require'dap'.repl.open()You should see a new window appear
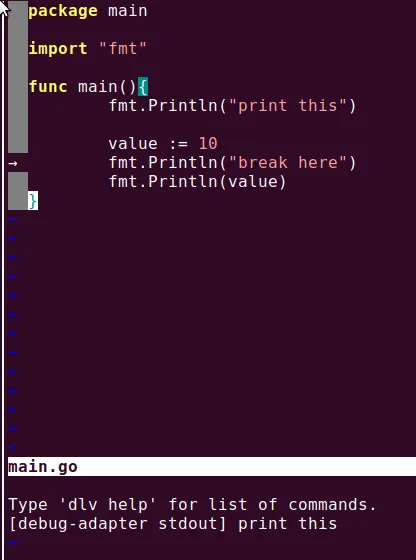
Navigate to it using CTRL+w+arrowdown. Then you need to activate Insert mode by pressing i and try executing a command. I’ll use the .scopes to see the local scope variables.
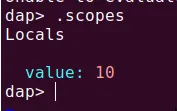
You can close the debug window with :q.
Now that we know how to use the debugger, let us add a few more convenient mappings. I have added an explanation to each command, you can change the buttons to what suits you.
-- nvim-dap keymappings
-- Press f5 to debug
map('n', '<F5>', [[:lua require'dap'.continue()<CR>]], {})
-- Press CTRL + b to toggle regular breakpoint
map('n', '<C-b>', [[:lua require'dap'.toggle_breakpoint()<CR>]], {})
-- Press CTRL + c to toggle Breakpoint with Condition
map('n', '<C-c>', [[:lua require'dap'.set_breakpoint(vim.fn.input('Breakpoint Condition: '))<CR>]], {})
-- Press CTRL + l to toggle Logpoint
map('n', '<C-l>', [[:lua require'dap'.set_breakpoint(nil, nil, vim.fn.input('Log Point Msg: '))<CR>]], {})
-- Pressing F10 to step over
map('n', '<F10>', [[:lua require'dap'.step_over()<CR>]], {})
-- Pressing F11 to step into
map('n', '<F11>', [[:lua require'dap'.step_into()<CR>]], {})
-- Pressing F12 to step out
map('n', '<F12>', [[:lua require'dap'.step_out()<CR>]], {})
-- Press F6 to open REPL
map('n', '<F6>', [[:lua require'dap'.repl.open()<CR>]], {})
-- Press dl to run last ran configuration (if you used f5 before it will re run it etc)
map('n', 'dl', [[:lua require'dap'.run_last()<CR>]], {})Now, running a debugger is amazing, but sometimes it can be nice to have a UI to help us.
I recommend nvim-dap-ui which makes everything look a little bit cleaner.
By now, adding a plugin should be a breeze. Update plugins.lua.
return require('packer').startup(function(use)
 -- Configurations will go here
 use 'wbthomason/packer.nvim'
 use 'williamboman/mason.nvim'
 use 'williamboman/mason-lspconfig.nvim'
 use 'neovim/nvim-lspconfig'
 -- Hrsh7th Code Completion Suite
     use 'hrsh7th/nvim-cmp'
     use 'hrsh7th/cmp-nvim-lsp'
     use 'hrsh7th/cmp-nvim-lua'
     use 'hrsh7th/cmp-nvim-lsp-signature-help'
     use 'hrsh7th/cmp-vsnip'
     use 'hrsh7th/cmp-path'
     use 'hrsh7th/cmp-buffer'
     use 'hrsh7th/vim-vsnip'
 -- File explorer tree
     use 'nvim-tree/nvim-web-devicons' -- optional, for file icons
 use 'nvim-tree/nvim-tree.lua'
 -- DAP for debugging
 use 'mfussenegger/nvim-dap'
 -- UI for DAP
 use { "rcarriga/nvim-dap-ui", requires = {"mfussenegger/nvim-dap"} }
end)Save, Reload (luafile %) and PackerSync.
After installing, we need to also set it up. Since this is part of the debugging I will store it inside the debugging.lua where we configure dap. Add a requirement for dapui and execute the setup() function.
-- fetch the dap plugin
local dap = require('dap')
-- Setup DapUI
local dapui = require('dapui')
-- set it up see more configs in their repo
dapui.setup()As with most plugins, this adds a few commands, and we will update custom-keys.lua to trigger the DapUi.
DapUI has a toggle function that brings it up, and we will want to remove the Nvim Tree to make it look a little better.
This is when NeoVim is starting to become cool, see how we can chain these functions together easily. Endless possibilities.
-- Press Ctrl+d to toggle debug mode, will remove NvimTree also
map('n', '<C-d>', [[:NvimTreeToggle<CR> :lua require'dapui'.toggle()<CR>]], {})If you execute the same main.go that we used earlier, set a breakpoint and start the debugger (F5). Once it halts, press d to bring up the DapUI which shows the threads, values of variables, REPL with Play/Repeat/Stop buttons.
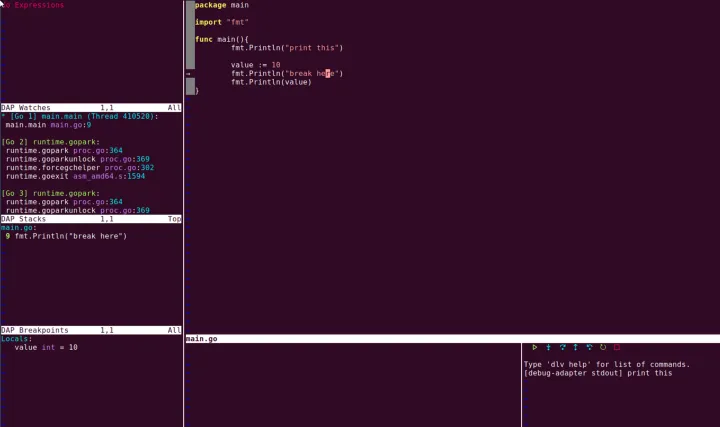
Press CTRL+d to bring back nvimtree and remove debug bars.
Make NeoVim Reactive Using Event Listeners
This is nice, we can debug the code that we write.
As you traverse the NeoVim bottomless pit of things you want to do, one great thing to know is how to use Events. NeoVim triggers events and plugins can also trigger events.
Just as in JavaScript, etc, we can listen to these events and apply commands to trigger them.
An easy way to learn this is to make DapUI appear whenever we trigger a Debug session.
The Nvim DAP will trigger two events, before and after which can be found in their docs.
Inside debugging.lua I will add a listener on those events, and trigger dapui.open after DAP has been initialized. And once DAP is terminated or exited, we will close using dapui.close.
-- fetch the dap plugin
local dap = require('dap')
-- Setup DapUI
local dapui = require('dapui')
-- set it up see more configs in their repo
dapui.setup()

-- dap fires events, we can listen on them to open UI on certain events
dap.listeners.after.event_initialized["dapui_config"] = function()
  dapui.open()
end
dap.listeners.before.event_terminated["dapui_config"] = function()
  dapui.close()
end
dap.listeners.before.event_exited["dapui_config"] = function()
  dapui.close()
endRestart the debugger inside main.go and see how it now opens automatically and closes.
With listeners, you can add formatting, etc, or anything you want.
Styling & Adding Development Utilities
Let’s best honest, what we have done so far is powerful and flexible as hell, but it looks like crap.
To make NeoVim look a little bit better we can start modifying the color scheme. Changing the color schema will apply different colors and make things look better.
One really common theme is the Dracula theme. It is probably popular because it looks great and supports many popular plugins.
It is super simple to install, the same as all other plugins.
The mighty three-step rocket, update plugger, add a configuration file, add require in init.lua.
Add to plugins.lua
-- Dracula theme for styling
 use 'Mofiqul/dracula.nvim'
Save the file :w, reload the file :luafile %, execute :PackerSync
Create a new file named styling.lua by pressing a in the NvimTree.
Inside styling.lua, apply the dracula colorscheme.
vim.cmd[[colorscheme dracula]]Save the file and update init.lua to include styling
require('plugins')
require('file-explorer')
require('mason-config')
require('gopls')
require('code-completion')
require('custom-keys')
require('debugging')
require('styling')
Reload NeoVim and it should look much cooler!

To make it even more powerful, let us add nvim-treesitter. Treesitter is a way to provide much better highlighting in the code.
At this point, you are more than familiar with how to install a plugin, So I won’t explain each step, only show the files. You should be able to manage to configure it on you’re own.
return require('packer').startup(function(use)
 -- Configurations will go here
 use 'wbthomason/packer.nvim'
 use 'williamboman/mason.nvim'
 use 'williamboman/mason-lspconfig.nvim'
 use 'neovim/nvim-lspconfig'
 -- Hrsh7th Code Completion Suite
     use 'hrsh7th/nvim-cmp'
     use 'hrsh7th/cmp-nvim-lsp'
     use 'hrsh7th/cmp-nvim-lua'
     use 'hrsh7th/cmp-nvim-lsp-signature-help'
     use 'hrsh7th/cmp-vsnip'
     use 'hrsh7th/cmp-path'
     use 'hrsh7th/cmp-buffer'
     use 'hrsh7th/vim-vsnip'
 -- File explorer tree
     use 'nvim-tree/nvim-web-devicons' -- optional, for file icons
 use 'nvim-tree/nvim-tree.lua'
 -- DAP for debugging
 use 'mfussenegger/nvim-dap'
 -- UI for DAP
 use { "rcarriga/nvim-dap-ui", requires = {"mfussenegger/nvim-dap"} }
 -- Dracula theme for styling
 use 'Mofiqul/dracula.nvim'
 -- Treesitter
 use {
  -- recommended packer way of installing it is to run this function, copied from documentation
         'nvim-treesitter/nvim-treesitter',
      run = function()
              local ts_update = require('nvim-treesitter.install').update({ with_sync = true })
              ts_update()
         end,

 }
end)Then a syntax-highlight.lua file to handle configurations
require'nvim-treesitter.configs'.setup {
  -- A list of parser names, or "all"
  ensure_installed = { "go", "lua", "rust" },

  -- Install parsers synchronously (only applied to `ensure_installed`)
  sync_install = false,

  -- Automatically install missing parsers when entering buffer
  -- Recommendation: set to false if you don't have `tree-sitter` CLI installed locally
  auto_install = true,

  highlight = {
    -- `false` will disable the whole extension
    enable = true,

  },
}And init.lua
require('plugins')
require('file-explorer')
require('mason-config')
require('gopls')
require('code-completion')
require('custom-keys')
require('debugging')
require('styling')
require('syntax-highlight')
Restart and the code should even highlight function names now.
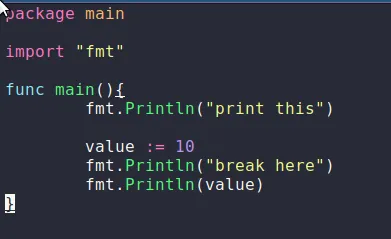
The next plugin we want is Fuzzy Search files, it is called Telescope.
For full capabilities you will want RipGrep installed
Let’s add it to Packer.
-- Telescope used to fuzzy search files
 use {
    'nvim-telescope/telescope.nvim', tag = '0.1.0',
    requires = { {'nvim-lua/plenary.nvim'} }
}Then add a file-finder.lua and fill in the configurations, in this case, a key mapping to bring up different search bars.
-- search files, even hidden ones
vim.keymap.set('n', '<leader>ff', ':lua require"telescope.builtin".find_files({no_ignore=true, hidden=true})<CR>', {})
-- ripgrep files, respects gitignore
vim.keymap.set('n', '<leader>fg', ':lua require"telescope.builtin".live_grep()<CR>', {})Note that Live Grep respects any .gitignore files and excludes results from them. Unless configured to include them.
Then also add it to init.lua
require('plugins')
require('file-explorer')
require('mason-config')
require('gopls')
require('code-completion')
require('custom-keys')
require('debugging')
require('styling')
require('file-finder')
require('syntax-highlight')
Now you might notice that the mapping is using Leader which is default by default the backslash key. This is really messy on my laptop, so I will remap it into , inside custom-keys.lua by adding the following line.
-- update leader key to ,
vim.g.mapleader = ","Now, restart NeoVim and enjoy an incredible fuzzy search
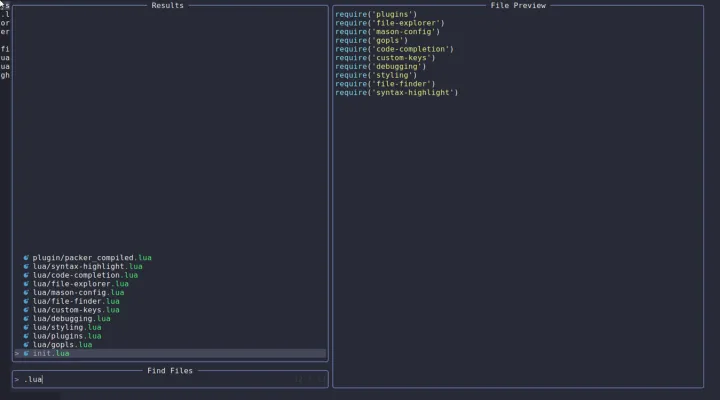
I particularly like the live-grep search using <Leader>fg that also searches for the keywords inside the files.
One final piece to add, I like having a status bar that displays a little bit of information such as git branch and more.
We can add this by adding the nvim-lualine plugin.
-- Lualine information / Status bar
 use {
    'nvim-lualine/lualine.nvim',
    requires = { 'kyazdani42/nvim-web-devicons', opt = true }
}After installing, configure it as you see fit, I will use the defaults in a new file statusbar.lua.
require('lualine').setup()Then also update init.lua to include the status bar.
require('plugins')
require('file-explorer')
require('mason-config')
require('gopls')
require('code-completion')
require('custom-keys')
require('debugging')
require('styling')
require('file-finder')
require('syntax-highlight')
require('statusbar')
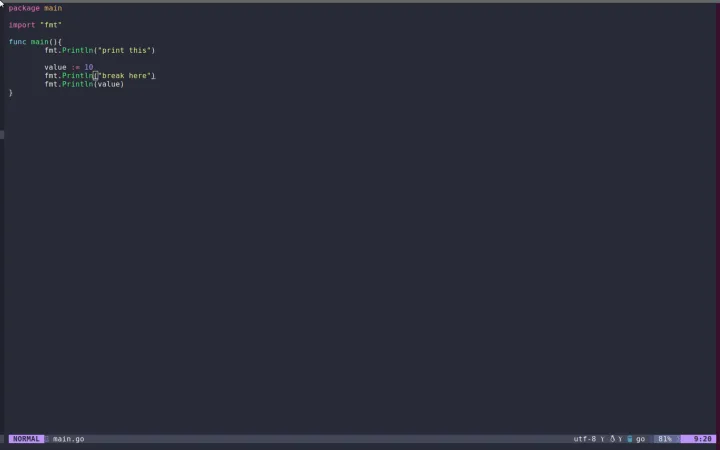
Restart Neovim and you should see a nice little status bar.
Recommended Plugins
Here is a list of plugins I recommend that will give you some training when installing.
- Autopairs - Generate brackets, and parenthesis pairs when you create them.
- Bufferline - Add a header showing opened buffers (files)
- LSPSaga - Code Actions, Floating Hover docs, etc.
- IndentBlankLine- Guide for indention
- FloatTerm - Open floating terminals, good for such as opening LazyGit.
- nvim-lint - Linter! Much needed.
- Trouble - Think VS Code Buttom Error tab
- TODO-Highlights - I like to write TODO comments as reminders, and this plugin makes them searchable with Telescope, and highlights them.
- tagbar - To get an overview of the structure, functions, etc in a file.
Conclusion
We have learned how to use NeoVim, there is of course more to learn but I think that will come naturally if you start using it daily.
So far we have covered the most needed basics, and the needed knowledge to start using NeoVim efficiently. You should without a problem be able to use NeoVim after learning this.
You should be familiar with the following
- Navigating NeoVim using Normal Mode and Insert Mode
- Executing Commands in Vim
- Adding Plugins & Configuring NeoVim
- Handle Plugins and their Configurations
Now, I do recommend looking up Linters and Formatters (hint: mason can help you).
It will come as great practice for you to install a plugin on you’re own to really learn and make it stick.
Remember that there are often Plugins that help you customize a full development environment, such as x-ray/go. The cons of them are that they often contain so much that it is hard to really learn the default mappings and how to use them.
You can find my dotfiles and current NeoVim config on Github.
I hope you enjoyed this article, now go build yourself a dream editor.
If you enjoyed my writing, please support future articles by buying me an Coffee
