Undervolting a Gaming Laptop
Learn to reduce heat and Noise on your CPU by Undervolting.
by Percy Bolmér, December 2, 2021
![By [Nijwam Swargiary] on Unsplash)](/_app/immutable/assets/img0-cd0cf390.webp)
Recently I bought a gaming laptop, an MSI GF65 Thin SER10. It is a great laptop for gaming and I am super pleased with it. However, when running a new game, like New World, the computer would sit around 95–100 degrees celsius. The fans would try to solve it by spinning at max RPM and the laptop would sound like a swarm of vacuum cleaners.
Gaming laptops are known to produce a lot of noise and build up very high temperatures on the components inside. It is not strange, all those components squeezed tight into such a small unit.
Luckily there are a few tricks that can be used to decrease the heat, and by doing that, making your laptop last longer and less noisy.
Enable Voltage control in BIOS
Many new laptops do not allow volting to be performed unless activated in the BIOS. In my case, and many other MSI computers you have to activate Advanced Bios to enable it. I use an MSI GF65 THIN laptop when doing this article.
When opening the regular BIOS on a new MSI, there are almost no options available. MSI has its way of accessing something called Advanced BIOS. The steps to find it is the following
Turn off your laptop
Boot it up and press the Delete key when the MSI logo appears.
When inside the regular BIOS, press and hold these four keys to enable Advanced mode. Right Shift + Right Ctrl + Left Alt + F2
Go into the Advanced Tab -> Power and Performance -> CPU Power Management Control-> CPU Lock Configuration-> CFG Lock and Overclock Lock. Enable those two options
Save settings by going to Save and Exit and pressing Save Changes and Exit BIOS.
Restart the computer
Undervolting
Lowering the voltage to the CPU is called undervolting and is a technique to lower the heat build-up on the CPU. By lowering the energy consumption we lower the heat.
Now, you might wonder how this is possible and why the laptop is not undervolted by default? Well, from my understanding every piece of hardware is unique and they all have different limits. To make sure the system runs and does not crash the manufacturers increase the limit to a given amount that will work for even to the worst-case scenario.
Undervolting is performed while the system is booted up, by using the software. This is important to know since you will have to reapply the undervolting each time you start the computer. To make this automatically apply, you can simply have the software start on startup.
However, since this is a manipulation that is performed on runtime we can consider this technique very safe. If you reduce the voltage too much, your computer will bluescreen and crash, but when restarting it will work again.
The only way to break anything is if you accidentally INCREASE voltage instead of decreasing it, well, you can imagine what can happen then.
There are of course drawbacks, you may notice a slightly lower performance. I still play New World on Ultra after performing these changes but reduced the temperature by a staggering 20 degrees, and the noise from the fans by a lot.
To perform undervolting we will use a software called Throttlestop, which can be downloaded by the link. Make sure to download and install it to get going.
Open ThrottleStop and you will be presented with a rather old-looking UI.
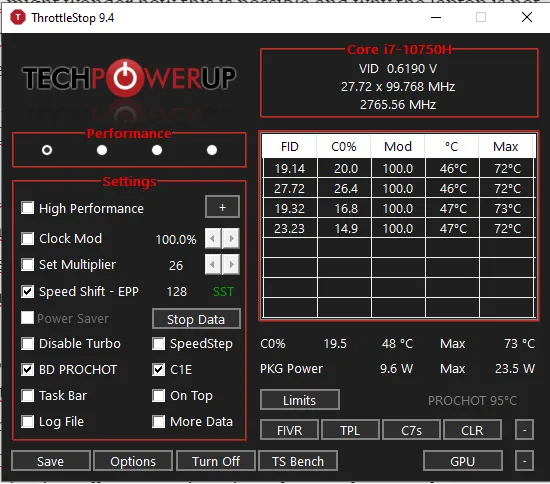
In this menu you see a lot of options, I won’t cover them all in this article.
To undervolt, you should go to the FIVR button. That will open yet another screen, in this screen you can see Turbo settings and Voltage settings.
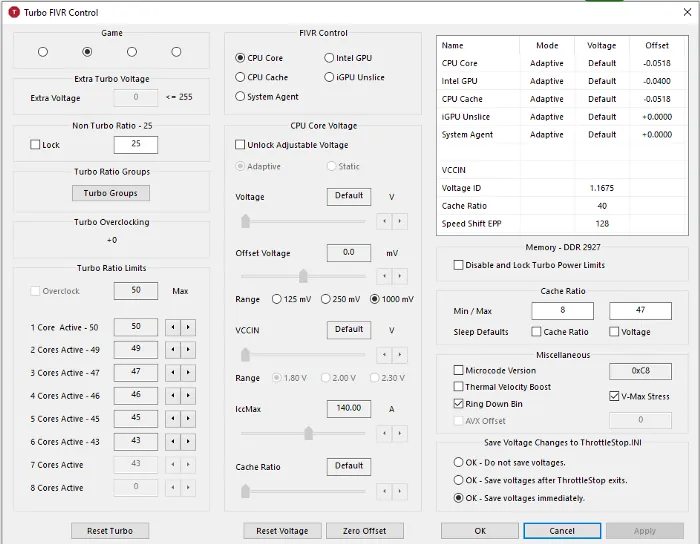
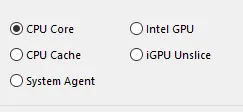
You can see at the top that you can control voltage for CPU core, CPU cache, and Intel GPU. We will begin by lowering the CPU Core and proceed with the others after that.
Undervolting CPU core, Cache and Intel GPU
The process to undervolt the three different components is done in the same way.
Begin by making sure you have the CPU Core selected in the Fivr Control option. This will make all the changes you make apply to the CPU Core.
Begin by clicking the Unlock Adjustable Voltage, this will unlock the ability to manipulate voltage on those components.
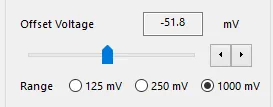
Navigate to the Offset Voltage and start by lowering that, I´ve seen people claim online that they lower as much as -100 mV, but that has proven at least for me to be very unstable and cause crashes. I´d recommend lowering to -30 first and then continuing to lower it at intervals of -10, until your computer crashes under heavy loads, like playing a game.
My computer is steady at -51 mV. Your result might be different depending on your luck with the components.
Undervolting is safe, but make sure you LOWER the voltage and not raise it, That would Overvolt instead which can fry your component
Once the CPU Core is lowered, switch to the CPU Cache (Simply by pressing the CPU Cache radio button in the FIVR Control at the top). One very important thing here is to remember that you should aim to undervolt the same amount to the cache, never more than the Core.
Repeat the steps for the Intel GPU. My computer runs nicely at -40mV.
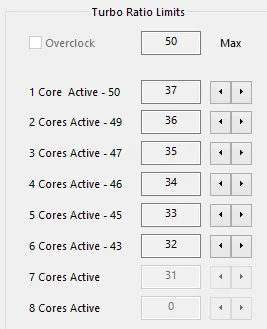
Turbo Ratio Limits
The next step is to reduce the number of cores that your CPU uses. This will lower your computer’s CPU power, but also greatly reduce the heat build-up. By default, my computer has 50 on everything, but lowering them to 37–32 made a very big difference in the heat and noise.
Make sure you try around what works for you and how much you need to reduce to have a lag-free game but less noise.
Simply press the down button to reduce the number.
Saving the undervolt settings
Note that if you reduce the voltage too much, your computer will blue screen and shut down.
Do not worry, ThrottleStop will only apply the undervolt once ThrottleStop is running and activated.
I recommend trying the limits of your computer until you find the desired effect and a stable running laptop during gaming sessions.
Once that is done, it is time to make ThrottleStop remember the settings. This can be done by changing the save settings in the lower-left corner of the FIVR screen.
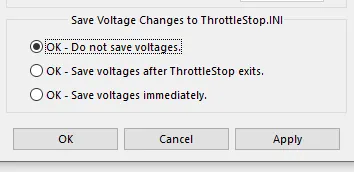
The default setting is that ThrottleStop won’t remember your settings. You can change this by selecting Ok — Save Voltages immediately.
The next time you start ThrottleStop, your settings will be saved.
You can have 4 different setups saved in ThrottleStop, and you select the profile you want by checking the radio button at the top.
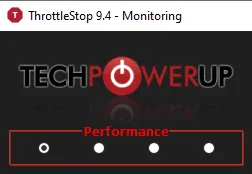
Don’t forget to apply the settings by Turning ThrottleStop on at the bottom button shown in the next image.

Conclusion
Some people will recommend you to make ThrottleStop start at bootup, but I think this is dangerous as if you do this before finding a stable setup you can cause an infinite blue screen loop. You can avoid it by booting up in Safe /Debug mode but that is still a hassle.
I rather start ThrottleStop before my gaming session, it only takes a second.
If you want to monitor how your temperatures are affected I do recommend HWMonitor which is free software.
I hope you can now game to much lower noise and avoid burning your fingers on your laptop due to massive heat builds.
If you enjoyed my writing, please support future articles by buying me an Coffee