Using GRPC with TLS, Golang and React (No Envoy)
A tutorial where we learn how to use gRPC with WebClients without a reverse proxy such as Envoy or Traefik
by Percy Bolmér, December 26, 2020

A few months ago I started a project where I wanted to use gRPC. It was an amazing experience. I really liked how I could use protobuf and gRPC to have the same Client in both the backend and the frontend.
During my development phase I encountered a few hiccups though. So when searching the internet for solutions to use gRPC in a web application it seems almost everybody recommends the envoy reverse proxy. I started using envoy and it worked very well, there were a lot of examples showing how to set it up.
Problems started occurring when I was moving over from regular HTTP into HTTPS. Configuration examples for envoy became scares and many examples contradicted each other. And adding that I wanted to use the gRPC metadata feature, it started to become really hard to setup. I needed another solution.
I came across Roger Chapman who wrote a post about using gRPC web-client without envoy. He explains how the team at Improbable has created a wrapper for a HTTP server that can be used to handle gRPC requests. This was a great help, and I decided I’d like to share my experience with the rest of you gophers.
This will be part of a series where we will keep developing the application to explore different aspects of gRPC and Golang.
- [Part 1] — You’re reading it now
- [Part 1.1] — Embedding a React application in a Golang binary
- [Part 2] — gRPC Interceptors
- [Part 3] - Streaming data with gRPC
Lets write an example project that uses a react application that communicates with a gRPC server.
Project setup
Lets begin by creating a new folder and initialize a Go module for this project. (Note that the full code can be found at https://github.com/percybolmer/grpcexample). We will start by creating the needed folders, such as cert which contains the certs, and ui/src which will hold our built static react app.
mkdir grpcexample
cd grpcexample
go mod init github.com/percybolmer/grpcexample
touch main.go
mkdir -p ui/src
mkdir cert
mkdir pingpong
Before we start coding our API, lets make sure we have certificates ready to use. To generate this we will use openssl . To make things a bit easier, I’ve created a script that does this for us, simply run the following script and it will generate files for us. To run the script you will also need a file in the same directory called certificate.conf . Both the script and the configuration file are found below.
*A certificate generation script.*
#!/bin/bash

# generate ca.key
openssl genrsa -out ca.key 4096
# generate certificate
openssl req -new -x509 -key ca.key -sha256 -subj "/C=SE/ST=HL/O=Example, INC." -days 365 -out ca.cert
# generate the server key
openssl genrsa -out server.key 4096
# Generate the csr
openssl req -new -key server.key -out server.csr -config certificate.conf
#
openssl x509 -req -in server.csr -CA ca.cert -CAkey ca.key -CAcreateserial -out server.crt -days 365 -sha256 -extfile certificate.conf -extensions req_ext
This configuration should to be placed in a file called certificate.conf.
[req]
default_bits = 4096
prompt = no
default_md = sha256
req_extensions = req_ext
distinguished_name = dn
[dn]
C = US
ST = NJ
O = Test, Inc.
CN = localhost
[req_ext]
subjectAltName = @alt_names
[alt_names]
DNS.1 = localhost
IP.1 = ::1
IP.2 = 127.0.0.1
I’ve placed the script and the configuration file inside the cert folder. After running that you should find a few new files in /cert. Lets move on with our Go API.
The gRPC service
So, the big PRO of using this setup is that we can easily use the same Client inside both react and Go backend to speak to the API.
Instead of rewriting the same struct in both Go and Javascript, we can create a Protobuf schema that generates the clients for us.
We are going to generate a Ping/Pong service that allows us to Ping, which we can call from both the React and Go application. This is a very simple protobuf example, but can easily be changed by you after your own projects need.
First off, make sure you have Protoc installed, so that you can generate the code based on the proto schema. How to install protoc can be found here.
Except Protoc, we also need the plugins to generate go code and javascript code. The go code is easily fetched with go get.
go get -u google.golang.org/protobuf/cmd/protoc-gen-go
go install google.golang.org/protobuf/cmd/protoc-gen-go

go get -u google.golang.org/grpc/cmd/protoc-gen-go-grpc
go install google.golang.org/grpc/cmd/protoc-gen-go-grpc
Also Install the javascript generator based on the instructions from here
Lets write the proto schema and generate some code.
syntax = "proto3";
package main;
option go_package=".;pingpong";

message PingRequest {
}

message PongResponse {
    bool ok = 1;
}

service PingPong{
    rpc Ping(PingRequest) returns (PongResponse) {};
}
If you don’t know about protobuf, I suggest visiting their offical site to read about it. In short, Messages are the objects that the API will use as requests and responses. The API itself is declared by the keyword service. In the schema above we have a API that will have a Ping method.
I’ve placed that in a file called pingpong/service.proto inside the grpcexample root. Now, to generate the files we will run Protoc.
protoc service.proto --js_out=import_style=commonjs,binary:./../ui/src/ --grpc-web_out=import_style=commonjs,mode=grpcwebtext:./../ui/src/ --go-grpc_out=. --go_out=.What happens here is that we run the Protoc binary to generate client code for both the Javascript and Go application. We also generate a gRPC Service.
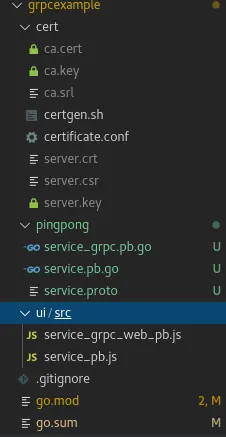
After running that you should find two new files in grpcexample/pingong named service_grpc.pb.go and service.pb.go containing the gRPC service and client for Golang, and in ui/src there should be service_grpc_web_pb.js and service_pb.js that is the client for javascript.
So far my folders looks like this
Lets start using the generated code in the Go application.
The Golang backend
Lets begin by creating a Golang application that is used to Serve a simple gRPC API over TLS. This application will also serve our static build from the react application later.
Create main.go , here we will create a function that uses our generated certificates to serve an HTTP API over TLS. The function will use the google.golang.org/grpc/credentials. This package allows us to point out the generated pem file and the server key, It will then read those files and output a Transport configuration struct that we can use in the gRPC server. The Transport configuration can be inserted into a grpc server to require TLS.
GenerateTLSApi — A golang example how to connect to a gRPC server with TLS
// GenerateTLSApi will load TLS certificates and key and create a grpc server with those.
func GenerateTLSApi(pemPath, keyPath string) (*grpc.Server, error) {
	cred, err := credentials.NewServerTLSFromFile(pemPath, keyPath)
	if err != nil {
		return nil, err
	}

	s := grpc.NewServer(
		grpc.Creds(cred),
	)
	return s, nil
}
Great, so setting up a gRPC server with TLS was easy.. But lets take a moment and think about it. How does the generated code know what the Ping function should do?
You’re right, It doesn’t.
The service definition in the proto only creates a Interface that matches the service. So if you open up the service_grpc.pb.go you will find it has defined a PingPong interface that looks like
PingPong Interface — The gRPC Server interface generated by Protoc
// PingPongServer is the server API for PingPong service.
// All implementations must embed UnimplementedPingPongServer
// for forward compatibility
type PingPongServer interface {
	Ping(context.Context, *PingRequest) (*PongResponse, error)
	mustEmbedUnimplementedPingPongServer()
}
So, we have to create a Struct that will fulfill this interface. I’ve created a new file called server.go which will hold the logic.
This gist shows a struct that fulfills the PingPong server interface.
package main

import (
	"context"

	pingpong "github.com/percybolmer/grpcexample/pingpong"
)

// Server is the Logic handler for the server
// It has to fullfill the GRPC schema generated Interface
// In this case its only 1 function called Ping
type Server struct {
	pingpong.UnimplementedPingPongServer
}

// Ping fullfills the requirement for PingPong Server interface
func (s *Server) Ping(ctx context.Context, ping *pingpong.PingRequest) (*pingpong.PongResponse, error) {
	return &pingpong.PongResponse{
		Ok: true,
	}, nil
}
As you can see, this PingPong service will always return a true. In this tutorial we will only focus on making everything work, adding fun logic to the API calls will be left to you.
This is how gRPC in Go works in basic, you generate a Interface, you create a struct that fulfills that interface, then you can register your struct as a server with the also generated RegisterPingPongServer function. This takes a grpc.Server object and a PingPong Interface.
So if you want you could start this Pingpong already by implementing a main function like this.
Full example of a running gRPC API over TLS.
package main

import (
	"log"
	"net"
	"time"
	pingpong "github.com/percybolmer/grpcexample/pingpong"
	"google.golang.org/grpc"
	"google.golang.org/grpc/credentials"
)

func main() {

	// We Generate a TLS grpc API
	apiserver, err := GenerateTLSApi("cert/server.crt", "cert/server.key")
	if err != nil {
		log.Fatal(err)
	}
	// Start listening on a TCP Port
	lis, err := net.Listen("tcp", "127.0.0.1:9990")
	if err != nil {
		log.Fatal(err)
	}
	// We need to tell the code WHAT TO do on each request, ie. The business logic.
	// In GRPC cases, the Server is acutally just an Interface
	// So we need a struct which fulfills the server interface
	// see server.go
	s := &Server{}
	// Register the API server as a PingPong Server
	// The register function is a generated piece by protoc.
	pingpong.RegisterPingPongServer(apiserver, s)
	// Start serving
	log.Fatal(apiserver.Serve(lis))
}
Lets create a simple gRPC client to make sure everything works before moving on. Lets create a folder called client, and inside it a main.go
mkdir client
cd client
touch main.go
Lets start by loading in a certificate that we can use by the client Golang — How to load TLS Cert and Key from a file
// loadTLSCfg will load a certificate and create a tls config
func loadTLSCfg() *tls.Config {
	b, _ := ioutil.ReadFile("../cert/server.crt")
	cp := x509.NewCertPool()
	if !cp.AppendCertsFromPEM(b) {
		log.Fatal("credentials: failed to append certificates")
	}
	config := &tls.Config{
		InsecureSkipVerify: false,
		RootCAs:            cp,
	}
	return config
}
Then a simple main function to start a connection and call Ping from the server A gRPC client that calls Ping from the server.
package main

import (
	"context"
	"crypto/tls"
	"crypto/x509"
	"io/ioutil"
	"log"

	"github.com/percybolmer/grpcexample/pingpong"
	"google.golang.org/grpc"
	"google.golang.org/grpc/credentials"
)

func main() {
	ctx := context.Background()
	// Load our TLS certificate and use grpc/credentials to create new transport credentials
	creds := credentials.NewTLS(loadTLSCfg())
	// Create a new connection using the transport credentials
	conn, err := grpc.DialContext(ctx, "localhost:9990", grpc.WithTransportCredentials(creds))

	if err != nil {
		log.Fatal(err)
	}
	defer conn.Close()
	// A new GRPC client to use
	client := pingpong.NewPingPongClient(conn)

	pong, err := client.Ping(ctx, &pingpong.PingRequest{})
	if err != nil {
		log.Fatal(err)
	}
	log.Println(pong)
}
Lets try it!
Go to the projects root folder and execute
go run *.go
// Open a new terminal
cd client
go run main.go
Great it works! However, the goal we have is to host the gRPC API for a web application.
Lets leave the golang client and return to the server. Normally at this point you would have Envoy configured as a reverse proxy for the port the API is hosted on. But we will wrap the API in a gRPC-web wrapper created by improbable-eng.
go get -u github.com/improbable-eng/grpc-web/go/grpcweb
We will create a new struct in main.go , that is called grpcMultiplexer which holds a wrapped gRPC server. This struct will only have one function, and this function is a middleware for a regular http router. The reason is that the gRPC requests will be multiplexed on the same port as regular https requests.
Sounds hard, but its only 11 lines of code.
type grpcMultiplexer struct {
	*grpcweb.WrappedGrpcServer
}

// Handler is used to route requests to either grpc or to regular http
func (m *grpcMultiplexer) Handler(next http.Handler) http.Handler {
	return http.HandlerFunc(func(w http.ResponseWriter, r *http.Request) {
		if m.IsGrpcWebRequest(r) {
			m.ServeHTTP(w, r)
			return
		}
		next.ServeHTTP(w, r)
	})
}
Now lets create the HTTP fileserver to serve our future React application. This fileserver will also be wrapped by the grpcMultiplexer. So http requests will be handeld by the regular http server, and gRPC requests will be passed onto the gRPC server.
Lets update main.go a bit
Golang Example that wraps a gRPC handler with a HTTP handler
func main() {

	// We Generate a TLS grpc API
	apiserver, err := GenerateTLSApi("cert/server.crt", "cert/server.key")
	if err != nil {
		log.Fatal(err)
	}
	// Start listening on a TCP Port
	lis, err := net.Listen("tcp", "127.0.0.1:9990")
	if err != nil {
		log.Fatal(err)
	}
	// We need to tell the code WHAT TO do on each request, ie. The business logic.
	// In GRPC cases, the Server is acutally just an Interface
	// So we need a struct which fulfills the server interface
	// see server.go
	s := &Server{}
	// Register the API server as a PingPong Server
	// The register function is a generated piece by protoc.
	pingpong.RegisterPingPongServer(apiserver, s)
	// Start serving in a goroutine to not block
	go func() {
		log.Fatal(apiserver.Serve(lis))
	}()
	// Wrap the GRPC Server in grpc-web and also host the UI
	grpcWebServer := grpcweb.WrapServer(apiserver)
	// Lets put the wrapped grpc server in our multiplexer struct so
	// it can reach the grpc server in its handler
	multiplex := grpcMultiplexer{
		grpcWebServer,
	}

	// We need a http router
	r := http.NewServeMux()
	// Load the static webpage with a http fileserver
	webapp := http.FileServer(http.Dir("ui"))
	// Host the Web Application at /, and wrap it in the GRPC Multiplexer
	// This allows grpc requests to transfer over HTTP1. then be
	// routed by the multiplexer
	r.Handle("/", multiplex.Handler(webapp))
	// Create a HTTP server and bind the router to it, and set wanted address
	srv := &http.Server{
		Handler:      r,
		Addr:         "localhost:8080",
		WriteTimeout: 15 * time.Second,
		ReadTimeout:  15 * time.Second,
	}
	// Serve the webapp over TLS
	log.Fatal(srv.ListenAndServeTLS("cert/server.crt", "cert/server.key"))

}
Try visiting https://localhost:8080 and it should work. You will only see a src folder for now, lets fix that in a second. Also remember that browser will complain as it is a self generated certificate.
Lets build the web application
To create the react application I will use create-react-app.
For those of you not familiar with React and Nodejs, i’ll make a super short intro how to get this up and running.
First of you need to install NPM. I am running Centos and can use yum.
yum install npmWhen you have npm installed you need to also install npx and some gRPC libraries.
npm install -g npx
npm add grpc-web
npm add google-protobuf
Once npx is installed, lets use the creact-react-app command to generate a new application for us.
cd ui
npx create-react-app pingpongapp
It will create a new folder called pingpongapp and in it there will be a bunch of folders and files. What we need to do is correct an small error in our file structure. Our generated javascript files are in grpcexample/ui/src , we need to move them to grpcexample/ui/pingpongapp/src/proto.
mkdir pingpongapp/src/proto
mv src/* pingpongapp/src/proto/
rm -rf src
Lets also update the main.go, right now the HTTP fileserver points to “ui/”, we should update that to “ui/pingpongapp/build”. This folder does not yet exist, don’t worry.

Lets move into the react application and build it to see everything works so far.
cd ui/pingpongapp
npm run build
cd ../..
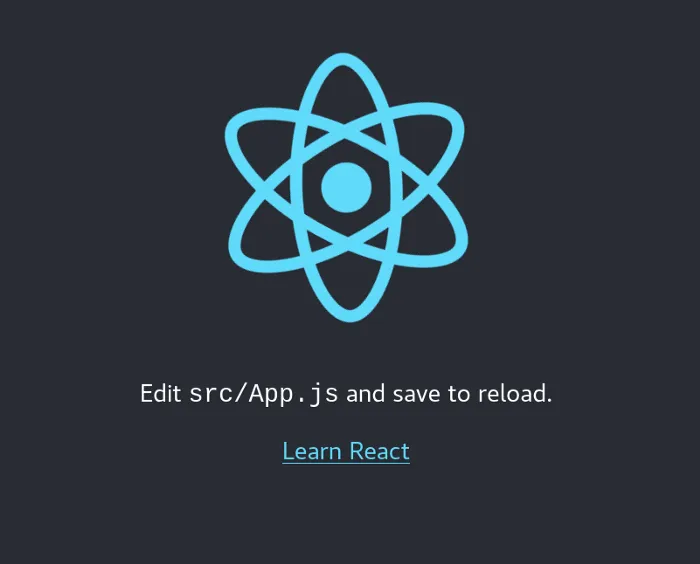
go run *.goWe’ve built the react app, and restarted our go backend. Visit localhost:8080 and you should see
Great! Now we have a server running a gRPC api, we are hosting our react app over TLS. Lets modify the application to use the API.
Open pingpongapp/src/App.js
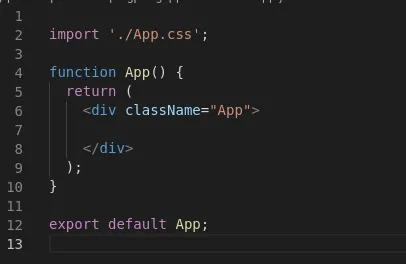
We can remove everything that is returned inside the App function.
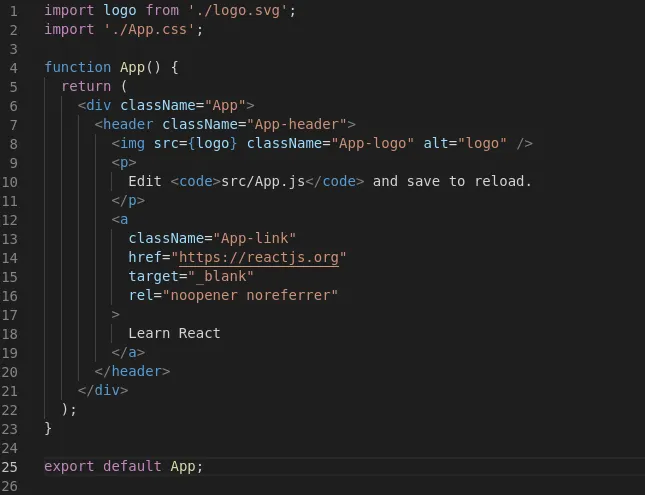
Remove everything so you have a file similar to this.
First of all we need to import the gRPC client, this is done at the top of the file. We will also import the PingRequest since we will need that to send our requests.
This react application will use React Hooks and state , so they are also needed as an import.
import React, {useState, useEffect } from 'react';
import { PingPongClient } from './proto/service_grpc_web_pb';
import { PingRequest } from './proto/service_pb';
The application will be super simple. It will display the current ping status (which will always be true). A request will be sent each third second.
I have outlined the react code with comments to explain whats happening.
import './App.css';
import React, {useState, useEffect } from 'react';
import { PingPongClient } from './proto/service_grpc_web_pb';
import { PingRequest } from './proto/service_pb';

  // We create a client that connects to the api
var client = new PingPongClient("https://localhost:8080");

function App() {
  // Create a const named status and a function called setStatus
  const [status, setStatus] = useState(false);
  // sendPing is a function that will send a ping to the backend
  const sendPing = () => {
    var pingRequest = new PingRequest();
    // use the client to send our pingrequest, the function that is passed
    // as the third param is a callback.
    client.ping(pingRequest, null, function(err, response) {
      // serialize the response to an object
      var pong = response.toObject();
      // call setStatus to change the value of status
       setStatus(pong.ok);
    });
  }

  useEffect(() => {
    // Start a interval each 3 seconds which calls sendPing.
    const interval = setInterval(() => sendPing(), 3000)
    return () => {
      // reset timer
      clearInterval(interval);
    }
  },[status]);

  // we will return the HTML. Since status is a bool
  // we need to + '' to convert it into a string
  return (
    <div className="App">
      <p>Status: {status + ''}</p>
    </div>
  );


}
export default App;
Next, we rebuild the react app
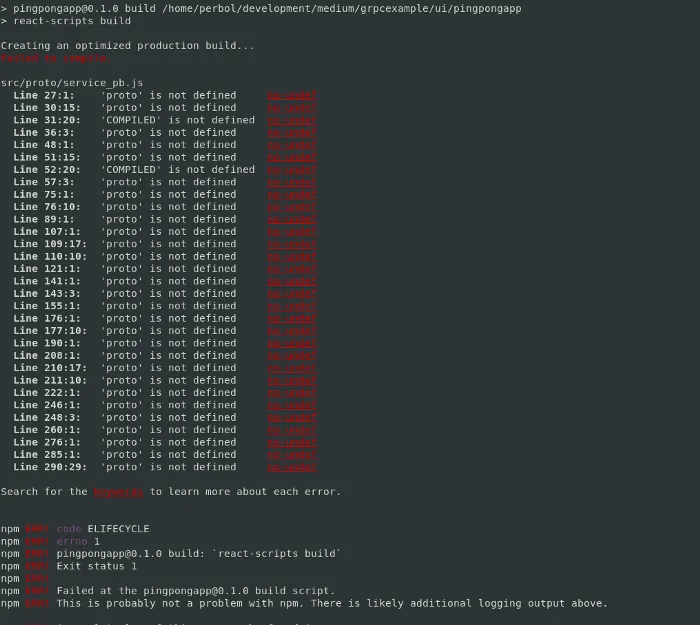
npm run build
If you encounter trouble building that says that Proto is undefined like the picture below, you need to modify some configurations in the build script as its a known bug.
If you didn’t encouter troubles, skip the following part.
Create a .env file at the root of the react application. The .env file will only have one line in it and it is to extend the regular eslinter.
echo "EXTEND_ESLINT=true" > .env
You also need to open up package.json and look for the eslintConfig part.
This should be extended with ignorePatterns:**/*_pb.js , what this does is that it will ignore any files containing _pb.js in its name.
This is how my eslintConfig looks like
"eslintConfig": {
    "extends": [
    "react-app",
    "react-app/jest"
    ],
    "ignorePatterns": ["**/*_pb.js"]
}
When the build succeeds, go back and restart the backend and revisit https://localhost:8080/.
You should now see a Status which is false, that changes to true after three seconds.
Thats it, you’re now running a react application that can communicate with a gRPC api without envoy!

Thanks for reading, and you can see the full code at https://github.com/percybolmer/grpcexample.
See part two about embedding the web application into a single binary.
If you enjoyed my writing, please support future articles by buying me an Coffee