Amazon Web Services (AWS) — Serverless Architecture
A complete tour for beginners to set up a full-stack application
by Percy Bolmér, February 19, 2021
![By [Science in HD] on Unsplash](/_app/immutable/assets/img0-b4114dea.webp)
When I first started learning about AWS I thought of it as dark wizardry. Every time I touched the topic there was so much to learn that I immediately stopped, not knowing how to proceed.
That’s why I’ve created this step-by-step tutorial of creating a full-stack application using AWS. We will after this tutorial have a frontend, backend that speaks to a database, and an API.
There are a few ways of communicating with AWS, in this tutorial we will use the services web-consoles. Web consoles are user-friendly web applications that let the user manage and set up the AWS services. For me, learning AWS felt a bit overwhelming since many tutorials used the AWS CLI. The AWS CLI is a command-line tool that does the same thing as the web consoles. I do suggest the AWS CLI if you are going to spend much time with AWS, but the web consoles offer a more easy learning curve.
What is AWS and Serverless?
AWS is a Cloud Infrastructure-as-a-Service (Cloud IaaS) platform run by Amazon. This cloud has services available to help developers perform computing inside the cloud. This means that as a user you can set up a service, for instance, a webpage. The webpage is then run by the cloud and managed by them as well.
So when you read serverless, it doesn’t mean there is no server. There just is no server involved for the users. The users (developers) don’t need a server to run and execute their code, it’s all done by the servers inside the cloud.
Think of it as leasing a car , you pay to use someone else server, they handle the services. The reasons to use a serverless approach according to AWS is as follows.
- No Server Management — No maintenance, no administration
- Scaling — Scaling the application is done automatically as it needs more memory or throughput.
- Pay for Value — Pay only for what you use.
- Automated high availability — The applications are run in an environment that provides high fault tolerance.
AWS — Getting started
The first thing to do is to sign up for an AWS account. You will need to provide a credit card for billing, there is a Free Tier that costs 0$, so don’t worry.
AWS offers many different services, each service has its unique capability. We will walk through a few of the basic services, step-by-step.
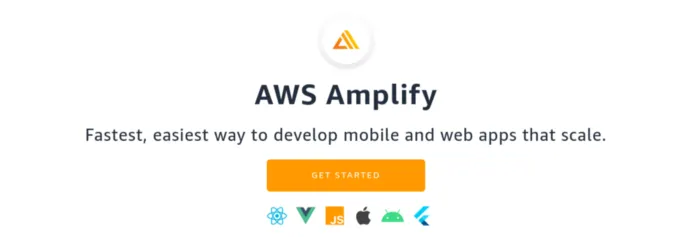
AWS Amplify — Set up a static website
We will begin by using the AWS Amplify service. It is a service used to host static websites. What’s cool about it is that we can connect it to a Git repository, this means it will host whatever static website you have on that repository.
When you visit the AWS console you will need to log in as a root user, provide the email you’re using as root. The reason why this option exists is that you can have many people in an organization that needs access to the same cloud service. We won’t cover IAM much in this tutorial, but it’s a service for user access.
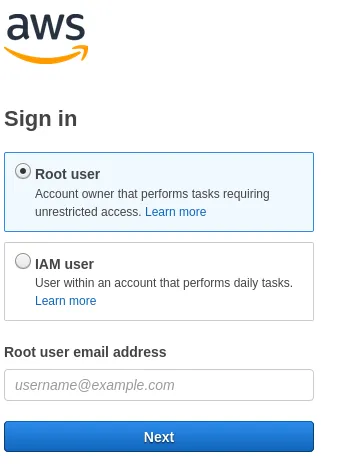
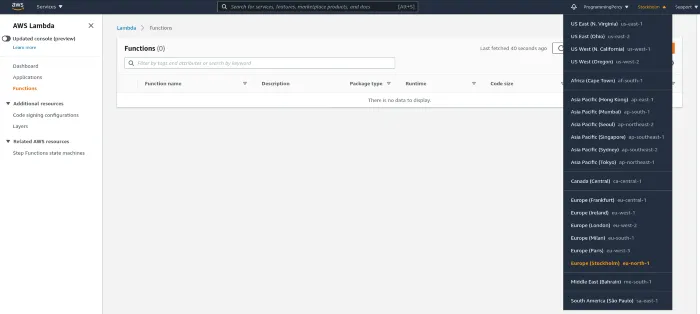
Important note before moving on, always change the region in EACH service that we will use. If you create a service in an Oregon region, you will only see you’re service if you’ve changed to Oregon. I see a lot of questions about this, “All my work is gone”. It’s many times that they work in the wrong region. The region can be changed at the top right corner of each service.

We will need to start with setting up a new repository, log into GitHub and create a new repository.
Create a new directory on your development machine called aws-programming-with-percy and create a new HTML file called index.html. The name of index.html is important. We will also initialize the GitHub repository in the directory.
mkdir aws-programming-with-percy
touch index.html
git init
git remote add origin https://github.com/percybolmer/aws-programming-with-percy.git
Open up index.html and copy the following gist into it.
<!DOCTYPE html>
<html>
<head>
    <meta charset="UTF-8">
    <title>Programming with Percy</title>
</head>

<body>
    Hello, your using AWS Amplify to host this via a GitHub Repo!
</body>
</html>Save your index.html and push it onto the repository.
git add .
git commit -m "Added index.html"
git push origin master
After the update, visit the Amplify Console on AWS. You should be welcomed with a heart-warming splash screen that greats you. Press the Get Started button, or Scroll down into the Get Started section.
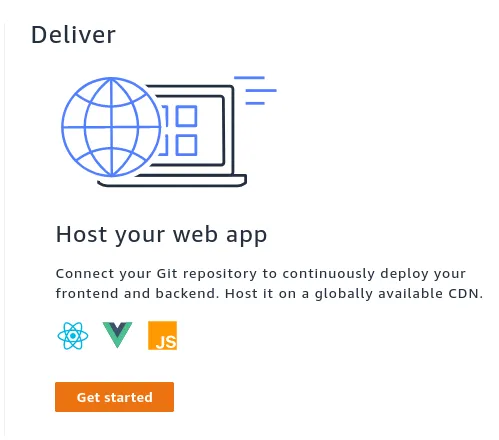
There will be two offers to start, we want to use the Deliver option.
Select GitHub in the next screen that asks how you want to provide your code.
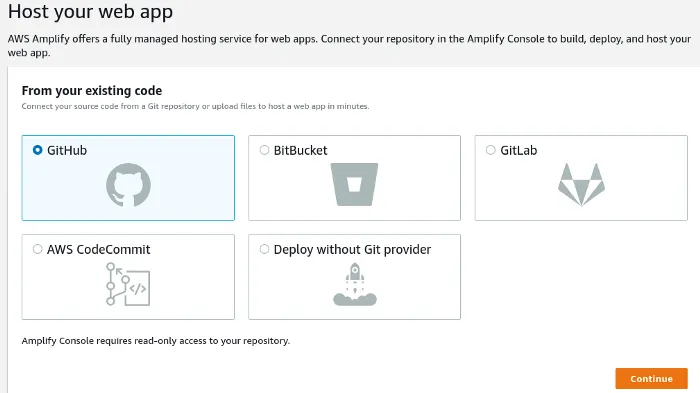
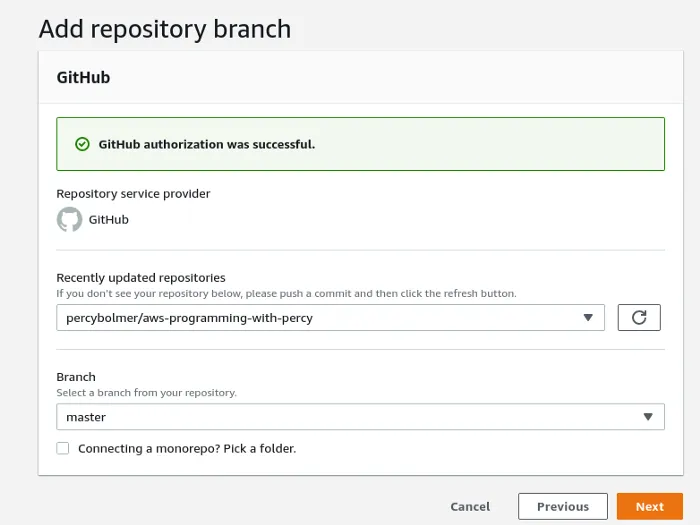
AWS Amplify will need access to your GitHub, If you’re logged in on the same browser you should be presented with an OAuth screen. We will trust AWS and accept them. Press the green “Authorized aws-amplify-console”.

You should be brought back into AWS Amplify and here we can set up what Repository to use. Make sure you select the repository that we just created that contains the index.html , also select the correct branch. If you followed my example it should be master, If you didn’t specify master then it can also be main.
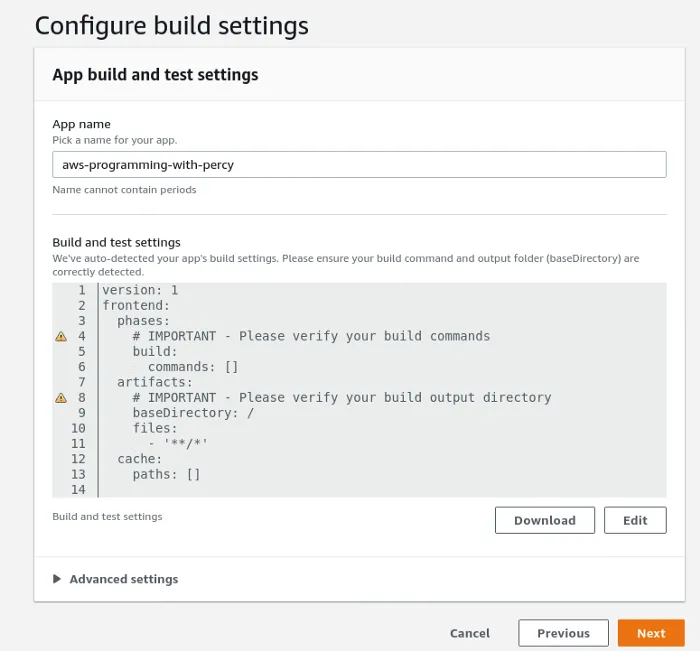
Next up we can set build settings. In this simple use case we don’t have any build settings yet, so let’s leave it be for now. But here you can set up how to build the project, customize docker images and environment variables.
Press next and you will be presented with a Summary screen.
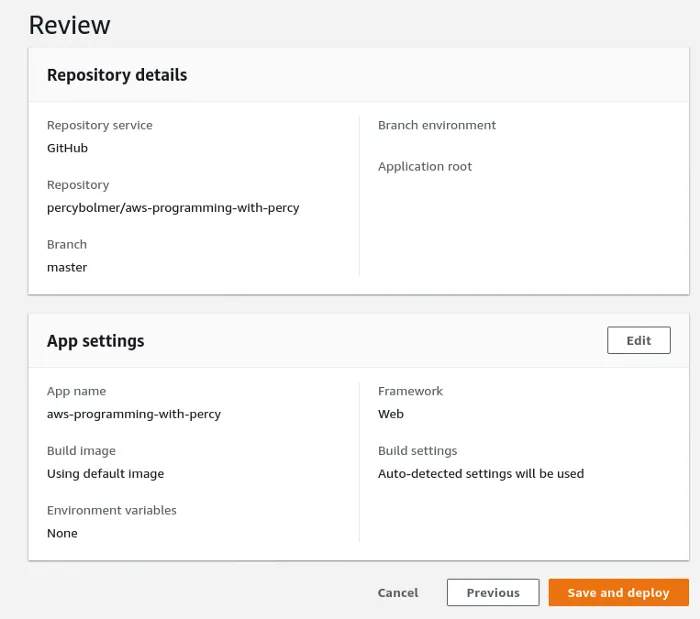
Press “Save and Deploy”. AWS Amplify will begin loading, It is now building your application. When It’s complete you will be redirected to an Admin dashboard where we can configure the website.
There is a link at the bottom that you can click to view the website, we now have a live website. Note, it is using a subdomain generated by AWS. You can change this to your custom domain. We won’t do that now, I don’t have a custom domain, and we are still learning the ropes. Click the link and make sure everything works.

A simple website does not get us very far though? Let’s proceed.
AWS Lambda — Your AWS Backend and code executer
Next up will be implementing an AWS Lambda . Another service that lets us run code based on certain triggers. I’ve got to say I heard talk about AWS Lambda for so long before I dared try it out. It’s just so much dark magic that’s happening that it frightens me. If I could build half as good software like this, I’d be so happy.
AWS Lambda is a serverless solution that lets you execute code based on certain events. Serverless means serverless for you as a customer, Amazon provides the servers and runs your code in a provisioned and managed way.
AWS Lambda is a serverless compute service that lets you run code without provisioning or managing servers, creating workload-aware cluster scaling logic, maintaining event integrations, or managing runtimes. With Lambda, you can run code for virtually any type of application or backend service — all with zero administration — AWS Lambda
Start by opening the AWS Lambda console. Change the region that you using by clicking on the top right corner. I live in Sweden so I’ve set mine to Stockholm.
We currently don’t have any functions, so let’s begin by creating one. Press the “Create Function button”.

There are four options presented. You can build your code from scratch, use a pre-built blueprint, upload a docker image, or browser the AWS Serverless Application Repository.
To upload a docker image it has to be part of the Amazon ECR . ECR is their Docker repository.
I will move on with creating a code piece from scratch, it will be a function called Greeter which prints Hello to a user. I will be using Golang as my programming language.

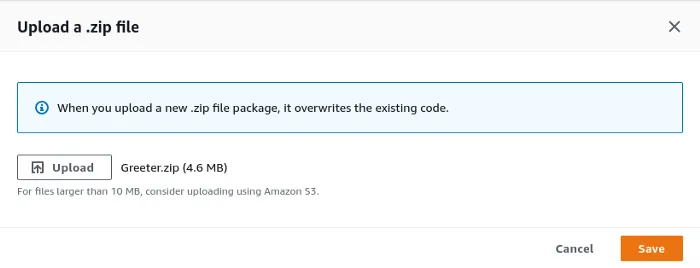
Sadly AWS Lambda doesn’t support a code editor in the browser for Go. If you’re using a supported language there will be a code editor under the Function Code section. We have to upload a .zip file containing the code we want to have if using Go. We will build a simple function that says Hello to a user.

I will create a new Golang project and create a simple main.go file. The main.go file will contain a function called GreetVisitor which will take a visitor’s name and last name and greet them.
package main

import (
	"fmt"
	// aws-lambda package has to be imported
	"github.com/aws/aws-lambda-go/lambda"
)

// User is a simple struct to accept as input
type User struct {
	Name    string `json:"name"`
	LastName string `json:"lastname"`
}

// Greetings is the response to a user entering
type Greetings struct {
	Greet string `json:"greet"`
}

// String implements the stringer interface for user
func (u User) String() string {
	return fmt.Sprintf("Welcome %s %s", u.Name, u.LastName)
}

// GreetVisitor is a lambda function that will greet a visitor
func GreetVisitor(event User) (Greetings, error) {
	return Greetings{Greet: event.String()}, nil
}

func main() {
	// Lambda start is used to handle the function
	lambda.Start(GreetVisitor)
}
Next, we need to initialize a go module and build a binary out of it, we will also need to zip the binary so that we can execute it in AWS Lambda.
go mod init Greeter
go get github.com/aws/aws-lambda-go/lambda
GOOS=linux go build -o Greeter main.go
zip Greeter.zip Greeter
These commands will download the needed aws-lambda-go package and compile my program into a binary called Greeter. I then zip Greeter into a zip file.
After we have the zip file, go back to the AWS Lambda console. Find the Function Code section again and select Actions and Upload zip.
Also, find Runtime Settings, we need to edit the binary that the function should run. Set the Handler name to the name of the binary we compiled, in my case it’s Greeter.

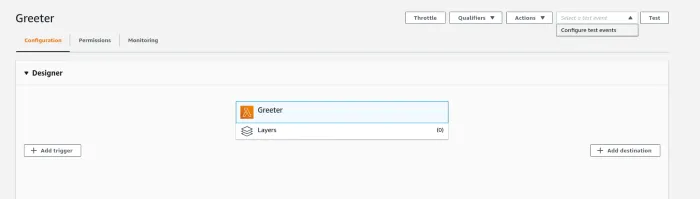
Let’s try if the code works as intended. We know that If the function receives a user it will print the user’s name and last name. Scroll to the top of the Greeter functions dashboard in AWS Lambda console and find a drop-down saying “Select a test event”. We will configure a test event to make sure the function works.
We will find a dialog allowing us to create test inputs to pass into the function we wrote. In my case, I will use the hello-world template and modify the JSON input to match that of our user struct.
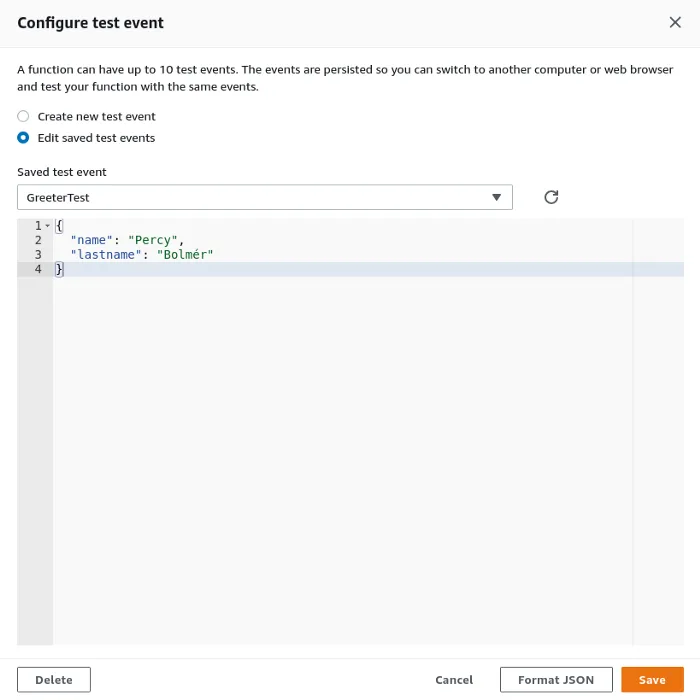
Press Create when you’re done and then click the “Test” button in the top right corner after selecting your newly created Test. In my picture, you can see the output as It is greeting me.

Great, we can execute custom code. However, this doesn’t help the website we have. There is no connection between them.
AWS API Gateway — RESTful API between Lambda and Amplify
Amazon API Gateway is a service that provides a way to insert APIs in front of our other applications. You can read about API Gateway on the AWS website. Think of it as a communicator between our Amplify and Lambda services.
Amazon API Gateway is a fully managed service that makes it easy for developers to create, publish, maintain, monitor, and secure APIs at any scale. APIs act as the “front door” for applications to access data, business logic, or functionality from your backend services.` — AWS API-Gateway.
Let’s begin by visiting the API Gateway console. Don’t forget to switch the Region used as we did with the other services.
The Gateway will provide you with a few options depending on the Gateway you want to create. We will proceed by using a REST API. Select Build on the REST API that is not marked as private.

After the API is created they will have generated an Example API for us. This API can be good to read quickly to get a good overview of what can be done.
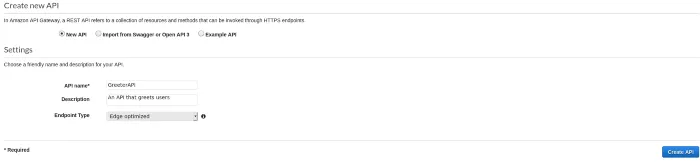
Select the New API and set an API Name for the API. We will also select Endpoint type. According to the AWS guides, an Edge Optimized is recommended for a website with clients with a wide geographical distribution. After setting the configuration, press the blue Create API button.
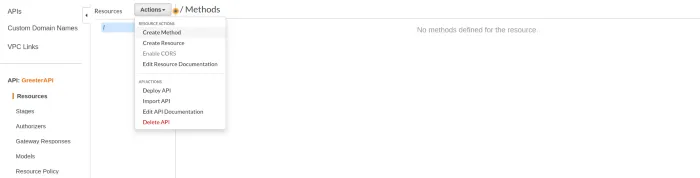
We will be presented with a view that displays all the methods that the API currently has. We don’t have any methods yet so it will be empty. We will begin by creating a new Method, Select the Actions dropdown and Create Method.
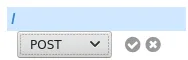
It will generate a new dropdown where we can select the HTTP method to use. We want our endpoint to listen to POSTs.
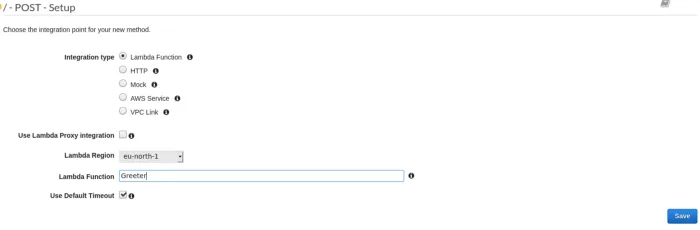
We will be shown a new screen allowing us to configure what will happen when a POST reaches the endpoint. We will want to execute the lambda function that we create before, so select the Lambda Function as the integration type.
We also need to enter the name of the Lambda function, in my case, I named it Greeter. Don’t forget to click the blue shiny save button.
It will prompt you for permission to invoke the lambda function. It makes no sense to cancel, we want this to be allowed, so accept it. We will be presented with a visualization of the API endpoint. It shows us the client on the left side and how the requests are transported onto our Lambda Greeter and then returned as a response.
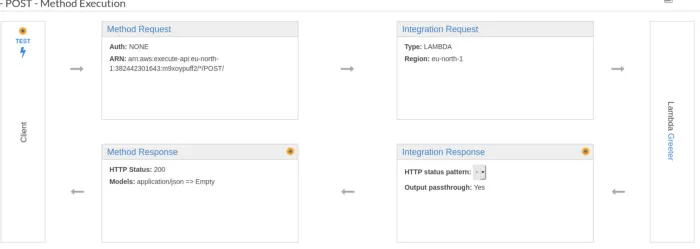
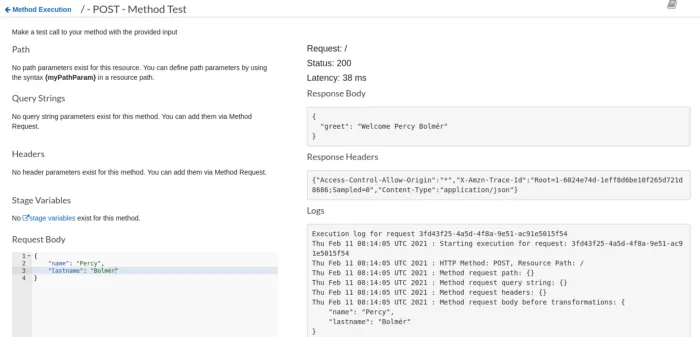
Let’s click the TEST button on the Client and make a test request to make sure it is working. We can easily add a JSON request and test it right in the browser. I’ve tested it and looks like I’m greeted properly.
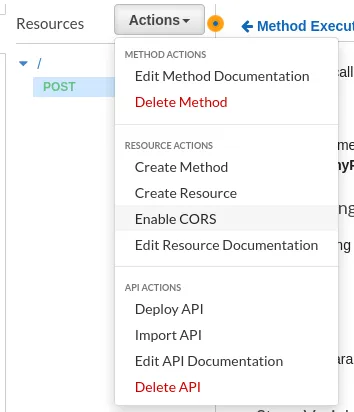
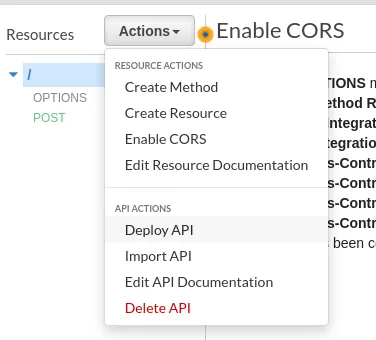
One more thing to do is to enable CORS. If you don’t know what CORS is I suggest reading What is CORS? a beautiful article by Bartosz SzczecińskiSelect the POST endpoint and go to the Actions dropdown. There is an option called Enable CORS.
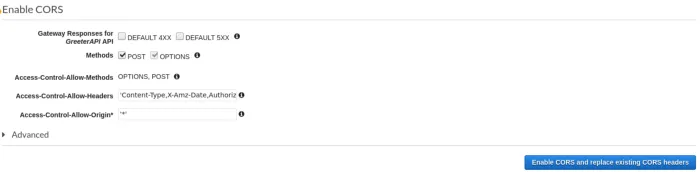
Selecting it will open up a form with a few options. For this tutorial, just leave it as is and press the blue “Enable CORS and replace existing CORS headers”
You will be prompted with a summary of the changes that will apply, Accept them. The next step is to deploy the API. Again, go to the Actions dropdown. And locate the Deploy API option.
Pressing the Deploy API will present us with a form that requires us to name the API. I’ve named mine development.
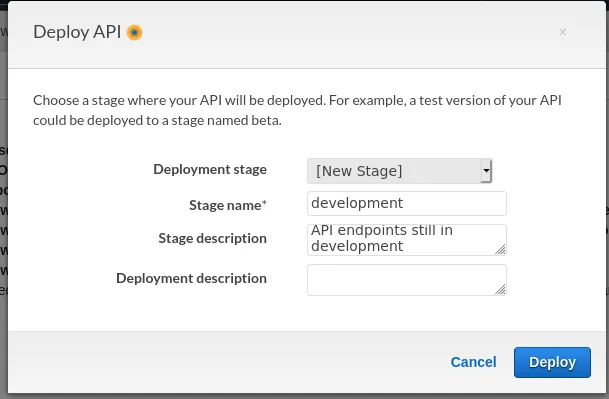
You will be moved from the Resources tab into the Stages tab now. The development Stage has a ton of settings, we won’t cover them in this guide. I recommend saving the Invoke URL, which is the URL where we will find the API. Its located at the top of the development Stage editor.

So we now have a frontend running with Amplify, a Backend with Lambda, and an API. But we aren’t using them together yet, we will change it so the website can take a name and last name and greet anybody that fills the form. We will also create a database to use in the lambda.
AWS DynamoDB — An NoSQL database
The next service we will use is Amazon DynamoDB. It is a key-value database that can be used inside our AWS infrastructure.
Amazon DynamoDB is a key-value and document database that delivers single-digit millisecond performance at any scale. — AWS DynamoDB
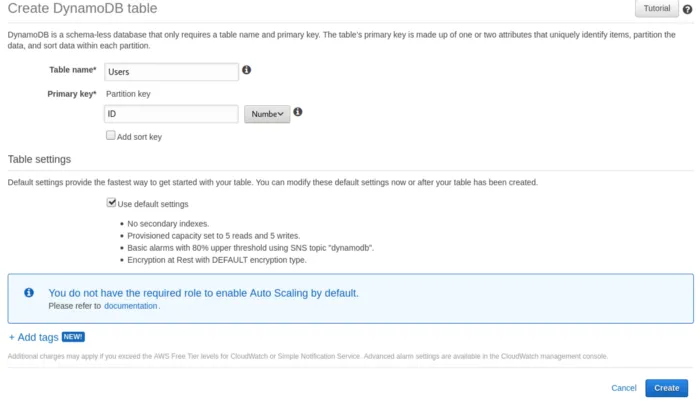
We will use the database to store users. Begin by visiting the DynamoDB console .
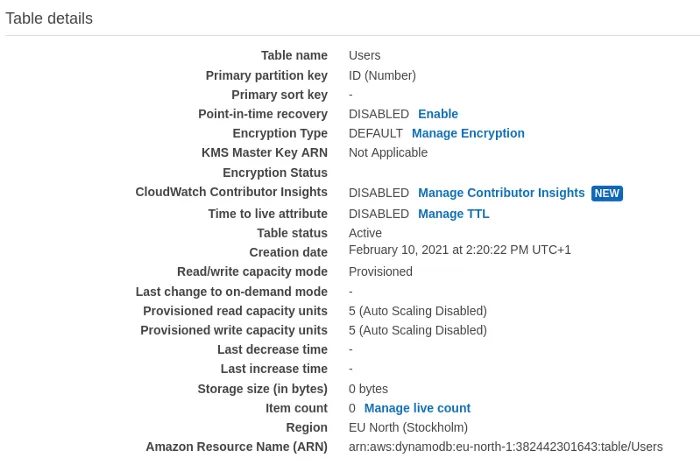
Select Create table and fill in the needed configurations needed in the form. We will need to name the table and set a primary key. I’ve named it Users and will be using an ID as the primary key.
Once the table is created you will see a new view where you can further configure and modify the table. Let’s keep this simple and copy the Amazon Resource Name (ARN). It’s located inside the Table details at the bottom .
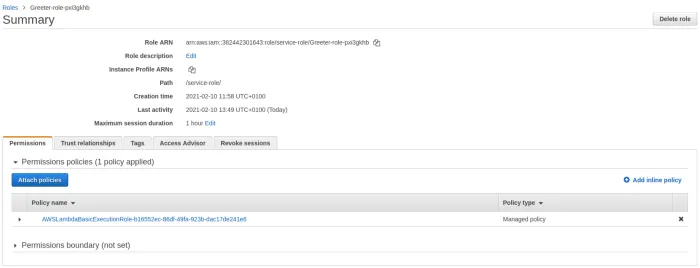
The database is up, but we won’t be able to connect to it unless we allow the Lambda function to have access. Open the AWS Lambda console again and go into the Greeter function. Navigate to the Permissions tab inside Greeter. We will then click on the link inside the Execution Role field.

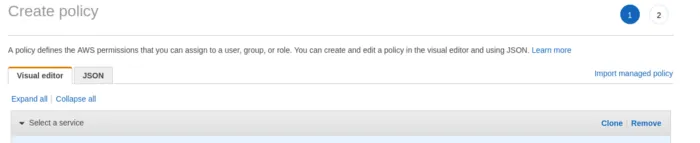
You will be brought to a new service called Identity and Access Management (IAM) . I won’t cover all the details of it, I’ll leave that for the curious, you can read about it here . We will add a new Inline Policy to the Greeter role. This can be done by clicking on Add Inline Policy .
When presented with a new screen, proceed by pressing the JSON field. You can use the Visual editor but I find it wonky. JSON is easy and fast.
Copy the following GIST and insert it into the JSON field, but remember to replace the whole RESOURCE field with your ARN that is displayed in the DynamoDB table.
{
"Version": "2012-10-17",
"Statement": [
    {
        "Sid": "VisualEditor0",
        "Effect": "Allow",
        "Action": [
            "dynamodb:PutItem",
            "dynamodb:DeleteItem",
            "dynamodb:GetItem",
            "dynamodb:Scan",
            "dynamodb:Query",
            "dynamodb:UpdateItem"
        ],
        "Resource": "arn:aws:dynamodb:eu-north-1:382442301643:table/Users"
    }
    ]
}After inserting the JSON press the “ Review Policy ” button. You will be prompted with a field that wants you to name the Policy. Enter a name that is easy to remember and understand what it is related to. Press “ Create Policy ” when done.

Once that is done, we have allowed the Lambda to access the database. We still need to update the lambda code so that it will do anything with the database. We will now update the main.go code in the Greeter application into the following. The code we will use is super simple and will only push any users into the database, with no duplication checks or anything. Let’s focus on learning the ropes in AWS instead of learning solid software engineering.
package main

import (
	"fmt"
	"os"

	// aws-lambda package has to be imported
	"github.com/aws/aws-lambda-go/lambda"
	"github.com/aws/aws-sdk-go/aws"
	"github.com/aws/aws-sdk-go/aws/session"
	"github.com/aws/aws-sdk-go/service/dynamodb"
	"github.com/aws/aws-sdk-go/service/dynamodb/dynamodbattribute"
)

// a variable that is a dynamoDB client
var dynaDB *dynamodb.DynamoDB

var latestID int

// User is a simple struct to accept as input
type User struct {
	Name    string `json:"name"`
	LastName string `json:"lastname"`
	ID      int    `json:"ID"`
}

// Greetings is the response to a user entering
type Greetings struct {
	Greet string `json:"greet"`
}

// String implements the stringer interface for user
func (u User) String() string {
	return fmt.Sprintf("Welcome %s %s", u.Name, u.LastName)
}

// GreetVisitor is a lambda function that will greet a visitor
func GreetVisitor(event User) (Greetings, error) {
	// Add an ID to the user
	event.ID = latestID + 1
	latestID++
	// Marhsal the user into a Map
	item, err := dynamodbattribute.MarshalMap(event)
	if err != nil {
		fmt.Println(err.Error())
		os.Exit(1)
	}
	// Create a dynamoDB input item, set the marshalled data and the users table
	input := &dynamodb.PutItemInput{
		Item:      item,
		TableName: aws.String("Users"),
	}
	// Send the Item into the DB
	_, err = dynaDB.PutItem(input)
	if err != nil {
		fmt.Println(err.Error())
		os.Exit(1)
	}
	return Greetings{Greet: event.String()}, nil
}

func main() {
	// Set up a Session to dynamoDB. If you want to setup access from CLI then you need to generate User keys.
	sess := session.Must(session.NewSessionWithOptions(session.Options{
		SharedConfigState: session.SharedConfigEnable,
	}))
	// Create a dynamoDB client
	dynaDB = dynamodb.New(sess)

	// Lambda start is used to handle the function
	lambda.Start(GreetVisitor)
}Don’t forget to rebuild the binary and zip it.
GOOS=linux go build -o Greeter main.go
zip Greeter.zip Greeter
Now a little reading breather for you, I t’s up to you to repeat the earlier steps we did to upload the Lambda . That could prove a useful training exercise. Go into the AWS Lambda console, select the Greeter function and upload the new ZIP. Rerun the GreeterTest.
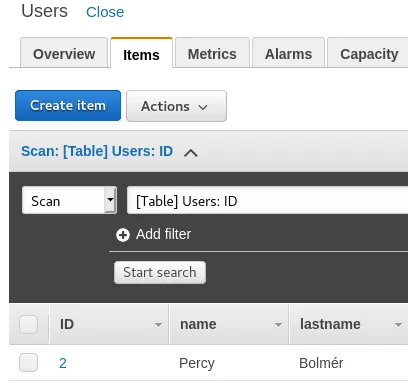
If all goes well you should be Greeted successfully. You can then go back to the DynamoDB console and look at the data that’s inserted. The data can be viewed inside the Items tab after pressing the Start search.
Great, now we have a database running also. All that’s left is a small update to the web application to invoke the API Gateway.
AWS Amplify — Invoking the API
A small life hack before we begin changing the code If you are going to stick to using the web-consoles, make a bookmark folder in your browser right now. You will notice that there are a lot of different services in AWS.
We need to update the HTML to also include a small javascript snippet. The javascript will send a request to the API Gateway. The API is hosted on the Invoke URL that I told you to save. If you don’t remember it you can find it inside the AWS API Gateway. The Invoke URL can be found under the development Stage that we created earlier.
In the updated code we will use a regular javascript fetch . It will make an HTTP request to our Gateway API and we will print the response into a text area that displays the greetings.
<!DOCTYPE html>
<html>
<head>
<meta charset="UTF-8">
<title>Programming with Percy</title>
<!-- Add some CSS to change client UI -->
<style>
body {
background-color: #232F3E;
}
h2 {
color: #FF9900;
margin: 20px 20px 20px 20px;
}
textarea {
margin: 20px 20px 20px 20px;
}
label, button {
color: #FF9900;
font-family: Arial, Helvetica, sans-serif;
font-size: 20px;
margin-left: 40px;
}
input {
color: #232F3E;
font-family: Arial, Helvetica, sans-serif;
font-size: 20px;
margin-left: 20px;
}
</style>
<script>
// define the callAPI function that takes a first name and last name as parameters
var callAPI = (firstName,lastName)=>{
// instantiate a headers object
var myHeaders = new Headers();
// add content type header to object
myHeaders.append("Content-Type", "application/json");
// using built in JSON utility package turn object to string and store in a variable
var raw = JSON.stringify({"name":firstName,"sirname":lastName});
// create a JSON object with parameters for API call and store in a variable
var requestOptions = {
method: 'POST',
headers: myHeaders,
body: raw,
redirect: 'follow'
};
// make API call with parameters and use promises to get response
fetch("https://m9xoypuff2.execute-api.eu-north-1.amazonaws.com/development", requestOptions)
.then(response => response.text())
.then(result => document.getElementById('greets').value(JSON.parse(result).body)
.catch(error => console.log('error', error));
}
</script>
</head>
<body>
<div class="content">
<h2> Hello, your using AWS Amplify to host this via a GitHub Repo! </h2>
<form>
<label>First Name :</label>
<input type="text" id="fName">
<label>Last Name :</label>
<input type="text" id="lName">
<!-- set button onClick method to call function we defined passing input values as parameters -->
<button type="button" onclick="callAPI(document.getElementById('fName').value,document.getElementById('lName').value)">Call API</button>
</form>
<textarea name="greets" id="greets" rows="4" cols="50" placeholder="Greetings will be displayed here">
</textarea>
</div>
</body>
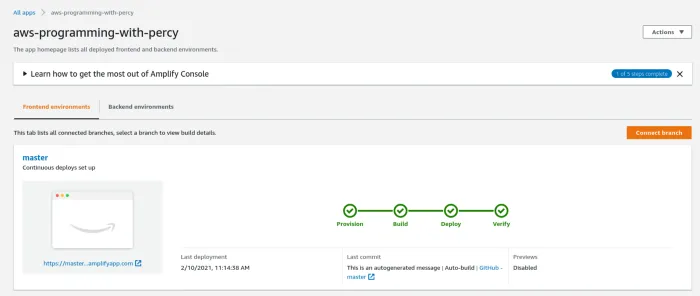
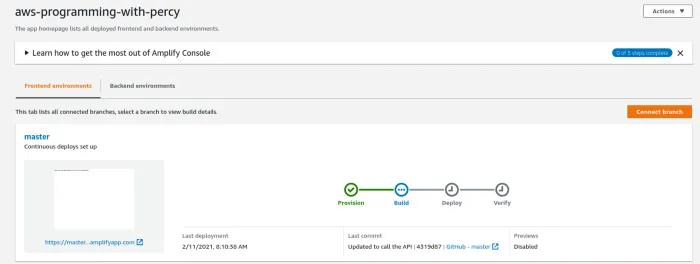
</html>When we have updated the repository, it may take a few seconds or minutes before the website is updated. Amplify will automatically detect changes in the repository since we have continuous deploys enabled. You can see inside the Amplify web-console if it is deployed or not, here in the screenshot you can see that it is currently rebuilding my website after it has detected the updated repository.
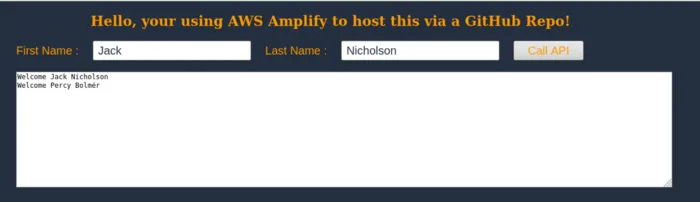
After the Verify is green, you can visit the URL the website is hosted at and you should be able to enter a username and last name and the text-area will add greetings. If you visit DynamoDB you should also see that the table is updated with the input.
Short recap
We use AWS Amplify to host the static website.
The website has a POST form that can send requests to AWS Gateway.
The Gateway API makes sure the request looks proper and forwards it into AWS Lambda.
Lambda is where we can run custom code. The Lambda is connected to DynamoDB which is a database.
![By [Ray Hennessy] on Unsplash](/_app/immutable/assets/img43-e5d8b392.webp)
Congratulations! You now have a web application with a frontend, backend, API, and database up and running.
I hope you’ve found this tutorial useful.
Also if you want to close your AWS account before any charges are applied to your servers, make sure to close your account at the bottom of the link . Or disable any services running manually.
Now, go out there and AWS!
If you enjoyed my writing, please support future articles by buying me an Coffee