GitHub Actions In Action
Automate building, testing, notifications, and deployment using GitHub Actions
by Percy Bolmér, February 15, 2021
Ever get tired of having bash scripts or makefiles that you have to run to in order to perform repetitive mundane tasks — running tests, building?
Do you feel setting up a CI/CD is overkill for a small home project? Well, you shouldn’t feel that way — it’s super easy using GitHub Actions.
GitHub Actions allows users on GitHub to perform a large number of actions, such as deploy to AWS, Terraform, Email the developers if a commit breaks any tests, and much, much more! GitHub Actions allows us to run a CI/CD very easily and without much prior knowledge.
In this article, we will bring GitHub Actions into Action and try them out. We will set up an example repository that uses GitHub Actions and we will try pushing to see the effects. I will also show more advanced cases where we can set up Docker containers inside the GitHub Action.
Back in the day, I use to have a makefile for every project I worked on. The makefile would have many possible options: build the project, test the project, and more. I also had complex jobs in the makefile that would SSH into multiple servers and deploy the application. Maintaining these makefiles was hard work and never felt good.
Recently I came across GitHub Actions , and I was amazed. They give us the ability to automatically perform actions based on certain events. I’ve started to implement it in every project that I have. These events can be things like pushing a commit to the repository, forks, pull requests, or scheduled.
I’m fond of the pull request event, when people make a pull request to a repository we can have it run all the unit tests on the new code.
GitHub Actions help you automate tasks within your software development life cycle. GitHub Actions are event-driven, meaning that you can run a series of commands after a specified event has occurred. — github.com
What’s even greater is that GitHub Actions are allowed for free to all GitHub users, even free accounts. The only exceptions are private repositories.
If you’re still not convinced that GitHub actions are for you, don’t forget to check out the Actions marketplace. Yes, they do provide us with pre-built configurations to perform almost anything!
Let’s review GitHub Actions and how they work
There are a few words we need to understand before we begin working. All GitHub Actions begin with an Event. Events are certain triggers that tell GitHub to execute the configured Actions.

There are many events that you can listen for, a full list can be found on the GitHub docs. To give you a taste of the events available, here are a few common ones:
Push— Triggers when a user pushes into a branchPull_request— Triggers when apull_requestis received on the repository. Can be specified to match only certain types ofpull_requests like opened etc.Fork— Triggers whenever the repository is forked.Issues— Triggers when an issue is changed. Can be specified to match certain types like opened, closed, etc.Release— Triggers when a release on the repository is created.
Event listeners are configured using the on keyword inside our GitHub Actions configuration. You can use multiple event listeners.
# This will create a event listener for Push events on a repository
on: push
So, Event s trigger GitHub to react, but what do they trigger? This brings us into the next component, the workflow. The workflow is the name of the configuration that contains all the jobs to execute. It’s important to set a name to the workflow, this is because we need to be able to reference them.
Remember, you can have many events and many workflows to execute.

The workflow name is set by using the name keyword in the configuration.
# This will set the name of the workflow
name: my-workflow
The next component is jobs. This is a container that holds all the Steps to perform.

Jobs are set by using the jobs keyword in the workflow configuration.
Jobs can be configured to run with many useful settings. You can create needed Docker containers and much more to run in the Jobs, or even change the operating system that it runs on. We will later run a PostgresDocker inside a Job.
#Configure jobs below
jobs:
  #Name the Job by setting a key value
  my-job:
      name: My custom job
      # Set the operation system to use on during the Job
      runs-on: ubuntu-latest
      # Configure the steps that are part of the job
      steps: #Comes later in the article
Jobs can contain many steps. A step is an actual action to perform.

This is where we start doing things and running commands. A step is a name for a certain command or series of commands. Steps reside inside Jobs and are set by using the steps keyword. Multiple steps can be configured — the example below is used to install Golang, check out the code from the repository, and then run terminal commands:
steps:
- name: Set up Go 1.x
uses: actions/setup-go@v2
with:
go-version: ^1.15.5
- name: Check out code from the repository
uses: actions/checkout@v2
- name: Run a terminal command
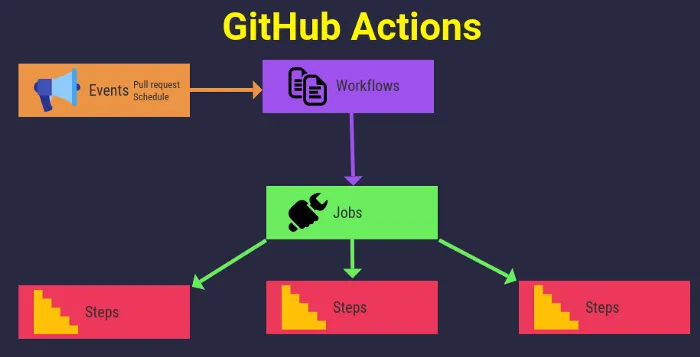
run: echo "Hello World" && pwdThis can seem confusing at first, or at least it did to me. That’s why I created an infographic showing the relationship between the components in GitHub Actions to visualize the connection. Remember that each child component can contain multiple components. So one event can trigger many workflows, a workflow can contain many jobs, and a job can contain many steps.
Let’s start using GitHub Actions
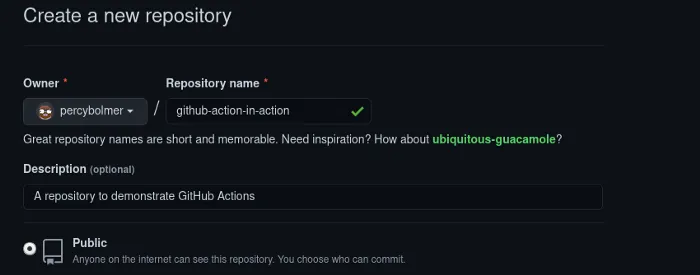
The first thing we need to do is to set up a GitHub repository. You will need a GitHub account to try this out.
Log in and create a repository, and make sure you set the repository to Public. GitHub Actions are only available for free if the repository is public.
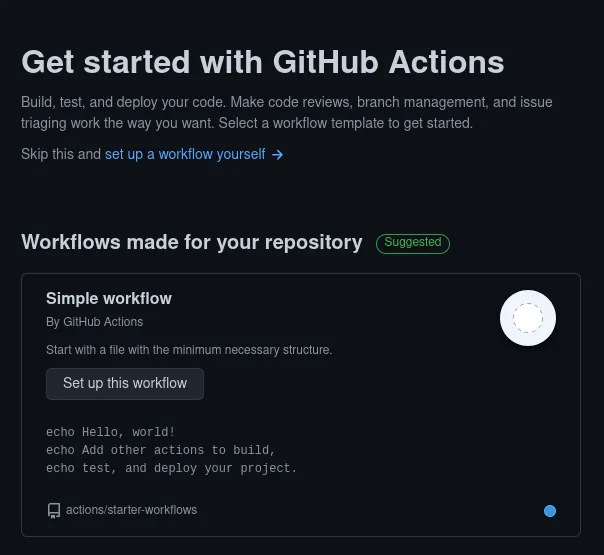
GitHub actions are stored in a YAML file residing in .github/workflow. You can create a workflow by adding a YAML file there, or you can use the website to generate the files for you. Navigate to the Actions tab once you enter the repository.

You should be presented with the option to set up a starter workflow, press the “Set up this workflow” to do it.
You will be presented with a very user-friendly page. It will contain a text-editor right in the browser on the left side. On the right side, you will have access to the marketplace containing pre-built steps. It was my first preview of this page that made me fall in love with GitHub Actions. Here we can edit our workflow and commit it.
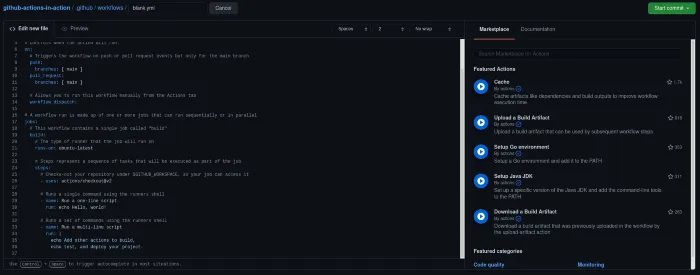
Make sure you read the current YAML and get comfortable with it. The current workflow will trigger two events — a push or pull request. It will only trigger if those events occur on the main branch.
There is then one job that’s called build which runs on an Ubuntu operating system. The build will have three steps: the first pulls any code in the repository, the next two will only print to standard out using echo.
What’s interesting to view is the use of the run command inside steps. This is how, as users, we can modify what’s going to happen in a step. This can be anything available for the selected operating system. An example is installing dependencies. Say I have a project that uses libpcap — since it sniffs networks, my unit tests will use localhost . But the tests will still need the operating system to have libpcap , so I use the run command to install it before running my unit tests. My unit tests are executed with run as well — think of it as a terminal.
This is enough for now, lets press the big juicy green commit button to try it out. Once you have committed it, enter the Actions tab again and you should see a job either in Queue or finished. Queue means that it’s going to run the workflow, but waiting for the servers to become ready.
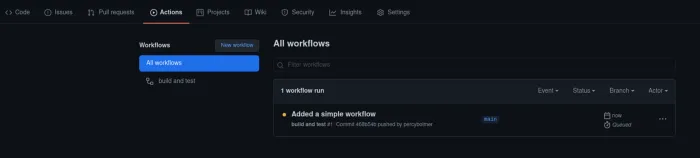
As you can see, under All workflows, you now have a workflow called build and test. You can click on that to see more in-depth statuses about all the jobs inside the workflow:
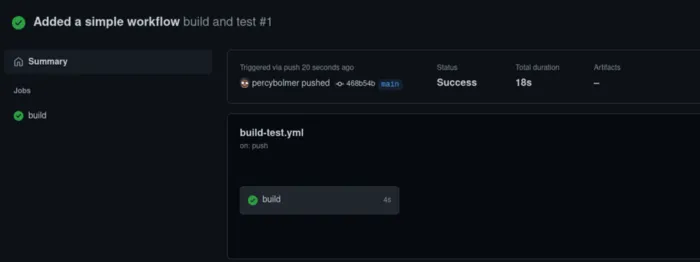
Inside the Workflow view, you should see any jobs that are part of it on the left panel. In this case, we only have one job, the building one. It’s also green, indicating that everything worked fine. This is a great overview of the workflow, but usually, you would want to click on the job to see an in-depth view of the steps. Click on the build job to see detailed information and output from each step.
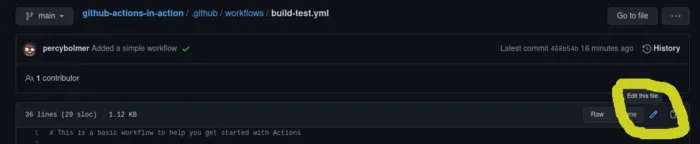
Now, for convenience’s sake, we will modify the configuration inside the browser, but it’s also fine to modify the file on your local computer. When you commit and push the changed configuration, it will apply it.
I will also add two new steps, one that compiles my repository code and one that will run any unit tests that are available in my repository. This has to be modified for your own needs or programming language, but should be easily done since you can only replace the terminal commands used. This is what my current workflow will look like, it will compile my Golang project and run all unit tests:
# This is a basic workflow to help you get started with Actions

name: build and test

# Controls when the action will run.
on:
  # Triggers the workflow on push or pull request events but only for the main branch
  push:
    branches: [ main ]
  pull_request:
    branches: [ main ]

  # Allows you to run this workflow manually from the Actions tab
  workflow_dispatch:

# A workflow run is made up of one or more jobs that can run sequentially or in parallel
jobs:
  # This workflow contains a single job called "build"
  build:
    # The type of runner that the job will run on
    runs-on: ubuntu-latest

    # Steps represent a sequence of tasks that will be executed as part of the job
    steps:
      # Checks-out your repository under $GITHUB_WORKSPACE, so your job can access it
      - uses: actions/checkout@v2
      # Sets up and installs Golang
      - name: Setup Go environment
        uses: actions/setup-go@v2.1.3
      # Run the go compile tooling using command line go build
      - name: Build
        run: go build -v ./...
      # Run unit tests that are available
      - name: Test
        # Notice the | ? This is used to run MULTIPLE command lines in one run.
        run: |
          go test -v ./...
echo CompleteNow, if you try copying that Gist and commit it you will see what happens when a GitHub action fails. Visit the Actions tab again and you should see a red icon instead of the green one we saw when everything passed.

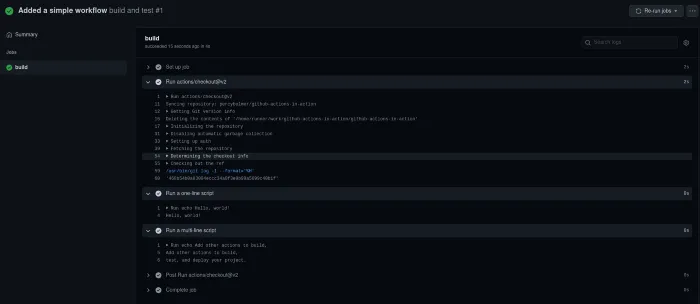
This is why I showed the parts on how to find the step view. We now need to debug what went wrong in the workflow, go into the step view of our job that failed.
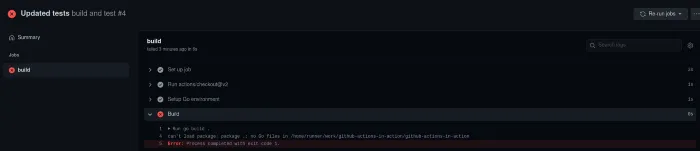
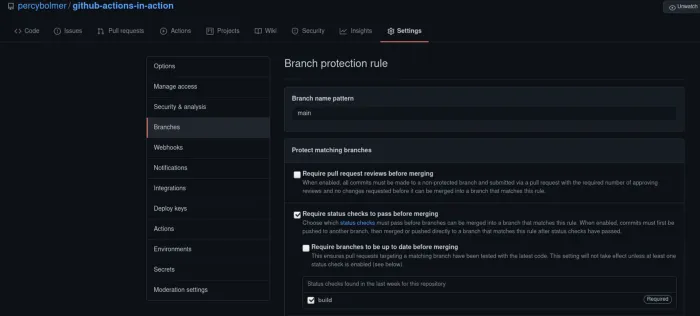
See that output? That’s amazing. It’s simple to navigate and easy to find the error. You might have noticed that the push failed, but it actually still applied it. This is a setting you can change on your repository if you want to — it is called a Branch Protection Rule. It’s located in Settings->Branches->Add Branch Rule-> Require status checks to pass before merging. I’ve configured one on the main branch for my build check just for fun. Note this only works for merges and pull requests, not pushes by administrators.
I’ll add some small code snippets written in Go to the repository, just enough for it to compile, and some simple unit tests.
I’ll create two new files for my repository and push them. main.go is the smallest Go application I could build — it will compile and that’s all it needs to.
package main

import "fmt"

func main() {
	fmt.Println("Git action Ye")
}There is also main_test.go that has two tests in it, just to show you the output.
package main

import (
	"testing"
)

func TestThis(t *testing.T) {

}

func TestThis2(t *testing.T) {
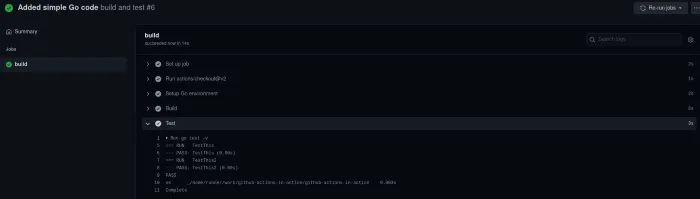
}Pushing those files to the repository will result in the workflow being executed. This time if we view the test step we should see the output that the tests passed:
It’s time to step this up a bit. So far we have used the simplest actions: We can compile and run unit tests, and this gets us far, but what if we want or need a parallel service running?
I’ve got a use case where I have an application that relies on both PostgreSQL and Redis to be available during tests. Why mock when we can run in test environments?
Let’s look at the service keyword. Service is used to run a docker container in parallel to your workflow. You can read more about them here.
Service containers are Docker containers that provide a simple and portable way for you to host services that you might need to test or operate your application in a workflow. –GitHub Docs
It helps to be familiar with Docker and Docker Compose for this part, since it will be using the same syntax. What we do inside the service configuration is the same as running a docker-compose would be. If you want to learn more about Docker, read my Docker article.
I’m going to add a test in the main_test.go that tries to connect to a PostgreSQL. At first, it will fail, but we will add a service running it so the test can pass:
package main

import (
	"database/sql"
	"fmt"
	"os"
	"testing"

	_ "github.com/lib/pq"
)

func TestThis(t *testing.T) {

}

func TestThis2(t *testing.T) {

}

// a Test that tries to connect to a PostgreSQL database
func TestConnect(t *testing.T) {
	// First get some ENV variabeles
	host := os.Getenv("POSTGRES_HOST")
	user := os.Getenv("POSTGRES_USER")
	port := os.Getenv("POSTGRES_PORT")
	password := os.Getenv("POSTGRES_PASS")
	dbname := os.Getenv("POSTGRES_DB")

	psqlConnection := fmt.Sprintf("host=%s port=%s user=%s password=%s dbname=%s sslmode=disable", host, port, user, password, dbname)

	// open the DB connection
	db, err := sql.Open("postgres", psqlConnection)
	if err != nil {
		t.Fatal(err)
	}
	// Make sure connection really works
	err = db.Ping()
	if err != nil {
		t.Fatal(err)
	}
}If you push the changed test it won’t work, it won’t find the host for two reasons. The first is that we are using environment variables to store the connection information. The second reason is, there is no PostgreSQL database running. Let’s fix both these issues by updating the workflow file.
We will set up a service running PostgreSQL and we will set environment variables using the env configuration.
The service will be inserted under the build job, this will make the service available for any step inside the job.
# This is a basic workflow to help you get started with Actions

name: build and test

# Controls when the action will run.
on:
  # Triggers the workflow on push or pull request events but only for the main branch
  push:
    branches: [ main ]
  pull_request:
    branches: [ main ]

  # Allows you to run this workflow manually from the Actions tab
  workflow_dispatch:

# A workflow run is made up of one or more jobs that can run sequentially or in parallel
jobs:
  # This workflow contains a single job called "build"
  build:
    # The type of runner that the job will run on
    runs-on: ubuntu-latest

    #Add services, aka Docker containers that runs in paralell
    services:
      #Name the service
      postgres:
        #Set the Docker image to use, find images on Dockerhub.com
        image: postgres:12
        # Set environment variables
        env:
          POSTGRES_USER: user
          POSTGRES_PASSWORD: qwerty
          POSTGRES_DB: workflow
        # Expose ports
        ports:
          - 5432:5432
        # Add some health options to make sure PostgreSQL is running fully before moving on
        options: >-
          --health-cmd pg_isready
          --health-interval 10s
          --health-timeout 5s
          --health-retries 5

    # Steps represent a sequence of tasks that will be executed as part of the job
    steps:
      # Checks-out your repository under $GITHUB_WORKSPACE, so your job can access it
      - uses: actions/checkout@v2
      # Sets up and installs Golang
      - name: Setup Go environment
        uses: actions/setup-go@v2.1.3
      # Go get to fetch external dependecny like the PostgeSQL driver
      - name: go get
        run: go get -v -t -d ./...
      # Run the go compile tooling using command line go build
      - name: Build
        run: go build
      # Run unit tests that are available
      - name: Test
        # Notice the | ? This is used to run MULTIPLE command lines in one run.
        run: |
          go test -v
          echo Complete
        # The tests are using environment variables so we need to add those
        env:
          POSTGRES_HOST: localhost
          POSTGRES_USER: user
          POSTGRES_PASS: qwerty
          POSTGRES_PORT: 5432
          POSTGRES_DB: workflow
If you’ve updated the test file and the workflow file and push them into the repository you should now see a green nice icon:
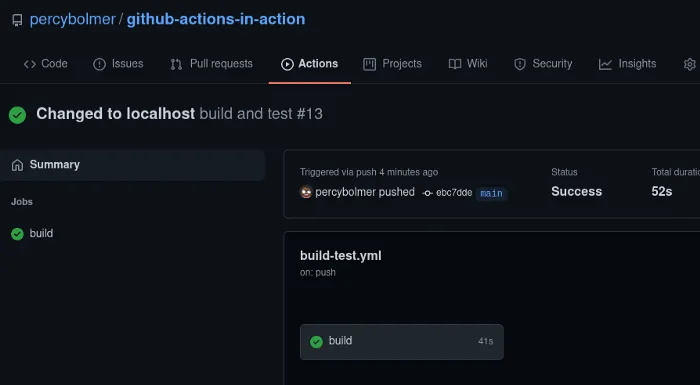
This is a very nice feature. Also since services are Docker-based you can use any Docker image you like. Take a look at DockerHub for available images.
So now you know how to set up some basic CI/CD easily with GitHub Actions. Let’s make sure the world knows the repository uses GitHub Actions and add a badge that tells us the status of the latest execution. This doesn’t only look nice on your README, but can also give a sense of trust for the repository. If I know the developers are using CI/CD and the state is passing all unit tests I tend to trust the repository.
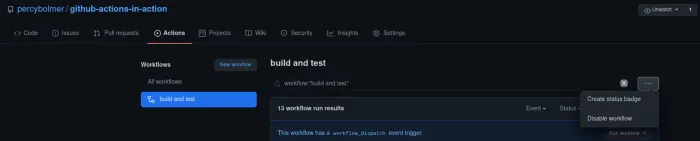
This will present you with a nice little dialog where you can customize the badge. We will make a badge telling visitors the status of the repository. Copy the generated text and paste it into your README.md and commit it.
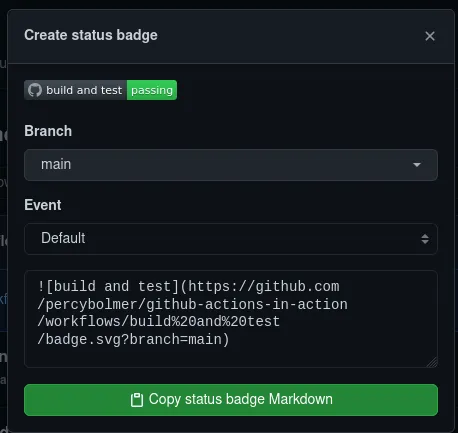
New visitors will now be presented with a nice little badge, assuring them that the code in your repository is working!

That’s it for this article. I suggest exploring the marketplace for more actions to perform — GitHub actions are a very powerful tool.
Thanks for reading.
If you enjoyed my writing, please support future articles by buying me an Coffee