Learn RabbitMQ for Event-Driven Architecture (EDA)
A beginner-friendly tutorial on how RabbitMQ works and how to use RabbitMQ in Go using an Event Driven Architecture
by Percy Bolmér, March 24, 2023
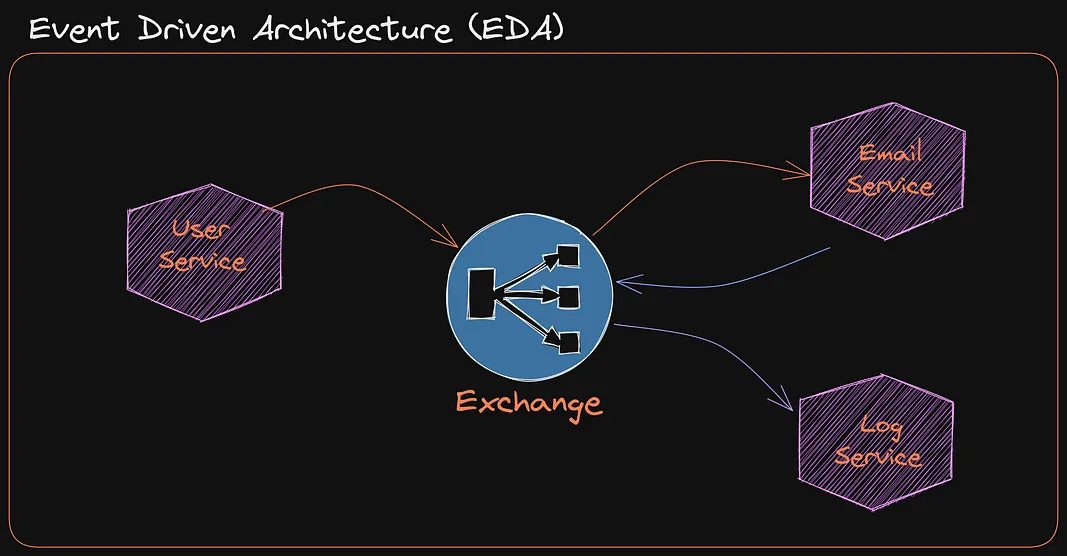
Event-Driven architecture (EDA) is one of my favorite things in programming. This architecture allows us to build microservices and easily share information between them.
In regular sequential software, you would have a function trigger another function or a recurring script that checks for certain things to do.
With Event-Driven architecture, we instead leverage a Queue or a Pub/Sub schema. Allowing different services to notify or send information between them to trigger code to execute.
Event-Driven Architecture is often used to build software that is highly flexible and extensible. This is a result of being able to easily add functionality or remove by simply listening to events with a new service.
It also makes it very easy to shadow deploy and test new services in parallel with production, since you can make the new service react to the same events without interfering with the running system.
It is not all sunshine and roses however, some consider EDA systems to be a little bit more complex, and sometimes harder to test when considering the full flow of services. I’d say the testing is easier since we can easily trigger an event and see how the related services react, or a single service. But without proper documentation of the architecture, it can also be hard to understand what triggers what and why.
This tutorial will look at how you can use RabbitMQ to build two microservices that communicate using events. We will look at different paradigms used in RabbitMQ, and while we will learn how to use RabbitMQ in Go, we will mostly focus on learning the concepts of RabbitMQ. Covering some common mistakes and a few best practices to follow.
RabbitMQ supports multiple protocols to send data, but in this tutorial, we will focus on using AMQP.
Over the course of this tutorial, we will learn the following
- Setup RabbitMQ using Docker
- Virtual Hosts, users, and permissions
- Managing RabbitmQ using CLI with rabbitmqctl and rabbitmqadmin
- Learn about Producers, Consumers and how to write them.
- Learn about Queues, Exchanges, and Binding
- Using Work Queues (first in and first out)
- Using Pub/Sub with RabbitMQ
- Using RPC-based patterns and callbacks.
- Encrypting traffic with TLS
- Using Configurations to declare resources in RabbitMQ
All code used in the article can be found on Github
Installing RabbitMQ - Setup User & Virtual host & Permissions
Getting RabbitMQ up and running can be done by following the examples at Downloading And Installing. I’d recommend following that guide when going into production, but for this tutorial and to experiment we can use an easier approach.
As always, the easiest way is to run a Docker!
This command will download the latest RabbitMQ and start it as a background process, exposing ports 5672 and 15672.
docker run -d --name rabbitmq -p 5672:5672 -p 15672:15672 rabbitmq:3.11-managementPort 5672 is to enable AMQP connections. AMQP is the networking protocol used by RabbitMQ and many other Message brokers.
Port 15672 is opened because the Admin UI And management UI are hosted on that port, also the API to manage RabbitMQ is on that port.
For more details on the ports, you can refer to the networking guide of RabbitMQ.
Once the docker is started, let’s begin by visiting the Management UI hosted at localhost:15672.
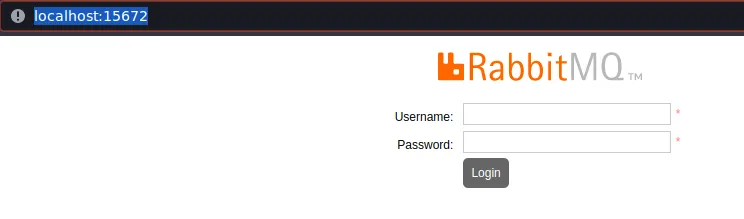
Whops, we need a User! Let’s create one using RabbitMQCLI. Don’t worry about installing it, it is present in the Docker Container we ran.
We can create a new user with the command add_user followed by the username and password. We use docker exec rabbitmq to execute the command inside the docker, replace rabbitmq with the name you have given the docker container.
docker exec rabbitmq rabbitmqctl add_user percy secretI recommend giving Admin access during the exploration as well. We can do this by adding an administrator tag to the new user.
docker exec rabbitmq rabbitmqctl set_user_tags percy administratorOh, one last thing, there is a guest user by default, I strongly recommend removing this user! This user is only available to users using localhost, but still better safe than sorry.
docker exec rabbitmq rabbitmqctl delete_user guestThat’s it, back to the Management UI and log in.
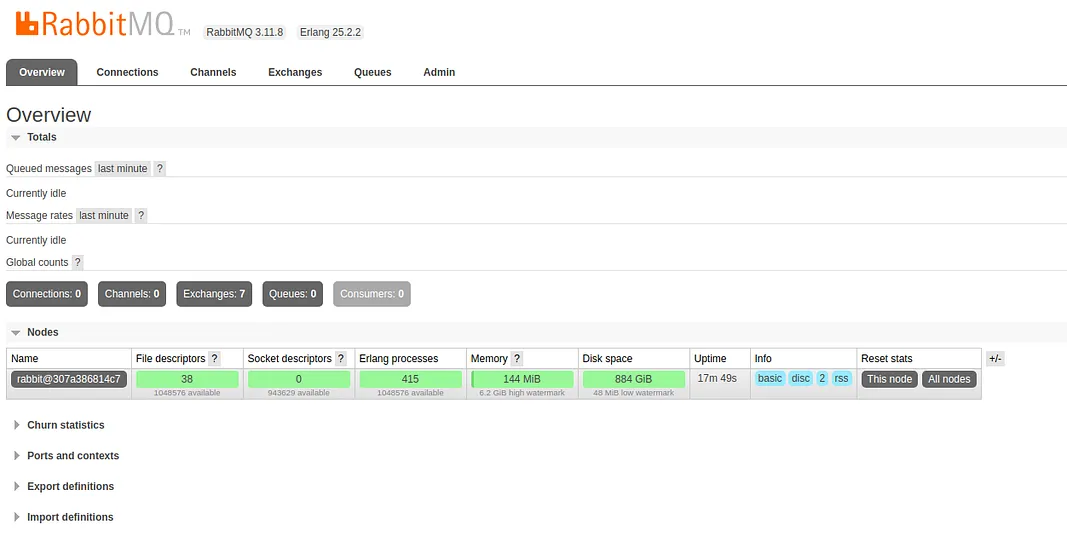
Once logged in you will see a rather old-looking UI, but it is great because we can really monitor RabbitMQ from here, and see what is going on. We will not play around with the UI yet, we need a service that actually connects and sends data first.
Before we start hacking, we need to fix two more things.
Resources in RabbitMQ, such as Queues and other things we will learn more about soon are separated by a logical layer, this logical layer is called a Virtual Host (Vhost).
The easiest way to explain Virtual Hosts would be, but probably wrong in some ways, to compare it to a Namespace.
We can use these vhosts to group certain resources together and restrict access by adding the users who are allowed to use the vhost.
Let’s begin by creating the vhost using the add_vhost command, it accepts a single input which is the name of the vhost.
docker exec rabbitmq rabbitmqctl add_vhost customersNow that we have a vhost, we can add permissions to the user we created earlier so that it is allowed to connect.
Adding permissions is done with set_permissions command, we use the -p flag to specify the vhost to add permissions on. The next item in the syntax is the user to add permissions.
The last part of the command is the scary part, it’s a regexp that defines what permission to add, an example to add all permissions could look like, or permissions on all resources beginning with customer- would be "^customer-*".
There will be 3 regexp slots, in order, it configures the permissions for the following.
- Conf - Permission to configure resources matching regexp
- Write - Permission to write on resources matching regexp
- Read - Permission to read on resources matching regexp
The full command to add full access to configure, write, and read on the customer vhost for my user percy would look like this. Note that I give access to .* which is everything.
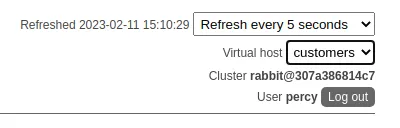
docker exec rabbitmq rabbitmqctl set_permissions -p customers percy ".*" ".*" ".*"After creating this, you should see the new vhost in the top right corner of the management UI.
Basics Of RabbitMQ - Producers, Consumers, Exchanges, and Queues
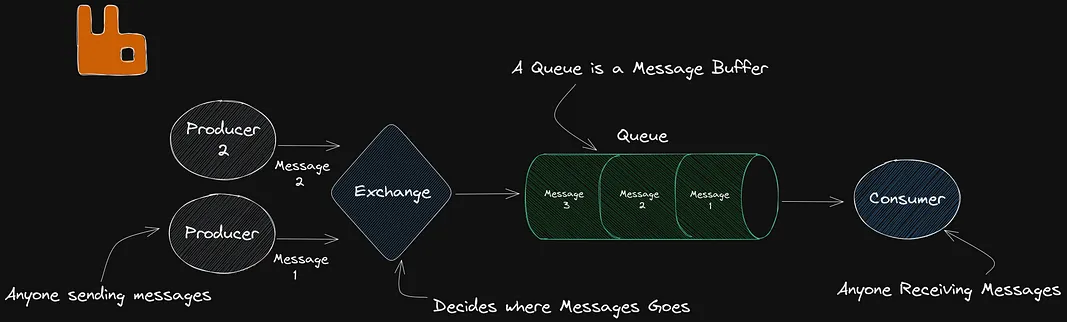
- Producer - Any software that is Sending Messages.
- Consumer - Any software that is Receiving Messages.
- Queue - An Queue accepts a Message, outputs the message, think of it like a large Buffer. Queues are FIFO (First in First Out) meaning that messages are outputted in the order they are inserted into the queue.
- Exchange - An Router, is the place where Producers send messages. The exchange accepts messages and sends them to the correct Queues depending on the type of Exchange and the Bindings (Rules) Applied.
The general idea is that we can use this to send and receive messages between Services. It is worth mentioning the Producers and the Consumers do not have to be on running on the same Host, allowing this to scale very well.
Begin by creating a new project with Go, If you don’t have Go Installed, please install it from here.
In a real go Project setup I would probably use Cobra, but to avoid new users from being confused I will simply create two main packages.
Let’s build a Producer in Go that can start sending messages on a Queue.
Begin by creating a new project for the producer and get the AMQP library that is officially maintained by the RabbitMQ team.
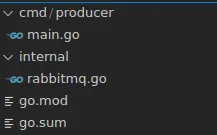
The project will have a cmd folder that will hold all the different services, each being it’s own runnable.
We will also have a internal folder that is used to store shared libraries etc.
mkdir eventdriven
cd eventdriven
mkdir -p cmd/producer
mkdir internal
touch cmd/producer/main.go
touch internal/rabbitmq.go
go mod init programmingpercy.tech/eventdrivenrabbit
go get github.com/rabbitmq/amqp091-goYour folder structure should look like the following.
Let’s add a connection to the RabbitMQ instance first inside internal/rabbitmq.go.
We will create a small helper function that will connect to RabbitMQ using the amqp protocol. We will allow users to specify the credentials and host, also the vhost to connect to.
I will simply return pointers to the connection, which is the network connection, and amqp.Channel which is used to concurrently send messages. Leaving it up to the users to manage the connection.
package internal

import (
 "context"
 "fmt"

 amqp "github.com/rabbitmq/amqp091-go"
)

// RabbitClient is used to keep track of the RabbitMQ connection
type RabbitClient struct {
 // The connection that is used
 conn *amqp.Connection
 // The channel that processes/sends Messages
 ch *amqp.Channel
}

// ConnectRabbitMQ will spawn a Connection
func ConnectRabbitMQ(username, password, host, vhost string) (*amqp.Connection, error) {
 // Setup the Connection to RabbitMQ host using AMQP
 conn, err := amqp.Dial(fmt.Sprintf("amqp://%s:%s@%s/%s", username, password, host, vhost))
 if err != nil {
  return nil, err
 }
 return conn, nil
}

// NewRabbitMQClient will connect and return a Rabbitclient with an open connection
// Accepts a amqp Connection to be reused, to avoid spawning one TCP connection per concurrent client
func NewRabbitMQClient(conn *amqp.Connection) (RabbitClient, error) {
 // Unique, Conncurrent Server Channel to process/send messages
 // A good rule of thumb is to always REUSE Conn across applications
 // But spawn a new Channel per routine
 ch, err := conn.Channel()
 if err != nil {
  return RabbitClient{}, err
 }

 return RabbitClient{
  conn: conn,
  ch:   ch,
 }, nil
}

// Close will close the channel
func (rc RabbitClient) Close() error {
 return rc.ch.Close()
}
A really good rule of thumb is to reuse a single Connection across the whole application and spawn new Channels for concurrent tasks. The reason for this is that a Connection is a TCP connection, while a channel is a multiplexed connection in the assigned TCP Connection. Following that rule of thumb allows for a much more scalable solution.
Let’s import this simple client into the cmd/producer/main.go and try connecting to see what happens.
For now, we will simply connect and sleep for 30 seconds before closing the connection.
package main

import (
 "log"
 "programmingpercy/eventdrivenrabbit/internal"
 "time"
)

func main() {
 conn, err := internal.ConnectRabbitMQ("percy", "secret", "localhost:5672", "customers")

 if err != nil {
  panic(err)
 }
 defer conn.Close()
 client, err := internal.NewRabbitMQClient(conn)
 if err != nil {
  panic(err)
 }
 defer client.Close()

 time.Sleep(30 * time.Second)

 log.Println(client)
}Once we have that in place, run the producer.
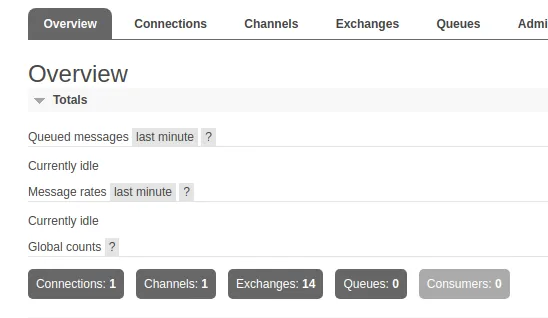
go run cmd/producer/main.goOnce that is running, navigate back to the management UI and see that we can actually see there is now 1 Connection and 1 Channel.
Channels are a really smart way of handling the TCP layer, you can read more about it in the docs. It allows users to reuse an open TCP connection with multiple Channels, instead of opening many TCP connections. It’s a multiplexing technique.
It’s time to start sending data, this is done on said Channel. There is more to a channel than one can probably think, it’s not just a dumb pipeline, there are actually some nifty options that can be configured when creating them.
We can create Queues from the UI, but I like creating them in the Code when Testing things out. In a production environment, I like having a configuration file to declare some basic setup, we will look into that later.
We can create a Queue by Calling the amqp.QueueDeclare, this function has many input parameters that we need to understand to get the wanted behavior of the Queue. The signature looks like this.
func (*amqp.Channel).QueueDeclare(name string, durable bool, autoDelete bool, exclusive bool, noWait bool, args amqp.Table) (amqp.Queue, error)- Name- The name used to reference the Queue. This can actually be empty, in that case, the server will generate a name.
- Durable- If the Queue should be persisted across Broker restarts (RabbitMQ restart)
- AutoDelete- If the Queue should be automatically deleted when the last Consumer leaves
- Exclusive- Only available for the same Connection that created the Queue.
- NoWait- Assumes the Queue is created on the Server
- Arguments- An option to provide user-provided arguments.
To make this a little easier, I will create a wrapper function that accepts the name, durable and autodelete parameters. I will leave the others disabled by default.
// CreateQueue will create a new queue based on given cfgs
func (rc RabbitClient) CreateQueue(queueName string, durable, autodelete bool) error {
 _, err := rc.ch.QueueDeclare(queueName, durable, autodelete, false, false, nil)
 return err
}Let’s update the producer/main.go to execute the new CreateQueue function, I will create a durable queue since I want the Queue handling new customers to be kept alive and persistent, I will also make auto delete set to false.
I will also create a nondurable Queue named customers_test to showcase the difference.
func main() {
 conn, err := internal.ConnectRabbitMQ("percy", "secret", "localhost:5672", "customers")

 if err != nil {
  panic(err)
 }
 defer conn.Close()

 client, err := internal.NewRabbitMQClient(conn)
 if err != nil {
  panic(err)
 }
 defer client.Close()

 if err := client.CreateQueue("customers_created", true, false); err != nil {
  panic(err)
 }
 if err := client.CreateQueue("customers_test", false, true); err != nil {
  panic(err)
 }

 time.Sleep(10 *time.Second)

 log.Println(client)

}After adding that, make sure to execute the producer.
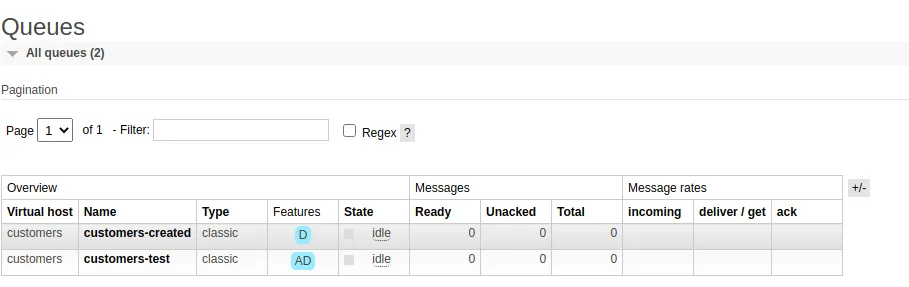
go run cmd/producer/main.goYou can visit the UI and view the Queues that should be both available. Notice that once the program exists, the customers_test queue is NOT DELETED, this is because we have yet to have a Consumer connect. Only Queues that had a consumer connect will be deleted.
For fun, you could try to restart RabbitMQ now and see how customers_test is gone, since it was not marked as durable.
Exploring Exchanges and Bindings
Before we can start sending messages on the Queues, we need to create an Exchange. There are a few defaults already created, but we will create our own to learn a little bit more about them.
The Exchange is a vital part of RabbitMQ, it is the resource to which we send Messages. The exchange’s job is to deliver the messages to the correct Queues.
To start receiving messages on a Queue, that queue needs to be bound to an Exchange, this is called Binding. Binding is basically a routing rule. One important thing to understand is that a Queue can be bound to MULTIPLE Exchanges, which makes it much more clear why there are different Exchange types also.
There are a few different types of exchanges, each with different behavior of how messages are sent.
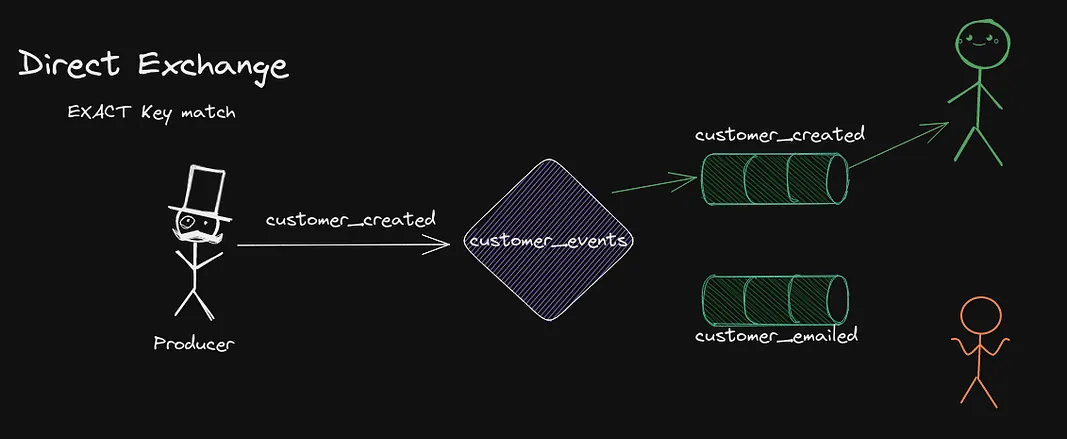
First, we have the most basic one, the Direct exchange. This one is really simple, messages are routed based on their EXACT routing key. In the example image, we see how the message sent to customer_created is only routed by the exchange customer_events into that specific queue. Direct exchanges are very useful when you need to distribute work to a set of workers.
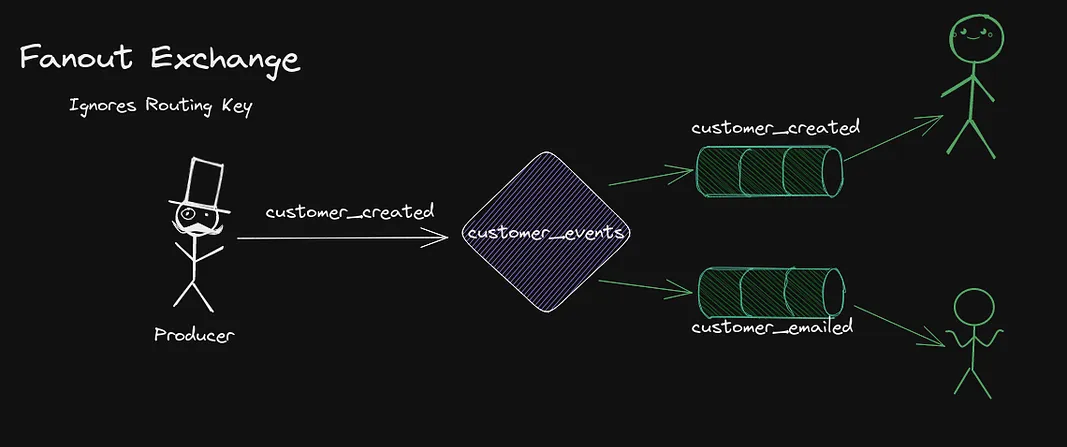
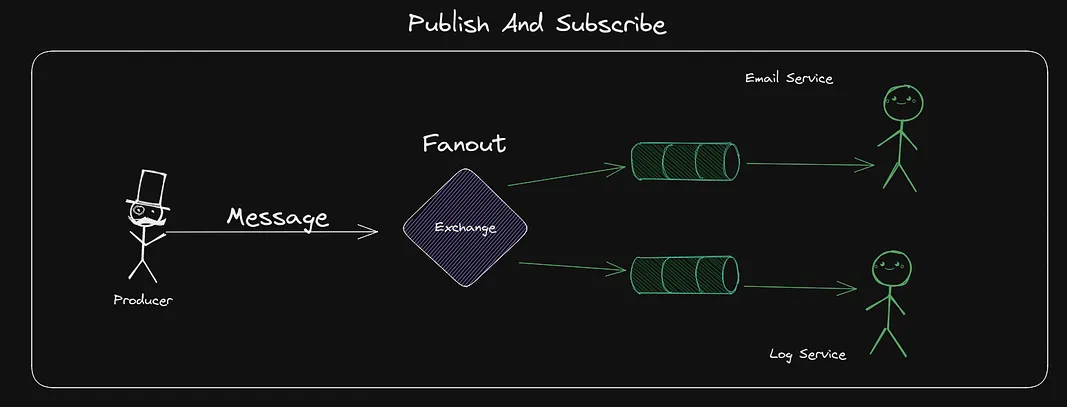
The second type is the Fanout which is used to send messages to ALL bound Queues. Any Queue that is bound to the exchange will get the message, the routing key is simply ignored! This is typically used for broadcasting messages to any parties interested.
Then we have Topic Exchanges, which once are pretty cool. They allow bindings to specify a rule to select subsets of the messages sent depending on their routing key.
The routing keys are delimited . between each word, say customers.eu.stockholm. This might be the routing key for customers from Stockholm Sweden, then we could have a binding that tells the Exchange that a Queue wants those messages, but not customers.us.florida for example.
There are a few special characters, the # means zero or more matches, so for example customers.# would match any routing key beginning with customers..
There is also * which is a specific word at a specific location, for example customers.*.stockholm would only match routing keys that have the first word customers and the third word stockholm.
This is of course very useful to have certain services only ingest messages that are related to a subset of the topics. The example below shows how a new customer is created in February, the Queue customer_created gets the message since the binding is for the customers.created.# rule, the Queue customer_emailed does not receive it since it does not match the binding customers.created.march.

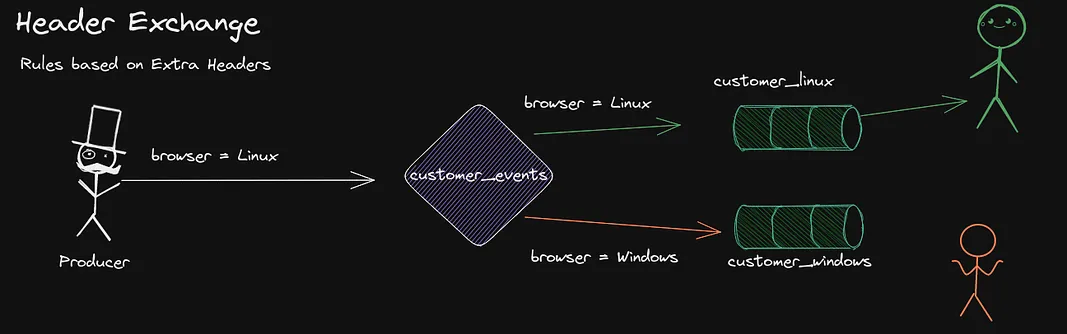
The final exchange is the Header exchange, each Message we send on RabbitMQ has the possibility to add Headers, which is a key value field. This can be really handy when we need to route based on a more advanced level.
Say that we add a browser header which indicates what web browser the users used when registering. We could route any Linux users to a certain queue for instance.
You can either specify multiple headers and that they all have to match, or only that one has to match. This is done in the binding by setting x-match to either all or any.
Let’s stop talking and instead create an Exchange that we can use.
To add an exchange, we will be using the rabbitmqadmin CLI tool that is very similar to rabbitmqctl that we used before.
We use the declare exchange command followed by the name of the exchange, and the type. For this tutorial, I will be using an Topic exchange.
We will create an exchange named customer-events. We also need to specify the vhost and the username and password of our administrator. Remember to set durable to true if you want it to persist restarts.
docker exec rabbitmq rabbitmqadmin declare exchange --vhost=customers name=customer_events type=topic -u percy -p secret durable=trueWe also need to give the user permission to send on this exchange. We set permissions on a certain topic using the set_topic_permissions command. The following command sets the user percy to allow posting on the vhost customers on the exchange customer_events on any routing key starting with customers.
docker exec rabbitmq rabbitmqctl set_topic_permissions -p customers percy customer_events "^customers.*" "^customers.*"Posting on this Exchange right now will not make anything happen, because we have no Bindings between the Queues ad the Exchange.
Any messages sent will be discarded.
Publishing Messages To Exchanges
To start publishing messages, we first need to create the binding between customers_created and customers_test queues and the customers_events exchange.
Open up rabbitmq.go and add a CreateBinding function that adds the binding.
// CreateBinding is used to connect a queue to an Exchange using the binding rule
func (rc RabbitClient) CreateBinding(name, binding, exchange string) error {
 // leaveing nowait false, having nowait set to false wctxill cause the channel to return an error and close if it cannot bind
 // the final argument is the extra headers, but we wont be doing that now
 return rc.ch.QueueBind(name, binding, exchange, false, nil)
}Then inside producer/main.go we add bindings so that we connect everything. We will expect customers to be published on the topic customers.created followed by the country they are from. But the Binding won’t care about the country, only that it matches the pattern.
...
 // Create binding between the customer_events exchange and the customers-created queue
 if err := client.CreateBinding("customers-created", "customers.created.*", "customer_events"); err != nil {
  panic(err)
 }
 // Create binding between the customer_events exchange and the customers-test queue
 if err := client.CreateBinding("customers-test", "customers.*", "customer_events"); err != nil {
  panic(err)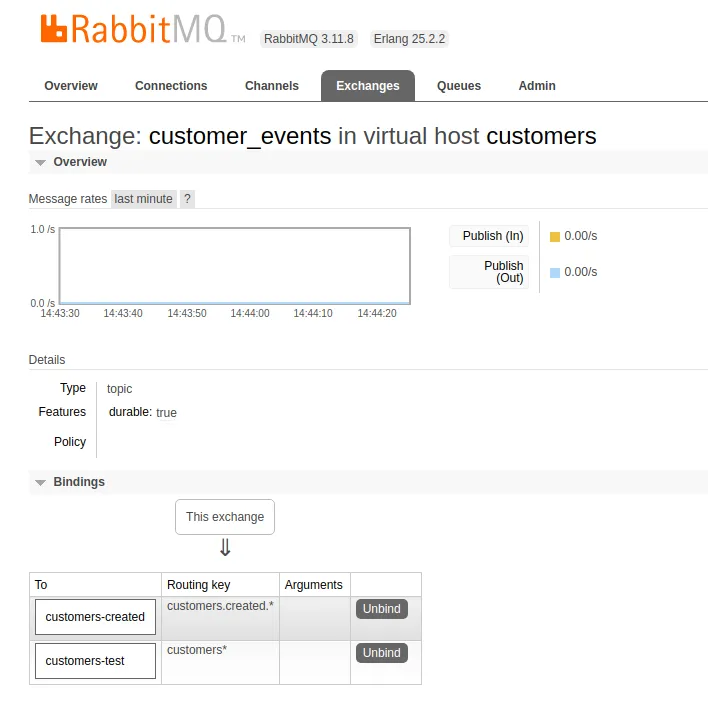
}If you execute the producer once we can visit the management UI and see the bindings that are available.
go run cmd/producer/main.goThen go into the UI and visit your Exchange.
Now that we have a binding, we can look at publishing messages. We begin with the easiest kind.
We create a wrapper function called Send that accepts parameters about what exchange, and routing key to publish to. The function will also accept a context to use and a amqp.Publishing struct.
The amqp.Publishing struct is essential to understand, as it allows us to customize the features and behavior of the message we send.
We will explore them step by step since there are quite a few of them.
// Send is used to publish a payload onto an exchange with a given routingkey
func (rc RabbitClient) Send(ctx context.Context, exchange, routingKey string, options amqp.Publishing) error {
 return rc.ch.PublishWithContext(ctx,
  exchange,   // exchange
  routingKey, // routing key
  // Mandatory is used when we HAVE to have the message return an error, if there is no route or queue then
  // setting this to true will make the message bounce back
  // If this is False, and the message fails to deliver, it will be dropped
  true, // mandatory
  // immediate Removed in MQ 3 or up https://blog.rabbitmq.com/posts/2012/11/breaking-things-with-rabbitmq-3-0§
  false,   // immediate
  options, // amqp publishing struct
 )
}Go back to producer/main.go and we will create a message to send. We will send two messages, one for each queue. This is to showcase the deliveryMode parameter which is really important. If you set it to persistent the message will be saved until some consumer grabs it, but this comes with overhead and longer latency.
If you have things that do not need to be durable, then set them to Transient to increase performance.
Remember, if you send persistent messages, your Queue also needs to be Durable, no point in saving Messages across Restarts, if the Queue itself is gone.
...
// Create context to manage timeout
 ctx, cancel := context.WithTimeout(context.Background(), 5*time.Second)
 defer cancel()
 // Create customer from sweden
 if err := client.Send(ctx, "customer_events", "customers.created.se", amqp091.Publishing{
  ContentType:  "text/plain",       // The payload we send is plaintext, could be JSON or others..
  DeliveryMode: amqp091.Persistent, // This tells rabbitMQ that this message should be Saved if no resources accepts it before a restart (durable)
  Body:         []byte("An cool message between services"),
 }); err != nil {
  panic(err)
 }
 if err := client.Send(ctx, "customer_events", "customers.test", amqp091.Publishing{
  ContentType:  "text/plain",
  DeliveryMode: amqp091.Transient, // This tells rabbitMQ that this message can be deleted if no resources accepts it before a restart (non durable)
  Body:         []byte("A second cool message"),
 }); err != nil {
  panic(err)
 }

 log.Println(client)
}Time to execute the Producer again.
go run cmd/producer/main.goYou should now see one message for each Queue in the UI under the Queue page.

If you want to, you can enter each queue and Consume the messages to view them, but I suggest a restart of RabbitMQ to show the difference between Transient and Persistent.
docker restart rabbitmqAfter restarting try reloading the UI, you should see that the whole customers-test queue is removed, but the customers-created queue actually has the old message left.
This is because Persistent messages are written to disk to survive crashes etc.
We will cover more advanced publishing soo.
Consuming Messages, Acknowledging, Nacking & Requeues
We know how to publish messages, but that does us no good if we cannot Consume the messages in another service.
Consuming is the process of grabbing a message from a Queue.
Let’s create a new binary that we can use to consume messages.
mkdir cmd/consumer
touch cmd/consumer/main.goBefore we start consuming, we will add a Consume function in Rabbitmq.go that will wrap the channel consume function.
When consuming there are a few options to consider.
- Exclusive - If set to true will ensure that this is a SINGLE and the ONLY consumer on that Queue, if False the server will fairly distribute messages amongst consumers.
- AutoAck - When true, will automatically acknowledge delivery, when false will expect the Consumer to call Acknowledge when complete. AutoAck might sound amazing, but it’s tricky, if your consumer fails after Acking a time-consuming process, the message is lost because the server thinks it’s done.
- NoLocal - Not supported in RabbitMQ, AMQP field for avoiding publishing and consuming from the same domain.
- NoWait - Won’t wait for the server to confirm.
Let us add the Consume function to Rabbitmq.go
// Consume is a wrapper around consume, it will return a Channel that can be used to digest messages
// Queue is the name of the queue to Consume
// Consumer is a unique identifier for the service instance that is consuming, can be used to cancel etc
// autoAck is important to understand, if set to true, it will automatically Acknowledge that processing is done
// This is good, but remember that if the Process fails before completion, then an ACK is already sent, making a message lost
// if not handled properly
func (rc RabbitClient) Consume(queue, consumer string, autoAck bool) (<-chan amqp.Delivery, error) {
 return rc.ch.Consume(queue, consumer, autoAck, false, false, false, nil)
}Now that we can consume, let’s fill in the consumer/main.go so that it connects to RabbitMQ and starts Ingesting messages from the queue.
package main

import (
 "log"
 "programmingpercy/eventdrivenrabbit/internal"
)

func main() {

 conn, err := internal.ConnectRabbitMQ("percy", "secret", "localhost:5672", "customers")
 if err != nil {
  panic(err)
 }

 mqClient, err := internal.NewRabbitMQClient(conn)
 if err != nil {
  panic(err)
 }

 messageBus, err := mqClient.Consume("customers_created", "email-service", false)
 if err != nil {
  panic(err)
 }

 // blocking is used to block forever
 var blocking chan struct{}

 go func() {
  for message := range messageBus {
   // breakpoint here
   log.Printf("New Message: %v", message)
  }
 }()

 log.Println("Consuming, to close the program press CTRL+C")
 // This will block forever
 <-blocking

}Running that consumer should print out a Message coming from the publisher once it happens.
Remember, Reuse the Connection, but create a new Channel for each Parallel processing, in our case a second RabbitMQ Client would be created to manage the
customers-testqueue.
go run cmd/consumer/main.goIf you don’t see any messages it is probably due to the fact that you need to run the producer first.
2023/02/12 22:17:24 New Message: {0xc0000b0000 map[] text/plain  2 0     0001-01-01 00:00:00 +0000 UTC    ema
il-service 0 1 false customer_events customers.created.se [65 110 32 99 111 111 108 32 109 101 115 115 97 103
101 32 98 101 116 119 101 101 110 32 115 101 114 118 105 99 101 115]}It might be worth exploring the Struct that is sent over the channel, the amqp.Delivery struct, it gives a good idea of all the fields present.
// Delivery captures the fields for a previously delivered message resident in
// a queue to be delivered by the server to a consumer from Channel.Consume or
// Channel.Get.
type Delivery struct {
 Acknowledger Acknowledger // the channel from which this delivery arrived

 Headers Table // Application or header exchange table

 // Properties
 ContentType     string    // MIME content type
 ContentEncoding string    // MIME content encoding
 DeliveryMode    uint8     // queue implementation use - non-persistent (1) or persistent (2)
 Priority        uint8     // queue implementation use - 0 to 9
 CorrelationId   string    // application use - correlation identifier
 ReplyTo         string    // application use - address to reply to (ex: RPC)
 Expiration      string    // implementation use - message expiration spec
 MessageId       string    // application use - message identifier
 Timestamp       time.Time // application use - message timestamp
 Type            string    // application use - message type name
 UserId          string    // application use - creating user - should be authenticated user
 AppId           string    // application use - creating application id

 // Valid only with Channel.Consume
 ConsumerTag string

 // Valid only with Channel.Get
 MessageCount uint32

 DeliveryTag uint64
 Redelivered bool
 Exchange    string // basic.publish exchange
 RoutingKey  string // basic.publish routing key

 Body []byte
}If you rerun the current consumer, you will see the same message appearing again. This is due to the fact that we never acknowledge that the consumer used the message. This has to be done manually when iterating the messages or using the Auto Acknowledge flag.
When acknowledging we can pass in a multiple flag, which indicates if we acknowledge multiple messages at once, we can leave it to be false.
We can acknowledge or NACK messages, Acknowledge means that everything was fine, Nack means we failed to process it and then the message will be passed back into the queue.
Let’s update the code that consumes messages so that It acknowledges them.
go func() {
  for message := range messageBus {
   // breakpoint here
   log.Printf("New Message: %v", message)
   // Multiple means that we acknowledge a batch of messages, leave false for now
   if err := message.Ack(false); err != nil {
    log.Printf("Acknowledged message failed: Retry ? Handle manually %s\n", message.MessageId)
    continue
   }
   log.Printf("Acknowledged message %s\n", message.MessageId)
  }
}()Rerun the code now, and you should see that the message is printed once again, but upon restarting the message is gone.
This is really useful, to avoid having a consumer take a message, fail while processing it, and then that message would be gone.
To showcase why Auto Ack might be dangerous, here is a modified example where we set Auto Ack to true, but failed during the processing.
// Auto Ack is now True
 messageBus, err := mqClient.Consume("customers-created", "email-service", true)
 if err != nil {
  panic(err)
 }

 // blocking is used to block forever
 var blocking chan struct{}

 go func() {
  for message := range messageBus {
   log.Printf("New Message: %v", message)
   panic("Whops I failed here for some reason")

  }
}() Run the consumer twice, and you will see that it is in fact only accepted at the first execution. This can be dangerous behavior if you don’t manage it properly. That’s why I keep mentioning it!
To handle failures, you can use Nack to tell RabbitMQ that it failed, and you can use the redelivered field to avoid retrying too many times.
Nack accepts a parameter for Requeuing, which is really handy!
Here is an example where we fail the first time a message arrives, Requeue it, and then Ack it the next time it comes.
messageBus, err := mqClient.Consume("customers-created", "email-service", false)
 if err != nil {
  panic(err)
 }

 // blocking is used to block forever
 var blocking chan struct{}

 go func() {
  for message := range messageBus {
   log.Printf("New Message: %v", message)

   if !message.Redelivered {
    // Nack multiple, Set Requeue to true
    message.Nack(false, true)
    continue
   }

   // Multiple means that we acknowledge a batch of messages, leave false for now
   if err := message.Ack(false); err != nil {
    log.Printf("Acknowledged message failed: Retry ? Handle manually %s\n", message.MessageId)
    continue
   }
   log.Printf("Acknowledged message %s\n", message.MessageId)
  }
}()There is more to consider here, right now the handler we use is single-threaded, which means we can only accept one message at a time. We can fix this by implementing a work group that allows for a certain amount of concurrent tasks.
I will add a errgroup, so this approach requires Go 1.2. Using an ErrGroup is super easy, and we can limit it to 10 messages per Consumer.
The errgroup is from the golang.org/x/sync/errgroup package.
.....
// Set a timeout for 15 secs
 ctx := context.Background()
 ctx, cancel := context.WithTimeout(ctx, 15*time.Second)
 defer cancel()
 // Create an Errgroup to manage concurrecy
 g, ctx := errgroup.WithContext(ctx)
 // Set amount of concurrent tasks
 g.SetLimit(10)
 go func() {
  for message := range messageBus {
   // Spawn a worker
   msg := message
   g.Go(func() error {
    log.Printf("New Message: %v", msg)

    time.Sleep(10 * time.Second)
    // Multiple means that we acknowledge a batch of messages, leave false for now
    if err := msg.Ack(false); err != nil {
     log.Printf("Acknowledged message failed: Retry ? Handle manually %s\n", msg.MessageId)
     return err
    }
    log.Printf("Acknowledged message %s\n", msg.MessageId)
    return nil
   })
  }
}()Adding this makes the consumer a little bit better.
The SetLimit is only used for now, there is another way to manage how many messages are consumed, using RabbitMQ which I Recommend called Prefetch, we cover that later
We can update the Publisher to spam a few more messages by wrapping the Send function in a for loop.
// Create context to manage timeout
 ctx, cancel := context.WithTimeout(context.Background(), 5*time.Second)
 defer cancel()
 // Create customer from sweden
 for i := 0; i < 10; i++ {
  if err := client.Send(ctx, "customer_events", "customers.created.se", amqp091.Publishing{
   ContentType:  "text/plain",       // The payload we send is plaintext, could be JSON or others..
   DeliveryMode: amqp091.Persistent, // This tells rabbitMQ that this message should be Saved if no resources accepts it before a restart (durable)
   Body:         []byte("An cool message between services"),
  }); err != nil {
   panic(err)
  }
 }

 if err := client.Send(ctx, "customer_events", "customers.test", amqp091.Publishing{
  ContentType:  "text/plain",
  DeliveryMode: amqp091.Transient, // This tells rabbitMQ that this message can be deleted if no resources accepts it before a restart (non durable)
  Body:         []byte("A second cool message"),
 }); err != nil {
  panic(err)
 }

 log.Println(client)
}Try it out and see that the Consumer now accepts multiple messages, or even try spawning multiple consumers to play some.
Noticed that the Producer exits right away after sending the message? Currently, the Send function does not wait for any confirmation from the server. Sometimes, we might want to block until the server confirms that it has received the message.
Happily, we can! We need to change the Publish function we use in RabbitMQ into PublishWithDeferredConfirmWithContext which will return an object that we can use to Wait for the server to acknowledge.
This object will always be NIL unless the Channel is put into Confirm the mode, setting it into Confirm mode will make the server send an acknowledgment when it receives the published message.
Inside Rabbitmq.go let’s change the Publish method and add a Wait.
// Send is used to publish a payload onto an exchange with a given routingkey
func (rc RabbitClient) Send(ctx context.Context, exchange, routingKey string, options amqp.Publishing) error {
 // PublishWithDeferredConfirmWithContext will wait for server to ACK the message
 confirmation, err := rc.ch.PublishWithDeferredConfirmWithContext(ctx,
  exchange,   // exchange
  routingKey, // routing key
  // Mandatory is used when we HAVE to have the message return an error, if there is no route or queue then
  // setting this to true will make the message bounce back
  // If this is False, and the message fails to deliver, it will be dropped
  true, // mandatory
  // immediate Removed in MQ 3 or up https://blog.rabbitmq.com/posts/2012/11/breaking-things-with-rabbitmq-3-0§
  false,   // immediate
  options, // amqp publishing struct
 )
 if err != nil {
  return err
 }
 // Blocks until ACK from Server is receieved
 log.Println(confirmation.Wait())
 return nil
}Let’s also update the NewRabbitMQClient to always set the channel into Confirm mode.
// NewRabbitMQClient will connect and return a Rabbitclient with an open connection
// Accepts a amqp Connection to be reused, to avoid spawning one TCP connection per concurrent client
func NewRabbitMQClient(conn *amqp.Connection) (RabbitClient, error) {
 // Unique, Conncurrent Server Channel to process/send messages
 // A good rule of thumb is to always REUSE Conn across applications
 // But spawn a new Channel per routine
 ch, err := conn.Channel()
 if err != nil {
  return RabbitClient{}, err
 }
 // Puts the Channel in confirm mode, which will allow waiting for ACK or NACK from the receiver
 if err := ch.Confirm(false); err != nil {
  return RabbitClient{}, err
 }

 return RabbitClient{
  conn: conn,
  ch:   ch,
 }, nil
}A better approach to Rabbitmq.go could be to add a NewChannel function and then have each function accept a Channel as an input parameter.
Running the program now, and you should see that the publisher.go prints TRUE each time a message is confirmed by the server, notice that this is not the same as the Consumer ACK. We only wait for the server to acknowledge that the published message is accepted.
Publish And Subscribe (PubSub)
Up until this point we have been using FIFO Queues(First in First out). This means each message is only sent to one Consumer.
In a publish and subscribe schema, you will want each consumer to receive the same message.
Everything we learned about bindings etc is still true and used in the same way. We can use a Fanout exchange (which pushes messages to all Queues bound) regardless of the Queue name.
The idea is that you let each Consumer create an Unnamed Queue, an unnamed queue will get a randomly generated unique name by the RabbitMQ server.
This is a great example when creating queues in the code is suitable
It’s possible that we would want to send customers_event to multiple services. Say that we would want an email service and a logging service that logs each customer event.
Let’s build that. (Since this is a tutorial only to learn RabbitMQ we will simply start the Consumer up in two instances).
We start by removing the exchange we have since it is the wrong Type. We also create a new one, but with Fanout as the type. This time we don’t specify a certain prefix for the permission, but give it full access.
docker exec rabbitmq rabbitmqadmin delete exchange name=customer_events --vhost=customers -u percy -p secret
docker exec rabbitmq rabbitmqadmin declare exchange --vhost=customers name=customer_events type=fanout -u percy -p secret durable=true
docker exec rabbitmq rabbitmqctl set_topic_permissions -p customers percy customer_events ".*" ".*"Since we won’t know the Queue name when we create an unnamed one with the current code, we need to modify it. Let’s return the Queue information returned from CreateQueue in the RabbitMQ package. That object will contain the randomly created name.
// CreateQueue will create a new queue based on given cfgs
func (rc RabbitClient) CreateQueue(queueName string, durable, autodelete bool) (amqp.Queue, error) {
 q, err := rc.ch.QueueDeclare(queueName, durable, autodelete, false, false, nil)
 if err != nil {
  return amqp.Queue{}, nil
 }

 return q, nil
}Time to update the Publisher, earlier in the tutorial we created the Channel bindings in the Publisher. This doesn’t really make sense according to me, it was only for the purpose of not moving too fast and still showcasing the functionality.
It makes much more sense for the Consumer to declare the bindings, since it relates to the consumer. It makes even less sense now with Publish And Subscribes where the number and paths of Consumers are probably unknown. Let’s update publisher.go making it much smaller.
package main

import (
 "context"
 "log"
 "programmingpercy/eventdrivenrabbit/internal"
 "time"

 "github.com/rabbitmq/amqp091-go"
)

func main() {
 conn, err := internal.ConnectRabbitMQ("percy", "secret", "localhost:5672", "customers")

 if err != nil {
  panic(err)
 }
 defer conn.Close()
 client, err := internal.NewRabbitMQClient(conn)
 if err != nil {
  panic(err)
 }
 defer client.Close()

 // Create context to manage timeout
 ctx, cancel := context.WithTimeout(context.Background(), 5*time.Second)
 defer cancel()
 // Create customer from sweden
 for i := 0; i < 10; i++ {
  if err := client.Send(ctx, "customer_events", "customers.created.se", amqp091.Publishing{
   ContentType:  "text/plain",       // The payload we send is plaintext, could be JSON or others..
   DeliveryMode: amqp091.Persistent, // This tells rabbitMQ that this message should be Saved if no resources accepts it before a restart (durable)
   Body:         []byte("An cool message between services"),
  }); err != nil {
   panic(err)
  }
 }

 log.Println(client)
}We will update the consumer.go to create a Queue without a name, create the binding, and then start consuming that Queue.
package main

import (
 "context"
 "log"
 "programmingpercy/eventdrivenrabbit/internal"
 "time"

 "golang.org/x/sync/errgroup"
)

func main() {

 conn, err := internal.ConnectRabbitMQ("percy", "secret", "localhost:5672", "customers")
 if err != nil {
  panic(err)
 }

 mqClient, err := internal.NewRabbitMQClient(conn)
 if err != nil {
  panic(err)
 }

 // Create Unnamed Queue which will generate a random name, set AutoDelete to True
 queue, err := mqClient.CreateQueue("", true, true)
 if err != nil {
  panic(err)
 }
 // Create binding between the customer_events exchange and the new Random Queue
 // Can skip Binding key since fanout will skip that rule
 if err := mqClient.CreateBinding(queue.Name, "", "customer_events"); err != nil {
  panic(err)
 }

 messageBus, err := mqClient.Consume(queue.Name, "email-service", false)
 if err != nil {
  panic(err)
 }
 // blocking is used to block forever
 var blocking chan struct{}
 // Set a timeout for 15 secs
 ctx := context.Background()
 ctx, cancel := context.WithTimeout(ctx, 15*time.Second)
 defer cancel()
 // Create an Errgroup to manage concurrecy
 g, ctx := errgroup.WithContext(ctx)
 // Set amount of concurrent tasks
 g.SetLimit(10)
 go func() {
  for message := range messageBus {
   // Spawn a worker
   msg := message
   g.Go(func() error {
    log.Printf("New Message: %v", msg)

    time.Sleep(10 * time.Second)
    // Multiple means that we acknowledge a batch of messages, leave false for now
    if err := msg.Ack(false); err != nil {
     log.Printf("Acknowledged message failed: Retry ? Handle manually %s\n", msg.MessageId)
     return err
    }
    log.Printf("Acknowledged message %s\n", msg.MessageId)
    return nil
   })
  }
 }()

 log.Println("Consuming, to close the program press CTRL+C")
 // This will block forever
 <-blocking

}This setup can be used to showcase Pub/Sub properly, we can spawn two consumers and then the Publisher. It will show how all Consumers see all the messages.
We now know how to use regular Queues and PubSub.
There is one more thing left, a third very common scenario is an RPC-based paradigm.
Remote Procedure Call (RPC) With RabbitMQ
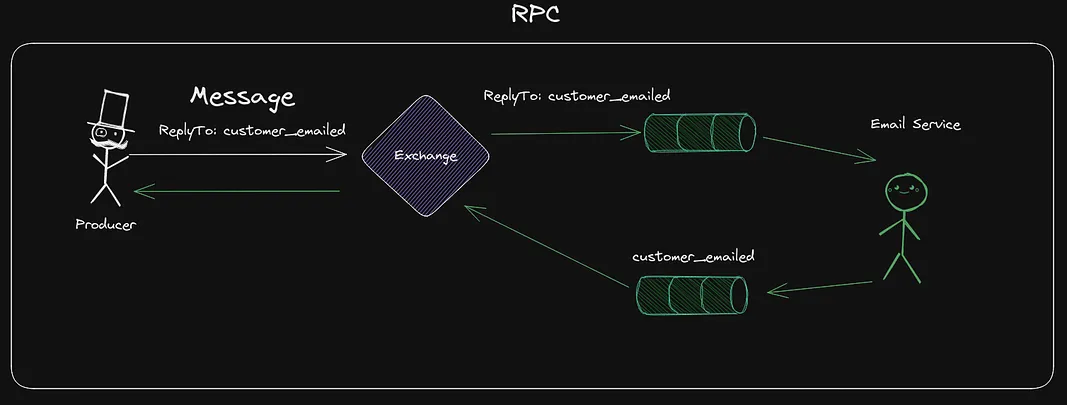
Sometimes, we want to have some callbacks on messages. Say that the Producer would like to know when the customer has emailed.
This is common and easily fixed. We can set a field named ReplyTo in the messages, this can be used to tell the Consumer to reply with a response on a certain Queue.
We might need to know which message the callback is related to, so we can also add in a correlationID which can be used to understand what request the response is related to.
Begin by creating a new Exchange with Direct type. I’ll name it customer_callbacks. The Direct type works well here.
docker exec rabbitmq rabbitmqadmin declare exchange --vhost=customers name=customer_callbacks type=direct -u percy -p secret durable=true
docker exec rabbitmq rabbitmqctl set_topic_permissions -p customers percy customer_callbacks ".*" ".*"The first thing we need to understand is one important best practice at this time.
Having a callback will require that the same service both Publishes and Consumes messages, and it is nothing wrong with that.
One famous rule is, however, to reuse connections for multiple channels. BUT NEVER PUBLISH AND CONSUME ON THE SAME CONNECTION.
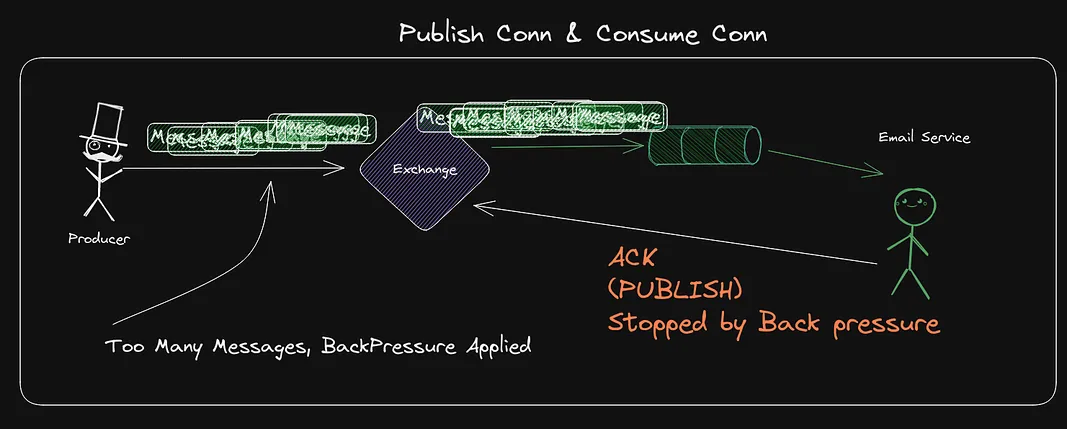
Imagine if you have an service that is both producing and consuming and you are doing it on the same connection, then imagine that the service is consuming a big amount of messages. If it is more messages than the service manages to handle, so messages starts stacking up. RabbitMQ May then apply back pressure and start blocking TCP connections from sending, and guess what, ACK messages have to be sent to handle messages. All of a sudden, your code cannot ACK messages since the connection is blocked. This can lead to delays.
The golden rules are
- Reuse connection in your application
- One Connection for Consuming, One for Publishing
- Spawn new Channels for each Goroutine
Let’s update the producer.go to start two connections, one for publishing and one for consuming. We will also create an unnamed queue and bind it to the exchange, then we will consume those responses.
We will also add replyTo in the message, which tells the consumer where to reply, and the correlationId which explains which unique event the messages relate to.
package main

import (
 "context"
 "fmt"
 "log"
 "programmingpercy/eventdrivenrabbit/internal"
 "time"

 "github.com/rabbitmq/amqp091-go"
)

func main() {
 conn, err := internal.ConnectRabbitMQ("percy", "secret", "localhost:5672", "customers")
 if err != nil {
  panic(err)
 }
 defer conn.Close()
 // Never use the same Connection for Consume and Publish
 consumeConn, err := internal.ConnectRabbitMQ("percy", "secret", "localhost:5672", "customers")
 if err != nil {
  panic(err)
 }
 defer consumeConn.Close()

 client, err := internal.NewRabbitMQClient(conn)
 if err != nil {
  panic(err)
 }
 defer client.Close()

 consumeClient, err := internal.NewRabbitMQClient(consumeConn)
 if err != nil {
  panic(err)
 }
 defer consumeClient.Close()

 // Create Unnamed Queue which will generate a random name, set AutoDelete to True
 queue, err := consumeClient.CreateQueue("", true, true)
 if err != nil {
  panic(err)
 }

 if err := consumeClient.CreateBinding(queue.Name, queue.Name, "customer_callbacks"); err != nil {
  panic(err)
 }

 messageBus, err := consumeClient.Consume(queue.Name, "customer-api", true)
 if err != nil {
  panic(err)
 }
 go func() {
  for message := range messageBus {
   log.Printf("Message Callback %s\n", message.CorrelationId)
  }
 }()
 // Create context to manage timeout
 ctx, cancel := context.WithTimeout(context.Background(), 5*time.Second)
 defer cancel()
 // Create customer from sweden
 for i := 0; i < 10; i++ {
  if err := client.Send(ctx, "customer_events", "customers.created.se", amqp091.Publishing{
   ContentType:  "text/plain",       // The payload we send is plaintext, could be JSON or others..
   DeliveryMode: amqp091.Persistent, // This tells rabbitMQ that this message should be Saved if no resources accepts it before a restart (durable)
   Body:         []byte("An cool message between services"),
   // We add a REPLYTO which defines the
   ReplyTo: queue.Name,
   // CorrelationId can be used to know which Event this relates to
   CorrelationId: fmt.Sprintf("customer_created_%d", i),
  }); err != nil {
   panic(err)
  }
 }
 var blocking chan struct{}

 log.Println("Waiting on Callbacks, to close the program press CTRL+C")
 // This will block forever
 <-blocking
}The consumer needs to be updated so that it also uses two connections. When we are done processing a message, we will add it so that we send out a response on the replyTo queue. Again, we have to use two different connections, one for consuming and one for publishing.
package main

import (
 "context"
 "log"
 "programmingpercy/eventdrivenrabbit/internal"
 "time"

 "github.com/rabbitmq/amqp091-go"
 "golang.org/x/sync/errgroup"
)

func main() {

 conn, err := internal.ConnectRabbitMQ("percy", "secret", "localhost:5672", "customers")
 if err != nil {
  panic(err)
 }
 defer conn.Close()

 publishConn, err := internal.ConnectRabbitMQ("percy", "secret", "localhost:5672", "customers")
 if err != nil {
  panic(err)
 }
 defer publishConn.Close()

 mqClient, err := internal.NewRabbitMQClient(conn)
 if err != nil {
  panic(err)
 }

 publishClient, err := internal.NewRabbitMQClient(publishConn)
 if err != nil {
  panic(err)
 }
 // Create Unnamed Queue which will generate a random name, set AutoDelete to True
 queue, err := mqClient.CreateQueue("", true, true)
 if err != nil {
  panic(err)
 }
 // Create binding between the customer_events exchange and the new Random Queue
 // Can skip Binding key since fanout will skip that rule
 if err := mqClient.CreateBinding(queue.Name, "", "customer_events"); err != nil {
  panic(err)
 }

 messageBus, err := mqClient.Consume(queue.Name, "email-service", false)
 if err != nil {
  panic(err)
 }
 // blocking is used to block forever
 var blocking chan struct{}
 // Set a timeout for 15 secs
 ctx := context.Background()
 ctx, cancel := context.WithTimeout(ctx, 15*time.Second)
 defer cancel()
 // Create an Errgroup to manage concurrecy
 g, ctx := errgroup.WithContext(ctx)
 // Set amount of concurrent tasks
 g.SetLimit(10)
 go func() {
  for message := range messageBus {
   // Spawn a worker
   msg := message
   g.Go(func() error {
    // Multiple means that we acknowledge a batch of messages, leave false for now
    if err := msg.Ack(false); err != nil {
     log.Printf("Acknowledged message failed: Retry ? Handle manually %s\n", msg.MessageId)
     return err
    }

    log.Printf("Acknowledged message, replying to %s\n", msg.ReplyTo)

    // Use the msg.ReplyTo to send the message to the proper Queue
    if err := publishClient.Send(ctx, "customer_callbacks", msg.ReplyTo, amqp091.Publishing{
     ContentType:   "text/plain",      // The payload we send is plaintext, could be JSON or others..
     DeliveryMode:  amqp091.Transient, // This tells rabbitMQ to drop messages if restarted
     Body:          []byte("RPC Complete"),
     CorrelationId: msg.CorrelationId,
    }); err != nil {
     panic(err)
    }
    return nil
   })
  }
 }()

 log.Println("Consuming, to close the program press CTRL+C")
 // This will block forever
 <-blocking

}Go ahead and try the code, you should see that the producer receives the RPC responses and prints them out.
Note that this code can be cleaned up, but this tutorial focuses on how RabbitMQ works, not clean code.
Prefetch Limit To Limit Amount Of Messages Sent
Remember that we limited the amount of work done by the consumer before by using an errgroup? This was a soft limit, a limit imposed by the code, but RabbitMQ can still send more messages out to the consumer.
There is a better fix to this, well, a combination should probably be used if you want your consumer to handle messages concurrently.
The AMQP protocol allows us to apply a Prefetch limit. This tells the RabbitMQ server how many unacknowledged messages can be sent to the channel at a time. This way we can add a hard limit.
This is done by applying a set of Quality Of Service rules (QOS). Let’s add a method in rabbitmq.go that applies the three available rules.
There are the following parameters
- Prefetch Count - How many unacknowledged messages the server can send.
- Prefetch Size - How many bytes of unacknowledged messages the server can send.
- Global - A flag that determines if the rule should be applied on the connection, or globally
// ApplyQos is used to apply qouality of service to the channel
// Prefetch count - How many messages the server will try to keep on the Channel
// prefetch Size - How many Bytes the server will try to keep on the channel
// global -- Any other Consumers on the connection in the future will apply the same rules if TRUE
func (rc RabbitClient) ApplyQos(count, size int, global bool) error {
 // Apply Quality of Serivce
 return rc.ch.Qos(
  count,
  size,
  global,
 )
}Then inside consumer.go we can simply call this and apply the number of messages we want to allow.
// Create an Errgroup to manage concurrecy
 g, ctx := errgroup.WithContext(ctx)
 // Set amount of concurrent tasks
 g.SetLimit(10)

 // Apply Qos to limit amount of messages to consume
 if err := mqClient.ApplyQos(10, 0, true); err != nil {
  panic(err)
 }
 go func() {
for message := range messageBus {Securing the connection with TLS
It’s the year 2023, before going into production I think it is very safe to say that we should encrypt the traffic.
RabbitMQ has a GitHub repository to help us create a rootCA and the certificates we need, which is the first step in starting to encrypt the traffic.
We need to clone this repository and execute the make file inside that will generate the files we need.
git clone https://github.com/rabbitmq/tls-gen tls-gen
cd tls-gen/basic
make PASSWORD=
make verifyAll the generated files will appear in a new folder called result. For this to work in Docker, we need to change their permissions.
sudo chmod 644 tls-gen/basic/result/*We need to delete the RabbitMQ container that is running, we will need to create a new one with a configuration file.
sudo docker container rm -f rabbitmqThe configuration file is called rabbitmq.conf and should be placed inside /etc/rabbitmq/rabbitmq.conf in the container.
This configuration file can be used to configure much more than just TLS, but we will stick to TLS for now. Create a new file with the correct name in the root of the project.
cd ../../ # Go to root of Project
touch rabbitmq.confWe need to mount the configuration file into the docker when we start the container. We will also mount the certificates generated from the TLS-Gen tooling into /certs so that the container can find them. Notice that both ports have been decreased by one, which is the standard in the RabbitMQ protocol.
docker run -d --name rabbitmq -v "$(pwd)"/rabbitmq.conf:/etc/rabbitmq/rabbitmq.conf:ro -v "$(pwd)"/tls-gen/basic/result:/certs -p 5671:5671 -p 15671:15671 rabbitmq:3.11-managementOnce that is done, we can start adding TLS configurations to this container.
In the rabbitmq.conf let us add the PATH to the certificates and the root ca. My computer is named blackbox, you need to replace the certs names with the names generated by your computer.
# Disable NON TCP
listeners.tcp = none
# TCP port
listeners.ssl.default = 5671
# SSL Certs
ssl_options.cacertfile = /certs/ca_certificate.pem
ssl_options.certfile   = /certs/server_blackbox_certificate.pem
ssl_options.keyfile    = /certs/server_blackbox_key.pem
# Peer verification
ssl_options.verify     = verify_peer
ssl_options.fail_if_no_peer_cert = trueThen restart RabbitMQ
docker restart rabbitmqTo verify that everything works, you can view the docker logs with docker logs rabbitmq. Search for the logs about listeners.
2023-02-19 07:35:15.566316+00:00 [info] <0.738.0> Ready to start client connection listeners
2023-02-19 07:35:15.567418+00:00 [info] <0.885.0> started TLS (SSL) listener on [::]:5671Now, the old programs won’t work anymore. It tries to connect using without TLS, so let’s fix that.
The programs need to be updated to use client certificates. Let’s add it as input to the ConnectRabbitMQ function.
// ConnectRabbitMQ will spawn a Connection
func ConnectRabbitMQ(username, password, host, vhost, caCert, clientCert, clientKey string) (*amqp.Connection, error) {
 ca, err := os.ReadFile(caCert)
 if err != nil {
  return nil, err
 }
 // Load the key pair
 cert, err := tls.LoadX509KeyPair(clientCert, clientKey)
 if err != nil {
  return nil, err
 }
 // Add the CA to the cert pool
 rootCAs := x509.NewCertPool()
 rootCAs.AppendCertsFromPEM(ca)

 tlsConf := &tls.Config{
  RootCAs:      rootCAs,
  Certificates: []tls.Certificate{cert},
 }
 // Setup the Connection to RabbitMQ host using AMQPs and Apply TLS config
 conn, err := amqp.DialTLS(fmt.Sprintf("amqps://%s:%s@%s/%s", username, password, host, vhost), tlsConf)
 if err != nil {
  return nil, err
 }
 return conn, nil
}Please notice that we now use amqps protocol. The certificate paths are absolute paths, let’s update the consumer and producer to insert these, I will use hard-coded values for now, but you should not do that in a real application.
conn, err := internal.ConnectRabbitMQ("percy", "secret", "localhost:5671", "customers",
  "/home/pp/development/blog/event-driven-rabbitmq/tls-gen/basic/result/ca_certificate.pem",
  "/home/pp/development/blog/event-driven-rabbitmq/tls-gen/basic/result/client_blackbox_certificate.pem",
  "/home/pp/development/blog/event-driven-rabbitmq/tls-gen/basic/result/client_blackbox_key.pem",
 )
 if err != nil {
  panic(err)
 }
 defer conn.Close()
 // Never use the same Connection for Consume and Publish
 consumeConn, err := internal.ConnectRabbitMQ("percy", "secret", "localhost:5671", "customers",
  "/home/pp/development/blog/event-driven-rabbitmq/tls-gen/basic/result/ca_certificate.pem",
  "/home/pp/development/blog/event-driven-rabbitmq/tls-gen/basic/result/client_blackbox_certificate.pem",
  "/home/pp/development/blog/event-driven-rabbitmq/tls-gen/basic/result/client_blackbox_key.pem",
 )
defer consumeConn.Close()BAM! Amazing, we got TLS.
Try running either the producer or consumer, and then watch the docker logs using docker logs rabbitmq.
2023-02-19 07:49:53.015732+00:00 [error] <0.948.0> Error on AMQP connection <0.948.0> (172.17.0.1:49066 -> 172.17.0.2:5671, state: starting):
2023-02-19 07:49:53.015732+00:00 [error] <0.948.0> PLAIN login refused: user 'percy' - invalid credentialsRight, we removed the Vhost, the user, the exchange, and everything when we deleted the docker since we don’t persist the storage.
This is great because that brings us to the next and final step of this tutorial, default configurations.
RabbitMQ Configurations And Management
Trust me, you don’t want to manage a rabbitMQ for multiple users using the AdminCLI, because, well it is a lot of work repeating stuff if you reset the cluster for some reason.
There is support for inserting definition files, JSON files that define users, vhosts, permissions, queues and exchanges, and even bindings.
They are really easy to use, let’s add my old user and give it permission to write and read on the customers vhost, and add a basic exchange.
Before that, we need a password hash, which can be a bit trickier than imagined. It depends on the RabbitMQ setup you have and which algorithm you have configured. The default one is SHA256.
I found a great bash script on stackoverflow to generate it for me. Create a file named encodepassword.sh and replace secret with the password, you wanna encode.
#!/bin/bash

function encode_password()
{
    SALT=$(od -A n -t x -N 4 /dev/urandom)
    PASS=$SALT$(echo -n $1 | xxd -ps | tr -d '\n' | tr -d ' ')
    PASS=$(echo -n $PASS | xxd -r -p | sha256sum | head -c 128)
    PASS=$(echo -n $SALT$PASS | xxd -r -p | base64 | tr -d '\n')
    echo $PASS
}

encode_password "secret"Run the script bash encodepassword.sh and store the Hash.
Update rabbitmq.conf to include the field load_definitions which can be used to load definition files at start-up.
log.console = true
# Disable NON TCP
listeners.tcp = none
# TCP port
listeners.ssl.default = 5671
# SSL Certs
ssl_options.cacertfile = /certs/ca_certificate.pem
ssl_options.certfile   = /certs/server_blackbox_certificate.pem
ssl_options.keyfile    = /certs/server_blackbox_key.pem
# Peer verification
ssl_options.verify     = verify_peer
ssl_options.fail_if_no_peer_cert = true
# Load definitions file
load_definitions = /etc/rabbitmq/rabbitmq_definitions.jsonI will point toward a file named /etc/rabbitmq/rabbitmq_definitions.json.
Create a file named rabbitmq_definitions.json in the root of the project, and fill it with the following JSON. At this point, I don’t think we need to cover the JSON fields, everything should be understandable and clear what is what. It is very similar to the CLI commands we ran before.
The following definition file creates the two exchanges we have customer_events and the customer_callbacks. The current code will generate its own Queues, so we just define an in the example for fun.
{
    "users": [
        {
            "name": "percy",
            "password_hash": "dPOoDgfw31kjUy41HSmqQR+X2Q9PCA5fD++fbxQCgPvKZmnX",
            "tags": "administrator"
        }
    ],
    "vhosts": [
        {
            "name": "/"
        },{
            "name": "customers"
        }
    ],
    "permissions": [
        {
            "user": "percy",
            "vhost": "customers",
            "configure": ".*",
            "write": ".*",
            "read": ".*"
        }
    ],
    "exchanges": [
        {
            "name": "customer_events",
            "vhost": "customers",
            "type": "fanout",
            "durable": true,
            "auto_delete": false,
            "internal": false,
            "arguments": {}
        },
        {
            "name": "customer_callbacks",
            "vhost": "customers",
            "type": "direct",
            "durable": true,
            "auto_delete": false,
            "internal": false,
            "arguments": {}
        }
    ],
    "queues": [
        {
            "name": "customers_created",
            "vhost": "customers",
            "durable": true,
            "auto_delete": false,
            "arguments": {}
        }
    ],
    "bindings": [
        {
            "source": "customers_events",
            "vhost": "customers",
            "destination": "customers_created",
            "destination_type": "queue",
            "routing_key": "customers.created.*",
            "arguments": {}
        }
    ]
}Once both files are in place, delete the old docker, and restart a new one, but this time we add a third mount for the definitions.
docker run -d --name rabbitmq -v "$(pwd)"/rabbitmq_definitions.json:/etc/rabbitmq/rabbitmq_definitions.json:ro -v "$(pwd)"/rabbitmq.conf:/etc/rabbitmq/rabbitmq.conf:ro -v "$(pwd)"/tls-gen/basic/result:/certs -p 5671:5671 -p 15672:15672 rabbitmq:3.11-managementAfter running that, verify the logs that they print out creating the user.
2023-02-19 08:17:53.467218+00:00 [info] <0.867.0> Started message store of type persistent for vhost 'customers'
2023-02-19 08:17:53.467310+00:00 [info] <0.867.0> Recovering 0 queues of type rabbit_classic_queue took 3ms
2023-02-19 08:17:53.467348+00:00 [info] <0.867.0> Recovering 0 queues of type rabbit_quorum_queue took 0ms
2023-02-19 08:17:53.467371+00:00 [info] <0.867.0> Recovering 0 queues of type rabbit_stream_queue took 0ms
2023-02-19 08:17:53.468487+00:00 [info] <0.698.0> Importing concurrently 1 permissions...
2023-02-19 08:17:53.469946+00:00 [info] <0.680.0> Successfully set permissions for 'percy' in virtual host 'customers' to '.*', '.*', '.*'Once that’s done, try running the consumer and producer and you should see that everything now works as expected. The only difference is that we now create the infrastructure in RabbitMQ using a configuration instead of using the CLI, and the traffic is encrypted.
Conclusion
Sadly, this is the end of this long, but thrilling and exciting adventure with RabbitMQ.
Let’s take a look at what we learned.
We have learned how to configure RabbitMQ with virtual hosts, and how to create users with permissions on those vhosts. We have also learned how to produce and consume messages on Queues and Exchanges.
You should be familiar with all the resources, such as Queues, Exchanges and Bindings.
We have also covered how to create a Publish and Subscribe schema, a RPC pattern and regular Work queues.
Hopefully, it is clear how to use Connections and Channels and the difference between them. The connection is a TCP connection, and a channel is a multiplexed virtual channel over a connection. Reuse Connections in the same software, but create new channels for each parallel process.
We learned never to produce and consume on the same connections.
And we have covered how to setup TLS and how to add definitions for predefined configurations for RabbitMQ.
I really hope you enjoyed this tutorial, and you can find all the code used on GitHub.
Feel free to reach out to me with any questions!
If you enjoyed my writing, please support future articles by buying me an Coffee