Learning Docker — The Easy Way
A tutorial which covers the basics of Docker and teaches you how to containerize your applications.
by Percy Bolmér, September 8, 2022
Docker has taken over the Software industry, becoming a de facto standard. I think most of us can agree on this.
Not only does Docker make the life of developers easier but also for operations and regular users. Not many years ago installing a piece of software could be troublesome, it took hours to install and set up stuff like databases, etc. Today, it is as simple as clicking Start on Docker Desktop or running a one-line command using Docker CLI.
This article is a tutorial on how to use Docker and about learning the basics to get started.
What is Docker
Docker is used for building shippable images that can be shipped and executed on any system that has docker installed. This is possible by containerizing software, a set of software that has everything needed to run.
This containerized software is possible to be run by anyone who possesses it. Imagine that you install PostgreSQL on a Ubuntu machine and configure it to work, it takes time, but with docker, you can containerize that installation and operating system, and the next time you need it, simply start it up.
Docker images are not Virtual Machines, but rather self-contained units of software, and that self-contained unit contains everything that it needs to be running. And when I say everything, I mean everything, the operating system, dependencies, networking, configurations.
If you are looking for a more in-depth explanation of how it works, I recommend reading the official docker docs for the details.
Need I Say docker is coded in Go?
Installing Docker
Download and Install Docker Engine by visiting their download website.
Docker-desktop is now available for all platforms and can act as a very nice gateway into learning and maintaining your docker engine.
If you are using Linux, don’t forget to run
curl -fsSL https://download.docker.com/linux/ubuntu/gpg | sudo gpg --dearmor -o /usr/share/keyrings/docker-archive-keyring.gpgThis will download the docker cryptographic key and add it as a trusted source.
If you are using Linux, you will also want to add your user to the docker group, which allows you to run docker without sudo.
sudo groupadd docker
sudo usermod -aG docker $USER
Images & Containers

All docker usage begins with an Image. Your image is the box that contains everything that is needed to run the operating system and other dependencies. Consider it a box that has been stuffed with all the files that are needed for that box to be started.
A Docker container image is a lightweight, standalone, executable package of software that includes everything needed to run an application: code, runtime, system tools, system libraries, and settings.
In docker, we often talk about two types of Images.
- Base Image — The start of every image, the image known as scratch, this is an image without anything, it is 0 bytes in size.
- Parent Image — When creating an Image, we define a parent to use as a starting point, everything from the parent will be present in the new image.
Images are built in docker with the docker build command. When building an image you need to specify a tag that is often related to a version, system architecture used, or parent image. We also need to give it a name, name, and tag separated by :.
An example build command looks like this
docker build -t myImage:1.0 .The dot, in the end, is not a typo, the last parameter given when building an image is the context. More on the context later.
You can view what images you have using the Docker CLI tool.
docker images
As you can see you will be presented with all the current images located on your machine. You will see the repository that the image is from, and the tag is the version tag. Image id is an auto-generated ID that can be used to refer to a certain image. The date it was created, and the total size of the whole image are also present.
The image is used by docker to run it into a container. Whenever we use docker run to start a container, it uses the image and turns that into a container. A container is a started image.
Think of the image as the blueprint, it has the needed software to run, and when you start an image up, it builds a container from that blueprint.
Or if you are familiar with OOP, an image could be considered a Class, while a container is an object.
This means you can have many containers running from the same image. It is important to understand that two containers running from the same image are completely separate. If we have an image called the base, and we start two containers from the base, the changes we make in container A do not reflect in container B. Neither do any changes made in the container reflect in the image.
Containers are started using the docker run command. Run takes an image and turns it into a container.
Remember that containers are instances of the image, but any changes in the container are not saved to the image.
However, one beautiful thing in Docker is if we start a container from a clean Ubuntu image, and add software and files that we want, we can save that container as an Image by using docker commit.
Simply put, we have docker build used to build an image, we have docker run that creates containers from images, and docker commit that creates images from containers.
This allows us to create highly customized images that fulfill all the needs for running software successfully.
DockerHub is a repository for images, a place where any organization or developer can publish their images. Docker will automatically use dockerhub to find any images that you try to use, but don’t have locally.
Running & Managing Containers

Let us run a container to get to learn it.
Running a docker is done using the docker run command. If you execute it, you will see that it prints a pretty easy-to-use syntax.
docker run [OPTIONS] IMAGENAME:TAG [COMMAND] [ARGS]Where OPTIONS are behavior flags, changing how to run the container. Imagename and Tag are simply the name and tag to use.
COMMAND is whatever commands we want to pass into the container once it starts, followed by any ARGS.
Let us run a Ubuntu container and make it print out all files that are present in the current working directory. Don’t worry if you don’t have a Ubuntu container installed, when trying to run a container that does not exist, docker will look at DockerHub automatically and download it for you.
docker run ubuntu ls -alIn the command I don’t specify what tag to use, it will automatically use the special tag latest which is the most recently uploaded image of that name.
If you run this command twice, you will see that the first time it downloads the image and it takes a few seconds, the second time it will run instantly.
Now, we have created two containers to print the directory contents, we can find the containers using the ps command. We will add the a flag to list all containers, otherwise, only running containers are listed.
docker container ps -aYou should see the containers there. You can remove them using their ID for now.
docker container rm $IDUsing a container ID is quite messy and they are long, I usually run my containers with the –name which allows you to create a custom name for your container. This name can be used to reference the docker in other commands, such as if you would want to delete it.
docker run --name test ubuntu lsThere are a few other flags that can come in handy when working with running containers.
–rm will make sure a container is removed once the process is closed
-it to run with an interactive shell.
Remember that if you run the docker run without –rm you won’t delete the container, and that will take up space on your hard drive.
Try opening a ubuntu shell and then exit it and relisting your containers, it should have been removed. Using an interactive shell is super useful when debugging why software is not working as intended.
docker run --rm -it ubuntuOf course, we can have the docker container running for a long time, we can use the -d flag to make the container run in a detached process. This is very common when you have a docker that runs your software.
You can easily try all of this out, simply execute the following command. In this example we want to run more than 1 internal command in bash, so instead of simply passing sleep right into the docker, we use the bash -c to insert multiple commands to run sequentially. Each command is separated by ;.
docker run --name myUbuntuContainer -d ubuntu bash -c "sliep 5; echo 'Hello World'; sleep 60"You should by now understand what this command does, but for fun, it will create a container named myUbuntuContainer from the ubuntu image, run in the background (detached -d ), and then execute the commands in the -c sequentially. Note that I don’t use –rm so this container won’t remove itself once execution is complete.
You can list all existing containers by running docker ps -a.

The output shows you the container ID which is used to reference the container, such as if you want to delete the container, but you can also use the name. ps also shows you what ports are exposed from the container into the host computer, which currently is none.
If you want to view what is going on in a detached container, you can view the STDOUT of the container by running. This is useful when you want to troubleshoot or understand why a container is not working.
docker logs $CONTAINERID/NAME
Notice that we have an error logged out, there is a typo in the first sleep command. Let us remove this container so it does not take up extra space, yes, leaving a container will take as much space as the size of the image.
We can remove the container using docker container rm followed by the container ID or the name. Note if your container is still running, you have to pass the -f flag to force remove it.
docker container rm myUbuntuContainerOne important aspect when running docker is limiting the number of resources allowed such as memory, and CPU allowed to be used by a certain container. You can add these resources with the following flags.
–memory — Use it to set the maximum amount of memory allowed, etc –memory=6m (6 megabytes is the minimum for a container)
–cpus — Used to limit how many CPU resources the container is allowed to use, etc –cpus=1.
You can verify any configurations for a container by using inspect. Try starting a container and setting the memory limit, then inspecting it
docker inspect ID/NameNetworking In Containers
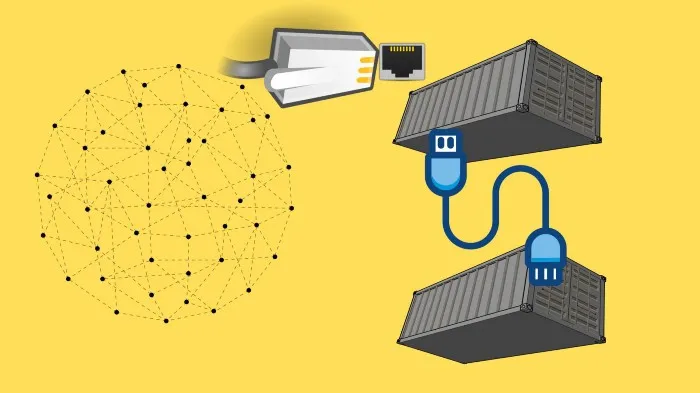
By default, your containers run in a private network. You can make containers run in the same network, or keep them isolated.
One of the most common things to do is expose ports from a container.
You can easily add the publish flag to the docker run command. The shorthand flag is -p and accepts the host machine port and the container port to link separated by a :.
Imagine you are hosting an API on port 8080 on your container, but want to expose that API on your host machine running the container on port 8099.
You can do that by running the following command
docker run -p 8099:8080 --name myUbuntuContainer -d ubuntu bash -c "sleep 5; echo 'Hello World'; sleep 60"You can either view the exposed port using docker container ps or docker port $CONTAINERID.

Notice that docker will default to TCP, you can specify the protocol by adding /tcp or /udp after the ports.
Another cool thing is that you can have docker dynamically assign the host ports for you. If you leave the host portion out of the -p flag it will find any available port and use that.
Try it out, try only specifying -p 8080 and see what port it chooses for you.
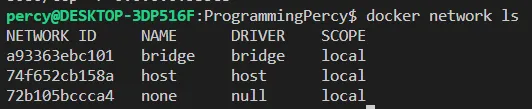
Docker also allows us to create virtual networks, to help us have containers able to connect. You can view all current virtual networks with docker network ls. You will see at minimum three networks.
The host network is used if you want no isolation, it will run the same network as the host computer running the container. none is used if you want no network at all.
You can create a new virtual network with the following command
docker network create skynetOnce you have created it, we can tell containers to run in this network using the –net flag when running the container.
To test this out, we will open two containers and assign them to the skynet and see if we can ping each other. However, we need to install ping to the ubuntu container, and YOU SHOULD NEVER DO THIS INSIDE THE CONTAINER.
We are simply installing the ping software to showcase the networking. We will look at how this could have been done when building our container instead later in the article.
Always install dependencies when you build the image
Let us begin by booting up the first container and preparing it, we will name this first container sky-client.
docker run --rm -it --net skynet --name sky-client ubuntuAfter installing ping, try executing a ping to the sky-server. You should see an error saying that this does not exist in the DNS.

We can remedy this, open a second terminal and start a second container named sky-server. Notice how we can use the container names to locate them on the network.
docker run --rm -it --net skynet --name sky-server ubuntuOnce the sky-server is running, try pinging it from the sky-client again.
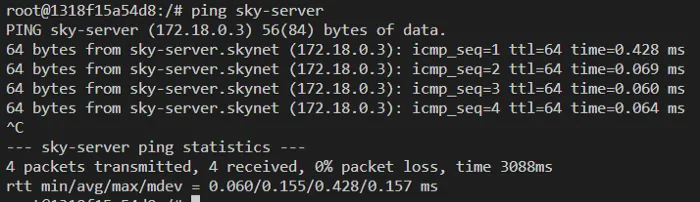
Great, we now have two containers running on the same virtual network. One thing to remember, you can have multiple networks on the same container.
Volumes
Sometimes you want to share data between the host and the container. Often this is the case when you have a database running in a container for instance, and want the database to persist between reboots.
You can add volumes between containers and the host by using the -v flag. Again, same as the network ports, you specify the path on the host machine, and then the path on the container to mount into. The paths are divided with :, as most of the time with docker.
Let us try opening a container and sharing a folder with the host. Remember to always use the full path on the host machine.
docker run --rm -ti -v /home/percy/sharedfolder:/shared --name sharing-is-caring ubuntuThis command will have a folder created on my host machine at /home/percy/sharedfolder that is connected to the /shared folder on the container.
Try creating a file or two in the folder, and see if you can view them on your host machine.
You can also mount folders between containers using the –volumes-from flag. This is useful if you have data that needs to be shared across multiple containers.
# Start container with mount
docker run --rm -ti --net skynet --name sky-client -v $PWD/data:/shared ubuntu
# Start the second container with same mounts
docker run --rm -ti --net skynet --name sky-server --volumes-from sky-client ubuntu
Registries
Registries are used to manage and distribute images. There is an official docker registry that is used by default, but you can set up your company registry as well.
You can search registries for images by using docker search. If you are interested in certain software, you can always search if there is an image for it. Say you would like to run a PostgreSQL container.
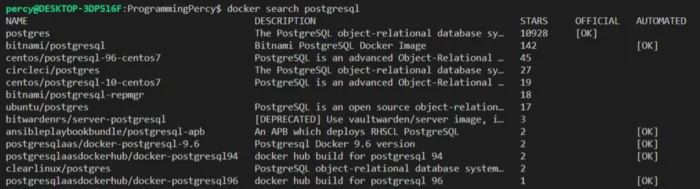
Note that you will find many images because anyone can upload an image on the official registry. You should look at the OFFICIAL tag and the number of stars when deciding on the image to use.
Since anyone can create an image and upload it, there can be risks when selecting an image.
If you would like a UI, you can view the official registry by visiting the Docker Hub. In the Hub, you can usually find a readme on how to use the image.
You can think of the registry as a code repository.
Building customized Images
There are two ways to customize images, the first one is using docker commit which saves a Container as a new Image. The second way is using Dockerfiles, which we will learn more about very soon.
Let us first see how we can use Docker commit to easily save an Image with any changes made from a container. Remember before that we downloaded Ping inside a Container? This does not save and is not the proper way to do it, but If we tested it and know that this container is correct and we want to save it as an Image we can Commit the Container.
Open a new Ubuntu Container and install Iputils-ping again.
docker run -it --name test ubuntuOnce that is done, exit the shell and open a terminal on your host machine.
Docker commit accepts a few options, I like to add –message which is a commit message of the changes. I also like adding the –author so that other developers know who to contact.
The syntax is
docker commit [OPTIONS] [ContainerName/ID] [repository/name:tag]So let’s commit the container we have that has the software we need.
docker commit --message "added iputils" --author programmingpercy test programmingpercy/ubuntu:1.0You should now be able to run a new container starting from this image.
docker run -it --name test2 programmingpercy/ubuntu:1.0So far we have used pre-defined images, but have yet to touch on the most beautiful part of Docker. We can create customized images using Dockerfiles. A Dockerfile is a file that contains a scripting language that we can use to create and make our images.
Docker files should be named dockerfile, this allows docker to automagically detect the files when you execute docker in a directory.
Dockerfiles are very easy to read and understand, they run sequentially from the top to the bottom. One thing that is important to remember is that each line in the dockerfile is its execution of docker run and docker commit. This is referred to as a layer and sometimes you can group actions into one line to save space.
An example of how we can create a custom ubuntu image that contains FFmpeg preinstalled would look like the following.
FFMPEG is a tool used to modify and work with video and audio streams
FROM ubuntu

RUN apt-get -y update
RUN apt-get -y install ffmpeg
CMD ffmpegThe syntax is pretty simple and we will cover the basics only for now.
On line 1 you see the FROM which indicates the parent image that our build process will begin from. So in this case, it will use the ubuntu image as a starting container it will RUN ubuntu as a container, apply changes and commit them. If you want a specific version, you could add the tag after a semicolon, so if you want ubuntu 20.10, etc, add the tag FROM ubuntu:20.10.
The next line uses the RUN command, this will start a container with the current layer and execute the command. So on line 3, we will start a container based on ubuntu and update the apt-get repository. This will be committed into a new temporary image.
This new temporary image will be used in line 4, download FFmpeg and add it to the container, then save the container as an image.
Now you might start wondering why it recreates images of each step as a layer, this is super effective and nothing to worry about. If a layer is not referenced in any way later, it will be deleted after it has been used. The main benefit is that docker will cache these layers, and reuse them across builds. So if you modify something you don’t have to wait for everything to rebuild.
In line 5, you see one of the many cool features of docker. CMD allows us to specify the executable inside the image that the container will execute upon running. This allows us to say that, when somebody runs this image, execute FFmpeg. So, what we just did was package FFmpeg into a docker image that can be run on any computer that supports docker, windows, mac, etc.
Before you can try it, we need to build the image. We have only defined in the dockerfile HOW to build it.
To build an image we use the docker build command. We will pass in a tag flag -t to specify a name for our image. We will also end the command with a ., the dot is confusing to many, so try following along.
The last parameter to the docker build command is the build context. It is the PATH to the location that the docker should use when building the image. A single . tells docker to use the current directory and is the most common approach, but you could theoretically build this image in another location by specifying a path. Why, you might think, because sometimes you want local files from your computer to be present in the image, we haven’t covered this yet but you can include files from the host machine into the docker image.
docker build -t demo/ffmpeg .Run the build command and wait for it to finish, this can take some time, and this is the reason why I choose FFmpeg. Not to bore you, but to show you the caching mechanism.
During the build time, you will see all the layers that are built, and removed until the final image is complete. The first build will take some time, but I recommend you try running the same command afterward. You should see that the layers are cached and the build time is true, instant.
You can now run your amazing FFmpeg image with the docker run command to execute FFmpeg where ever you want.
docker run demo/ffmpegThere are many other docker statements available for the Dockerfile.
One very common is the ADD statement. This allows you to specify a folder or file on the host machine (the one building the image) to COPY over into the image.
The syntax is really easy, you specify the path on the host, followed by the path on the image.
ADD mycomputer/myfile.txt /path/in/imageADD also accepts URLs, so you could tell docker to fetch a file from a URL and place it in the image. Another important statement is the ENV which is short for environment variable
ENV DATABASE_USER = "my user"Now, there is a minor bug in our image. We used the CMD statement to trigger FFmpeg, which works but it does not allow us to add more parameters into FFmpeg, which we will need.
Time to clarify the difference between the CMD statement and the ENTRYPOINT statement. CMD is used to specify a whole command to use when the container runs. ENTRYPOINT instead specifies the start of a command to run.
So to allow users to use our FFmpeg image, but modify the FFmpeg arguments we need to change the CMD into ENTRYPOINT. Try performing the change and then rerun the container. You can now also add certain FFmpeg arguments to your run command.
FROM ubuntu

RUN apt-get -y update
RUN apt-get -y install ffmpeg
ENTRYPOINT ["ffmpeg"]Rebuilding the image now should allow users to add input files etc and more to the docker run demo/ffmpeg -inputfile etc.
Let us try adding files, we will use the previously mentioned ADD command to fetch a demo video. We will fetch a demo video from a URL so we can try transforming the video. We will store the file in /videos inside the image.
I recommend not storing videos in the Image, this is just to SHOWCASE how it works.
In the following gist I also modified all the RUN commands into one layer, this is a common technique used to save some space by grouping related layers into the same. The && is bash for AND, and the \ is just a new line without breaking the command.
FROM ubuntu

RUN apt-get -y update &&\
  apt-get -y install ffmpeg &&\
  mkdir /videos
ADD https://sample-videos.com/video123/mp4/720/big_buck_bunny_720p_1mb.mp4 /videos
ENTRYPOINT ["ffmpeg"]Next, we will rebuild the image, and then execute FFmpeg to speed up the video, and then output it into a mounted folder.
docker build -t demo/ffmpeg .
# Run the container on the demo video and output into mounted share
docker run -v $PWD/data:/shared demo/ffmpeg -i /videos/big_buck_bunny_720p_1mb.mp4 -filter:v "setpts=PTS/60" /shared/output.mkv
You should be able to view a speeded version of the video on your host machine after executing the command. Here is a list of the most popular commands used in Dockerfiles.
- RUN — Used to execute a command in the terminal. For Linux, it’s Bash, for windows it’s cmd.
- ENV — Used to assign environment variables inside the container.
- LABEL — Used to add metadata to a container. Labels from parent images are inherited.
- COPY — Copies a file from the host to the container. Can only copy files from the host.
- ADD — Very similar to COPY, it also copies files into our container. The difference is that ADD can also use files from remote, by URL. It can also extract local TARs into the container.
- ARG — Variables that can be set at build time by the person building the image. ARGS can be used inside the Dockerfile during the build, but after the image is built they cannot be used or changed, unless rebuilding the image.
- VOLUME — Adds a mount point between the host and the container. The syntax is VOLUME path. This is often used when persisting data between container restarts, such as databases. The actual data is stored on the host but used in the container.
- EXPOSE — Tells the Docker engine that the container is listening on a specific port and protocol. The format is port/protocol (UDP/TCP)
- CMD — Defines the command and parameters that the Docker container should run when started. This usually points to a binary with a default set of values. CMD should be used when users are allowed to change the command.
- ENTRYPOINT — Often said to be used when the container is supposed to be run as an executable. It does the same as CMD, but if using ENTRYPOINT the user is not allowed to change the command.
- WORKDIR — Sets the path where the commands running after setting it should be. So if setting it to /app, it’s like running cd /app.
Multistage Builds
There is much more you can do in the dockerfiles. One thing to look into on your own is how to use multi builds to reduce the size of the docker images by a lot. Using multi-stage builds you can reduce the size of your images by over 90%. I’ve seen images at sizes around 1GB turn into a few MB.
Multi stages allow us to use images to build our software and then move them into a much more bareboned image as a final product.
I usually use it to build my Go software on an Ubuntu image, then proceed to move it into a scratch container that only contains my single binary.
Multi-stage builds are possible by adding multiple FROM statements inside the Dockerfile, and we can assign each FROM a certain name using AS. It is very common to see the build stage named builder etc.
FROM ubuntu AS builderBy naming a build stage we can later use the COPY with the –from argument to reference the file system on that build stage.
FROM golang:1.9 AS builder
# Build our software binary
FROM scratch
# Here we will copy the binary from the Builder Image into this scratch Container
COPY path/on/builder path/on/scratchTo review the difference between a multi-stage build and a normal we will build both images and compare them. First, we need something to build, and to update the dockerfile to build that binary.
Here is a simple Go program that just prints a message, don’t worry if you do not have Go installed, we will build it inside the Docker image, remember?
Copy the following gist into a file named main.go in the same directory as your dockerfile.
package main

import "log"

func main() {
  log.Println("Hello from Scratch")
}Now let us update the dockerfile to first COPY the main.go from the host machine into the image, then build the binary.
We will then COPY that binary into a scratch image.
FROM golang:1.9 AS builder
WORKDIR /
# copy everything from host folder into this image
COPY . .
# Build binary and place it at /main
RUN go build -o /main
# Initiate the Second Build stage
FROM scratch
COPY /main /main
ENTRYPOINT ["/main"]Build the image by executing the regular build command.
docker build -t multistaged .Execute docker images to view the final image, mine ended up being 1.95 MB in size, which is super small. This is because the only thing inside the image is our binary, nothing else that bloats the image.
You can even try executing the image to verify that it works.
docker run multistagedSo why did we go through all this instead of a single build, let’s compare the images.
You can stop a multi-stage build at a certain build step using the –target option to docker build. This will allow us to run the first build stage and create an image out of it, we pass the name of our stage, builder.
docker build --target builder -t singlestaged .Once completed, you can run docker images to compare the sizes.
Mindblowing, right?

Orchestrating containers
Now it is easy to imagine as we start using docker it progresses fast, we can set up a database, a Redis, etc to start running very easily. If you build a system that relies on these containers, we need to orchestrate them.
An orchestration system is used to start and restart containers when they fail, manage resources, and also allow containers to discover each other.
There are many orchestration services out there, the easiest to get started with is docker-compose which is usually used to help developers run multiple containers in a very easy fashion. Docker-compose is often used in development phases to make it easy to test and run everything locally. The reason why docker-compose does not fit for wider deployments is that it is limited to running on a single computer.
For production environments, it is more usual to find Kubernetes used. Kubernetes is used on local hardware is and also easily deployable to cloud providers using managed services.
I recommend learning Kubernetes, and If you want to get started with it, I have an article you can read.
Learn Kubernetes — The Easy Way
August 8, 2022
In this tutorial we learn about Kubernetes and how it can be used to orchestrate containerized applications
Read moreConclusion
In this tutorial, you have learned about Images and Containers, the two key components of Docker.
We have learned how to create images, and how to write our Image specifications using Dockerfiles.
We have looked at how you can configure the network between containers.
We learned how to mount volumes between the host and containers, and also between containers.
I hope that you have been provided with enough of the basics to get you going with Docker on you’re own.
If you want to learn more about docker.
In my projects, I, almost always keep a dockerfile that packages and containerizes the software. I also recommend adding a docker-compose file that will start up any related needed services. For instance, if you develop an API that uses a database, it is super useful to have a compose that starts up your API but also the database. It helps other developers to get up and running fast and reduces the need to install the database or keep a development instance up.
Docker really has changed my life as a developer, making life a whole lot easier.
I hope that you have enjoyed this tutorial, and I would love to hear back from you about your ideas, feedback, or opinions about this tutorial.
If you enjoyed my writing, please support future articles by buying me an Coffee