Redis as a Pub/Sub Engine in Go
Share information and work between many applications
by Percy Bolmér, February 3, 2021
What is Redis
Redis is an in-memory database, what this means is that it stores data directly in memory without saving it on disk. This is an important factor to remember when using Redis. If the system your running Redis on loses power, you will lose the data that is stored in the memory. Redis does persist data through snapshots though , so only new data since the last snapshot is lost. This is why many people often say that you should utilize Redis as a Cache for storing data. There is some persistence mechanism in place for Redis though, so it’s not entirely true that all data is lost, read more about it here.
Redis is an open source (BSD licensed), in-memory data structure store, used as a database, cache, and message broker. — Redis website
Redis is a key-value store. This means that we can store data by specifying a key and what value to contain. A key can be any binary blob actually, so even the key can be quite advanced.
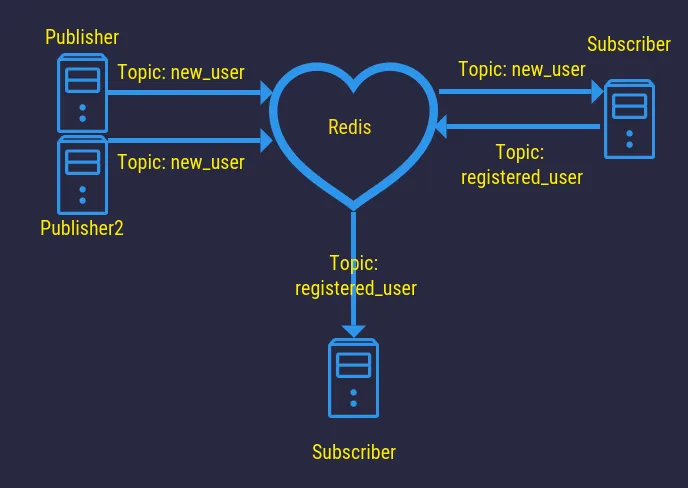
Redis also supports a Pub/Sub architecture. This means that we can publish data and subscribe to data by using Redis. If you haven’t used Pub/Sub before, it is usually used to share data between applications. I use it in one of my projects to distribute work between certain applications. It’s important to mention that any message published on a channel/topic will get sent to EVERY subscriber. Also, messages sent with Pub/Sub will be forgotten as soon as they are published. If you want to use Redis as a work queue, don’t aim for the Pub/Sub.
Why would we want an in-memory cache then? Well, speed is one thing. Since there aren’t any big delays saving data in SQL etc, and memory tends to be very fast.
In the picture above we saw an example I had where the user accounts from multiple websites were stored on one central database. New users were supposed to receive emails, and this was used to reduce the amount of duplicate code and applications running. This is an example of how you could use Redis as a Pub/Sub engine or work distributor.
Better yet, Imagine a central logging application that takes errors from a Redis and logs them in central storage. This way many applications could just throw their errors at Redis and don’t have to worry about solid logging logic in each application.
It can also help scaling applications, one cool scenario I’ve seen is a work distribution platform. It was composed of many microservices, and whenever a microservice needed work done by another service, they would push their work onto a work queue in Redis. The cool thing about it was that when the developers noticed a service lagging, they could easily add a server with the same kind of service that read work from the same queue. This allowed them to add workers without stopping or changing anything of the other services.
Some people I meet say things like,
If I want a in-memory cache I use a
map[string]interface{}
And that is fine. But Redis doesn’t only give you a very scalable cache, it also helps you persist it, order it, sort it, and many many more built-in things. It is also network-attached, so it’s easier to scale than using a regular map.
Installing dependencies
First off we are going to use Docker to run Redis To install docker if you don’t get it, instructions here. If you are unfamiliar with Docker, you can read about it in my other article.
If you’re in an offline environment you will need to download the Redis image, we will use this. If you’re connected to the internet, no need to grab anything. Docker will pull the image for us, auto-magically.
We are also building a Go application to talk to Redis. Don’t worry about installing Go if you don’t have it, we will be using a Docker for this also. But you should seriously just install go anyways… it rocks!
Setting up the docker-compose
We will begin by creating a docker-compose file that will contain the architecture of the project which will be a Redis and two Go applications.
I also want to say sorry, the setup step is rather long, longer than I wanted to. But I don’t wanna rush the compose setup if there is someone new to docker. If you want to cheat and are comfortable with docker, here is the repository.
The Redis will be used as a Pub/Sub engine, and one go application will publish data while the other application will subscribe on data.
We will start making the foundation of the docker-compose by adding the Redis first. We also need to create some folders that Redis will want us to mount. We will mount a folder called redis/data to persist data, this is where the Redis will store snapshots of the memory. We will also have redis/conf which we will have a redis.conf file that contains configurations needed.
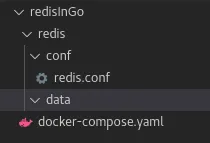
Create the folders, then also create docker-compose.yaml.
mkdir -p redisInGo/redis/conf
mkdir redisInGo/redis/data
touch docker-compose.yaml
The Redis configuration can be downloaded from Redis website here.
version: "3.0"
services:
  redis:
    image: "redis:alpine"
    # The Command will make redis-server run with our custom Configuration
    command: redis-server /usr/local/etc/redis/redis.conf
    volumes:
      - ./redis/data:/data #Used for persisting data
      - ./redis/conf:/usr/local/etc/redis #Used for configuring redis
    networks:
      - data_sharing

networks:
  data_sharing:
    driver: bridge
The current docker-compose will only boot up Redis. But we will work on this as a foundation and add more and more to it as we go. The first thing we need to do is open up redis.conf and set a password to Redis.
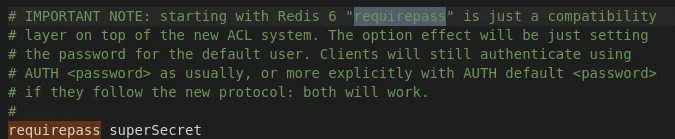
Search for requirepass in the configuration and replace the password with your secret key.
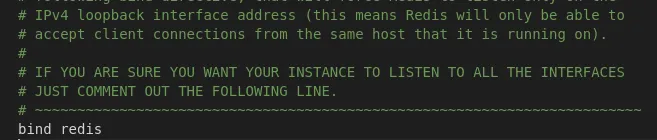
Also, search for the bind configuration that binds the IP address, this is usually localhost (127.0.0.1). In our case we will be running in a container environment, so change bind to “redis”. That’s the name we will give the Redis container.
Save the file and try running the docker-compose to make sure everything is working.
sudo docker-compose upYou should see an output saying something along the lines Redis * Ready to accept Connections.
Once this is done it’s time to start working on the publisher and the subscriber applications. We will begin by adding the needed core to the docker-compose, just to get everything running. We will then begin using Redis as soon as the layout is complete.
Create a folder called publisher and one called subscriber. Both these folders should contain two files, main.go and dockerfile.
mkdir publisher && mkdir subscriberI will show the code residing inside the publisher, I want you to copy that code into both publisher and subscriber, but replace each occurrence of publisher inside the subscriber folder .
package main

import "fmt"

func main() {
	fmt.Println("hello from publisher")
}The same goes for the dockerfile, replace publisher with subscriber and have a copy in each folder.
FROM golang:1.15

RUN mkdir /app
WORKDIR /app
COPY . .
RUN go mod init publisher
RUN go build -o publisher
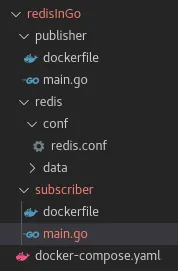
CMD ["/app/publisher"]This is how my current project setup looks like
We will want to add the two new applications to our docker-compose, then we are all set to start using Redis. I’ve updated the docker-compose to build both applications and run them.
version: "3.0"
services:
  redis:
    image: "redis:alpine"
    # The Command will make redis-server run with our custom Configuration
    command: redis-server /usr/local/etc/redis/redis.conf
    volumes:
      - ./redis/data:/data #Used for persisting data
      - ./redis/conf:/usr/local/etc/redis #Used for configuring redis
    networks:
      - data_sharing
  publisher:
    # Makes the compose- build our Image based on the files in publisher folder
    build:
      context: ./publisher
      dockerfile: Dockerfile
    depends_on:
      - redis
    networks:
      - data_sharing
  subscriber:
      build:
        context: ./subscriber
        dockerfile: Dockerfile
      depends_on:
        - redis
        - publisher
      networks:
        - data_sharing

networks:
  data_sharing:
driver: bridgeFire the old compose down and the new one up and you should see the output from all three applications.
sudo docker-compose down && sudo docker-compose up --build
# I use the --build flag to force build the images
Output that verifies the setup is working properly.

Finally, Redis time
So, congratulations on making it through the long setup phase. But now we have a solid development environment. Time well spent.
Let’s begin by using Redis as the publisher. We will want to connect to Redis and publish data. The application we will build will be a user registration application or act like one. It will randomly generate new users and publish them onto a topic/channel. The other application will subscribe to the new users and log them to stdout.
Not the best example, It won’t make it into your toolbox of super cool software. But it can act as a starting point for real applications. Remember we want to focus on how Redis works like for a Pub/Sub engine.
Let’s begin by looking at the Publish method of the Redis client
func (c Client) Publish(ctx context.Context, channel string, message interface{}) *IntCmdIt takes a context, a channel, and a message. Channel is the name of the topic to publish our message on. The message is an empty interface, so this can be any kind of data. What’s important is that the go-redis package that we use will expect this message to be part of the encoding.BinaryMarshaler interface. This is because it needs to be able to transfer the data as a []byte.
The publisher will consist of a User struct that can be encoded into a []byte. The application will start up and connect to Redis, then begin generating random users and publishing them. I’ve commented on the code as much as possible.
package main

import (
	"context"
	"encoding/json"
	"math/rand"
	"time"

	"github.com/go-redis/redis/v8"
)

// User is a struct representing newly registered users
type User struct {
	Username string
	Email    string
}

// MarshalBinary encodes the struct into a binary blob
// Here I cheat and use regular json :)
func (u *User) MarshalBinary() ([]byte, error) {
	return json.Marshal(u)
}

// UnmarshalBinary decodes the struct into a User
func (u *User) UnmarshalBinary(data []byte) error {
	if err := json.Unmarshal(data, &u); err != nil {
		return err
	}
	return nil
}

// Names Some Non-Random name lists used to generate Random Users
var Names []string = []string{"Jasper", "Johan", "Edward", "Niel", "Percy", "Adam", "Grape", "Sam", "Redis", "Jennifer", "Jessica", "Angelica", "Amber", "Watch"}

// SirNames Some Non-Random name lists used to generate Random Users
var SirNames []string = []string{"Ericsson", "Redisson", "Edisson", "Tesla", "Bolmer", "Andersson", "Sword", "Fish", "Coder"}

// EmailProviders Some Non-Random email lists used to generate Random Users
var EmailProviders []string = []string{"Hotmail.com", "Gmail.com", "Awesomeness.com", "Redis.com"}

func main() {
	// Create a new Redis Client
	redisClient := redis.NewClient(&redis.Options{
		Addr:     "redis:6379",  // We connect to host redis, thats what the hostname of the redis service is set to in the docker-compose
		Password: "superSecret", // The password IF set in the redis Config file
		DB:       0,
	})
	// Ping the Redis server and check if any errors occured
	err := redisClient.Ping(context.Background()).Err()
	if err != nil {
		// Sleep for 3 seconds and wait for Redis to initialize
		time.Sleep(3 * time.Second)
		err := redisClient.Ping(context.Background()).Err()
		if err != nil {
			panic(err)
		}
	}
	// Generate a new background context that  we will use
	ctx := context.Background()
	// Loop and randomly generate users on a random timer
	for {
		// Publish a generated user to the new_users channel
		err := redisClient.Publish(ctx, "new_users", GenerateRandomUser()).Err()
		if err != nil {
			panic(err)
		}
		// Sleep random time
		rand.Seed(time.Now().UnixNano())
		n := rand.Intn(4)
		time.Sleep(time.Duration(n) * time.Second)
	}

}

// GenerateRandomUser creates a random user, dont care too much about this.
func GenerateRandomUser() *User {
	rand.Seed(time.Now().UnixNano())
	nameMax := len(Names)
	sirNameMax := len(SirNames)
	emailProviderMax := len(EmailProviders)

	nameIndex := rand.Intn(nameMax-1) + 1
	sirNameIndex := rand.Intn(sirNameMax-1) + 1
	emailIndex := rand.Intn(emailProviderMax-1) + 1

	return &User{
		Username: Names[nameIndex] + " " + SirNames[sirNameIndex],
		Email:    Names[nameIndex] + SirNames[sirNameIndex] + "@" + EmailProviders[emailIndex],
	}
}Next up we need to view what is being sent. For this we will modify the subscriber/main.go.
This will be a very simple application, much like the publisher. It will connect to the Redis, and subscribe to the channel, and print any items found on it.
It will contain the same User struct, in a real-life example I would break this out into its package that is imported in both applications. But for this short demo, copy-pasting works.
package main

import (
	"context"
	"encoding/json"
	"fmt"
	"time"

	"github.com/go-redis/redis/v8"
)

func main() {
	// Create a new Redis Client
	redisClient := redis.NewClient(&redis.Options{
		Addr:     "redis:6379",  // We connect to host redis, thats what the hostname of the redis service is set to in the docker-compose
		Password: "superSecret", // The password IF set in the redis Config file
		DB:       0,
	})
	// Ping the Redis server and check if any errors occured
	err := redisClient.Ping(context.Background()).Err()
	if err != nil {
		// Sleep for 3 seconds and wait for Redis to initialize
		time.Sleep(3 * time.Second)
		err := redisClient.Ping(context.Background()).Err()
		if err != nil {
			panic(err)
		}
	}
	ctx := context.Background()
	// Subscribe to the Topic given
	topic := redisClient.Subscribe(ctx, "new_users")
	// Get the Channel to use
	channel := topic.Channel()
	// Itterate any messages sent on the channel
	for msg := range channel {
		u := &User{}
		// Unmarshal the data into the user
		err := u.UnmarshalBinary([]byte(msg.Payload))
		if err != nil {
			panic(err)
		}

		fmt.Println(u)
	}
}

// User is a struct representing newly registered users
type User struct {
	Username string
	Email    string
}

// MarshalBinary encodes the struct into a binary blob
// Here I cheat and use regular json :)
func (u *User) MarshalBinary() ([]byte, error) {
	return json.Marshal(u)
}

// UnmarshalBinary decodes the struct into a User
func (u *User) UnmarshalBinary(data []byte) error {
	if err := json.Unmarshal(data, u); err != nil {
		return err
	}
	return nil
}

func (u *User) String() string {
	return "User: " + u.Username + " registered with Email: " + u.Email
}If you go and run the docker-compose after filling the publisher and subscriber you should start seeing output like the picture below.

Great! We now have two (3 with Redis) applications working together in a Pub/Sub. As you can see, go-redis is easy to use. All it took was two methods to get it up and running (Publish and Subscribe).
You can try adding another publisher yourself, it’s just copying the publisher service in the docker-compose and renaming it.
There is A LOT more you can do with Redis, pushing work to a channel for instance that is gathered by many workers. This article just showcases how to get the Pub/Sub in a Go environment up and running. The depth of what you can do is vast. That’s it for today.
Now, go out there and Pub/Sub!
If you enjoyed my writing, please support future articles by buying me an Coffee