Webhook Testing Without the Headache - A Developer's Sanity-Saving Tutorial
Effortless Local Testing - Learn how to test Webhooks on your local environment
by Percy Bolmér, January 27, 2024

In this tutorial, we’ll dive into the art of testing webhooks effectively. Discover how to receive third-party webhooks directly on your local machine using Ngrok, all without needing a public domain. Get ready to streamline your webhook testing process like never before!
We will also cover how to efficiently start mocking Webhooks using Wiremock. The reason why we will learn how to mock Webhooks is because we can then have a completely offline test environment with no dependencies. Also, some services bill you for excessive usage of webhooks, so let’s avoid that.
After the tutorial, you will be able to
- Route webhooks from Third-party services to your local application (localhost)
- Mock WebHooks for local and offline development
What Are Webhooks?
Webhooks works like a notification system. Imagine giving your phone number to a friend who will call you whenever they have news. In the digital world, Webhooks do this through URLs instead of phone numbers. You give a third-party software your URL which they immediately notify when something happens.
For example, if something changes in a GitHub repository, like a failed pipeline. GitHub will instantly send a message (webhook) to a specified URL of your choice. This URL should lead to your service waiting to hear the news.
What’s needed to use WebHooks is an API that listens on the URL provided to the service, to accept the information sent.
Testing WebHooks Without A Public Domain Using Ngrok
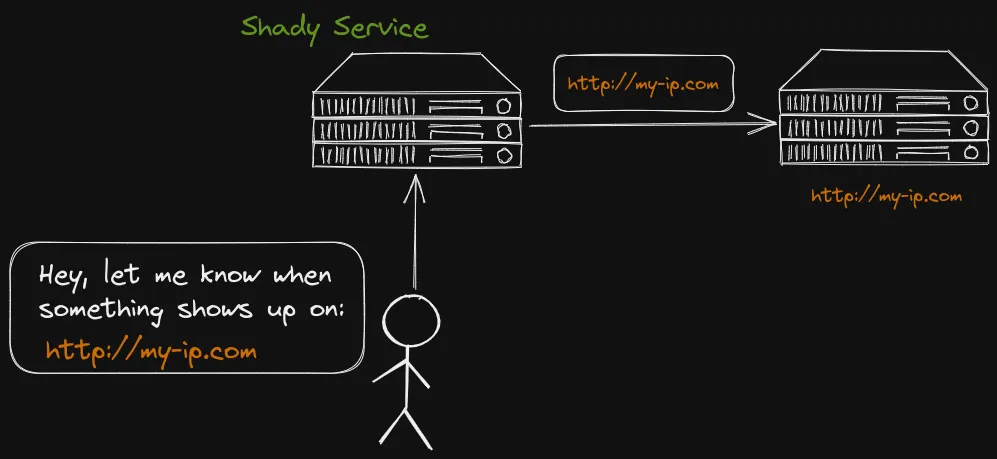
Testing webhooks is often a hassle due to the need for a public URL - a hurdle when you want to code locally. But don’t worry, there is a way around this issue and it is easier than you think.
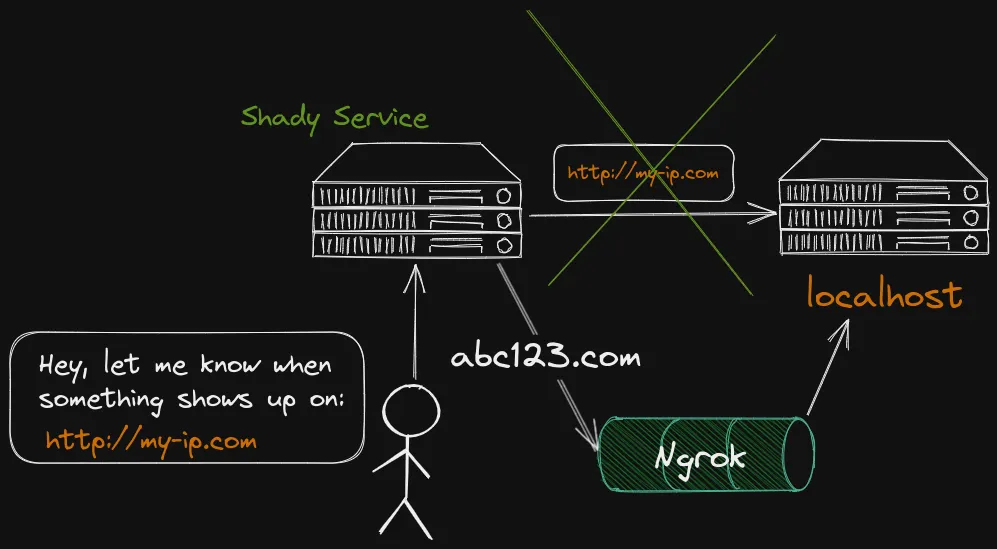
Enter Ngrok, it lets us bypass the issue of having to host an API on an public domain while we are developing. With Ngrok, we set up a proxy right on our machines that plays a middleman between the local computer and the internet.
Ngrok works by starting up an Agent running on your computer. Ngrok then assigns you a free domain and all traffic to that domain will be routed to your agent. More details can be found in the Ngrok documentation.
Ngrok requires you to create an account to start using it, but it is free to use. Begin by Creating an account on Ngrok.
After that, we need to install the Agent that can run on our host. You will find installation instructions in the Ngrok dashboard, along with your auth token.
Don’t ever share you’re authentication token, others can then access your tunnel
wget https://bin.equinox.io/c/bNyj1mQVY4c/ngrok-v3-stable-linux-amd64.tgz
sudo tar -xvzf ngrok-v3-stable-linux-amd64.tgz -C /usr/local/bin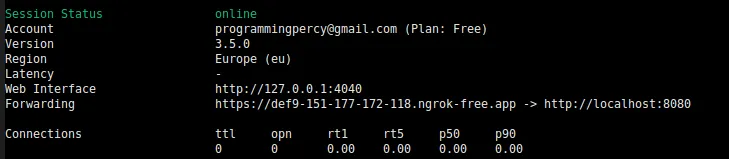
ngrok config add-authtoken YOURTOKENNext, we can start getting the webhooks to our application by starting the agent
ngrok http http://localhost:8080Running the command will display a bit of information. The most important one is Forwarding that is the URL we can use for the Webhooks.
Setup A Project Accepting Webhooks
We need a service that triggers webhooks, for simplicity, I will use Github as that service. Visit your GitHub account (or use another service if you have one in mind)

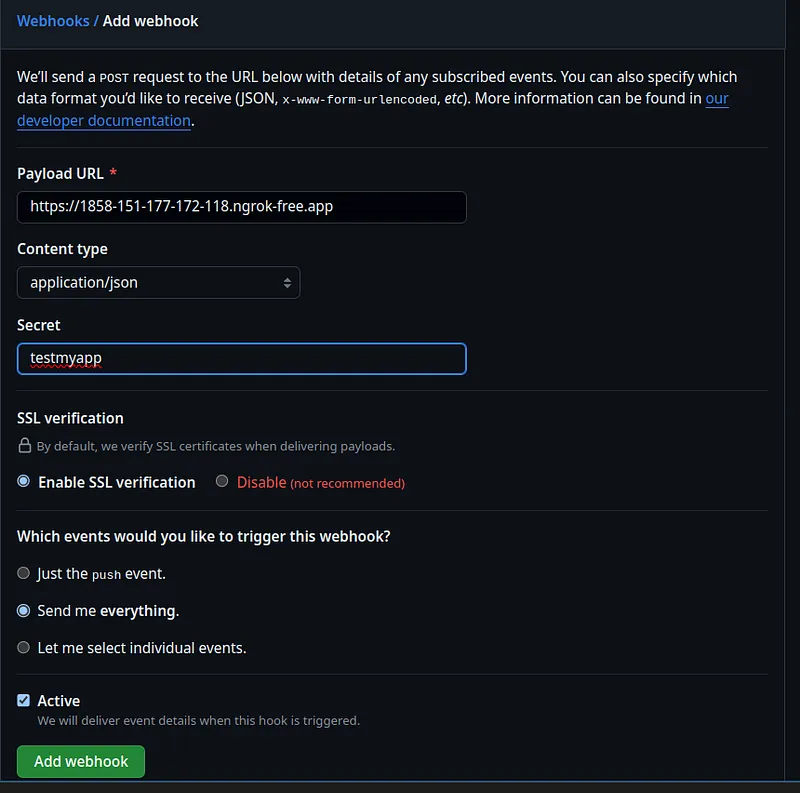
If you create or select a repository you own, you can visit the settings and there should be an Webhooks tab that allows you to set up a webhook.
Usually, webhook services ask you for a URL, this URL should be the domain that Ngrok prints out for you.
The secret can be used to validate requests, read more on GitHub. The secret will be used to create a hash that we can use to validate that the request comes from GitHub.
Creating an Application to accept webhooks
So we have Ngrok listening on port 8080, and we have set up Github to push events to the Ngrok URL.
We need one final thing, a WebHook handler listening on the port 8080. For this, we are gonna create a simple HTTP handler in Go that just prints out the requests.
This will be a super simple service that just prints any payloads that get sent to our machine, good enough to test with.
package main

import (
 "io"
 "log/slog"
 "net/http"
)

func main() {

 // Accept requests on / and print the payloads
 http.HandleFunc("/", func(w http.ResponseWriter, r *http.Request) {
  defer r.Body.Close()

  data, err := io.ReadAll(r.Body)

  if err != nil {
   panic(err)
  }
  slog.Info("New request", "payload", string(data))
 })

 slog.Info("Listening on port :8080")
 // serve the app on :8080, same port used by ngrok (important)
 http.ListenAndServe(":8080", nil)
}We must use the same port that we told Ngrok to use, in our case here :8080.
Run the go application go run main.go so that we can listen to traffic to localhost:8080, and so that Ngrok can route the webhooks to our local application.
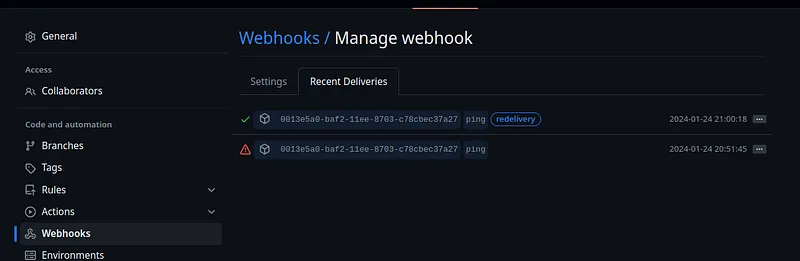
GitHub will send a PING when the Webhook is created. We can redeliver this PING hook by pressing “redeliver”. Visit the “recent deliveries” press the three dots and select redeliver.
You should see a checkmark saying that it was successful this time.
To verify further you can inspect the output from the Go application, it should have printed a JSON payload from GitHub.
2024/01/24 20:59:47 INFO Listening on port :8080
2024/01/24 21:00:18 INFO New request payload="{"zen":"Keep it logically awesome.....Mocking Webhooks using WireMock
Now that we have a real service sending us Payloads, let’s solve a few issues
- If their service is down, we are screwed and cannot develop and test
- Some services do cost money, so we want an offline solution
- The services usually require some user INPUT to react and fire webhooks, we want to automate it.
We can solve these things using Wiremock.
If you are unfamiliar with Wiremock, I have to give a shoutout to them. It is a fantastic tool to Mock data for REST,gRPC, Webhooks, and much more.
We will run Wiremock using a Docker container. we will create a new folder named wiremock which will store all data related to Wiremock.
I won’t cover the inner and outs of WireMock in this article, but on a basic level, WireMock acceps JSON files that define rules. These rules can explain REST endpoints and what data they should return, or Webhooks to send out.
These mappings should live in JSON files inside a folder called mappings so we are going to create one.
mkdir -p wiremock/mappings
touch wiremock/mappings/webhook.jsonInside webhook.json we will create an endpoint called send-webhook. Once this endpoint gets a GET request, it will fire off a WebHook. We can specify the location of our location app, and the payload to use.
{
    "request": {
        "urlPath": "/send-webhook",
        "method": "GET"
    },
    "response": {
        "status": 200
    },
    "serveEventListeners": [
        {
            "name": "webhook",
            "parameters": {
                "method": "POST",
                "url": "http://localhost:8080",
                "headers": {
                    "Content-Type": "application/json"
                },
                "body": "{ "result": "SUCCESS" }"
            }
        }
    ]
}Once that file exists, we will start WireMock using Docker and we will make sure it runs on the host network to reach the Go application on port 8080.
I often tend to have a Docker compose and instead use the service names, but for ease during this tutorial, we will use localhost. We will mount the WireMock folder, make sure you are placed in the root of the project.
docker run -it --rm --name wiremock --network=host -v $PWD/wiremock:/home/wiremock wiremock/wiremock:3.3.1 --verbose --port=8081Wiremock is running on port 8081, so we can curl it and it will fire off a Webhook.
curl localhost:8081/send-webhookAfter running that you should see a webhook arrive in your Go service.
2024/01/24 21:49:10 INFO New request payload="{ "result": "SUCCESS" }"To make it mock real data, you can steal the payload from the Ngrok webhook and paste it into your body field in the wiremock mapping. This way you can mock with data that is close to the real data from the service.
Conclusion
In this tutorial, we have created a simple way of accepting WebHooks from services to locally running applications. This can be used to test webhooks from third-party applications.
I usually start by setting up Ngrok to have the real payloads sent to me. To learn how the third-party service works and what kind of data to expect. We can also stop relying on using a tunnel for our traffic which doesn’t feel like something I want to do all the time.
After I’ve gotten real payloads I usually put them into a WireMock so that I can avoid having a dependency or paying for development hooks.
With this setup, we can easily mock data during development but also end-to-end test the applications we build that rely on Webhooks.
I hope you enjoyed this tutorial, feel free to reach out to me with any ideas or thoughts!
Appendix
Ngrok
How Ngrok works
WireMock
GitHub Webhooks
GitHub Webhook validation
If you enjoyed my writing, please support future articles by buying me an Coffee