Using RabbitMQ Streams In Go
Learn how to use RabbitMQ Streams using both Core and Plugin in this tutorial
by Percy Bolmér, January 13, 2024
Recently I published an article about RabbitMQ and how to use it in Go to build a Event Driven Architecture.
All Images in this article is made by Percy Bolmér. Gopher by Takuya Ueda, Original Go Gopher by Renée French (CC BY 3.0)
That article covers the basics of RabbitMQ, this time, however, we will increase our knowledge and learn about Streams. This article expects that you have a basic understanding of RabbitMQ Queues, If you don’t I highly recommend my previous article.
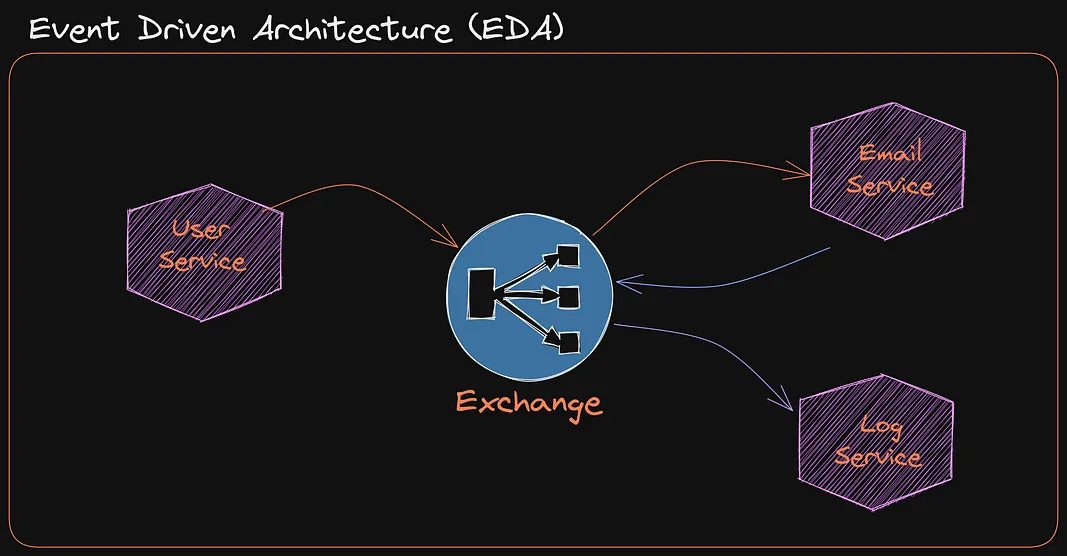
Learn RabbitMQ for Event-Driven Architecture (EDA)
March 24, 2023
A beginner-friendly tutorial on how RabbitMQ works and how to use RabbitMQ in Go using an Event Driven Architecture
Read moreI have always relied on RabbitMQ and Kafka combined. RabbitMQ for most stuff and the times when I needed replayability, time traveling, or events that persisted, I used Kafka.
Time traveling is when you can replay events from a certain time in your system
Using two brokers became more complex since I now needed to deploy Kafka and handle both brokers.
RabbitMQ has released support for a feature that they call Streams in 2021. It’s taken time for me to test it, but I finally did and am glad that I did.
Streams are designed to specifically help us with the problems mentioned above, which the industry usually uses Kafka for.
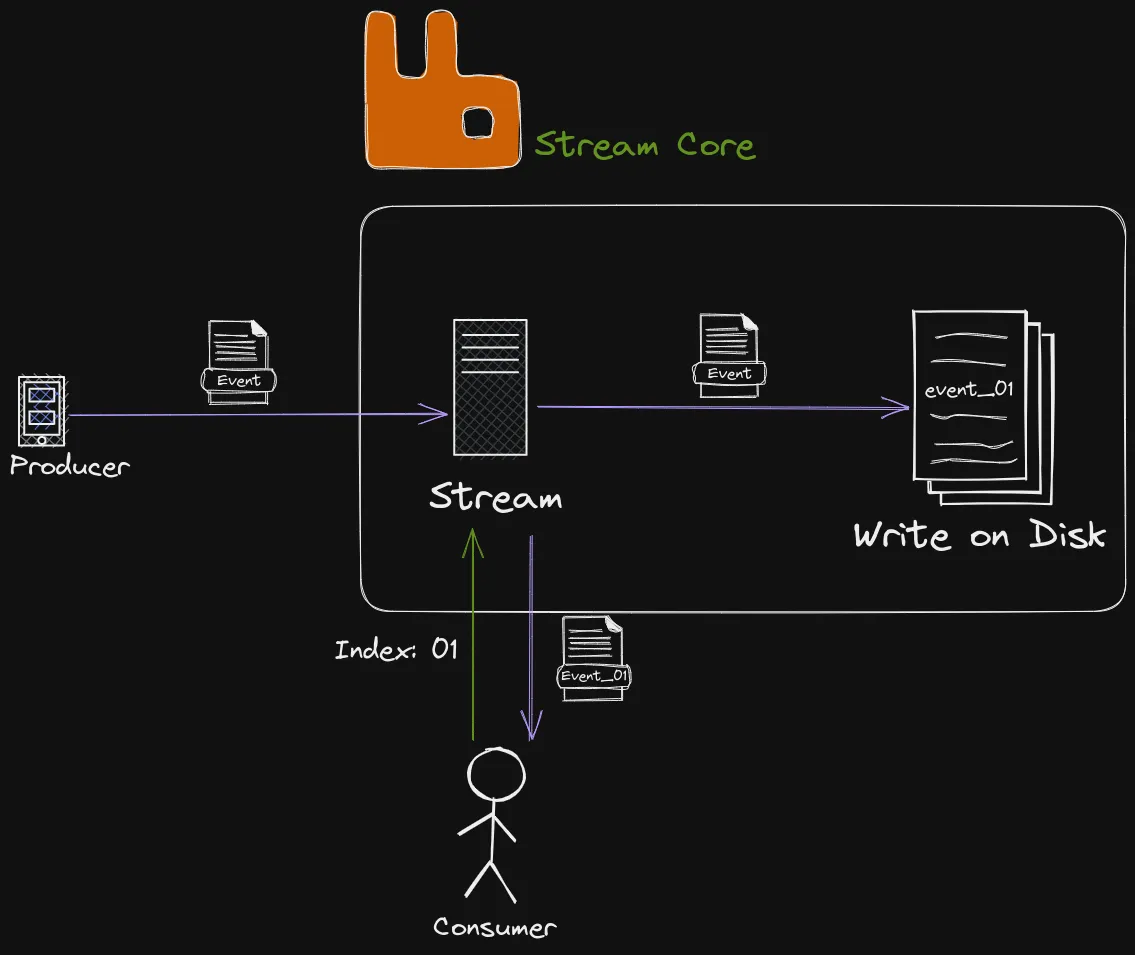
Each event sent on the RabbitMQ streams is written to the file system. and stored forever unless a specific TTL is configured. Each event is indexed which allows us to easily replay events, and trigger time traveling.
RabbitMQ Streams can be used by companies to build robust event-driven data pipelines that ensure reliable and timely data delivery with high integrity. The ability to replay and view events afterward can also be used for audibility and reproducibility.
All the code that will be used can be found on my Github
Another reason for streams was that each consumer had to create their Queue in fan-out exchanges. This could lead to many queues being created and it causes unnecessary overhead. Streams were made to have multiple consumers on the same Stream.
What’s even more amazing, if you are familiar with RabbitMQ before, using streams is almost seamless!
In this article, we will cover the following topics
- What streams are, and how they work
- How to use Streams in Go
- Stream Core And Stream Plugin and their differences
- Subentries and Compression
- Deduplication
What Streams Are And How They Work
Streams are available for all RabbitMQ instances after version 3.9.
Streams are created to solve a few “issues” that RabbitMQ regular Queues had. One of them is that once a message is consumed there is no way of rereading the message. This is not nice when you need to save each message due to either replayability, compliance, or auditing.
Messages are consumed by design, its not an issue. I just lack the correct word to explain it.
So, what is a Stream?
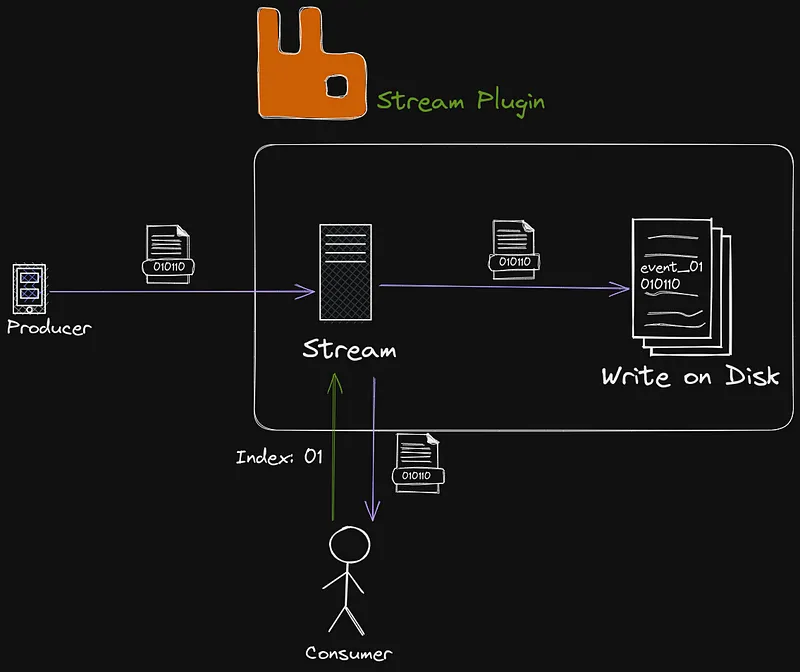
Consider a Stream an Append-Only log. Events published on the Stream are appended to the log and cannot be modified/removed. Each event is persisted by being written to the log on the file system.
The event has metadata about the
- Index- In which Sequence the event is written to the Log, used as an identifier for the event
- Timestamp - When the event was added to the stream
I like to think of Streams as an extended Queue that persists messages. While being a very simplified way of explaining it, it helps to understand the purpose.
Streams are using the AMQP 0.9.1 protocol. Which is why they can be used seamlessly with the RabbitMQ integrations out there. A more in-depth feature matrix is available in the RabbitMQ docs.
One important thing to understand regarding streams in RabbitMQ is that two parts of RabbitMQ can be used when talking about Streams.
- Stream Core - Adds the basic capabilities to RabbitMQ to handle Streams. Supports AMQP 0.9.1.
- Stream Plugin - A plugin you can enable in RabbitMQ, that adds extended functionality to Streams and enables AMQP 1.0. The protocol is Binary. It also adds more features such as Super Streams etc.
We will view the differences between Stream Core and Plugin later when we try them out to clarify them. It is important to understand that Core works out-of-the-box and can be used with any AMQP 0.9.1 client.
If using the Stream Plugin the messages are in a binary format and should be used in low latency environments or if you need a high throughput.
RabbitMQ itself states that Stream Core can handle “Hundreds of thousands of messages per second” while Stream Plugin can manage “Millions per second”.
We will begin by learning about streams using the Streams Core and then move on to the Plugin once we understand the concept.
Using RabbitMQ Streams Core In Go
We will begin by using Stream Core and to do that we can use a simple regular Queue. We will create a regular Queue for now and we will look into how we can upgrade it into a stream.
We start by setting up the Project with a Producer who will be responsible for creating the Queue and a Consumer who will read the messages.
mkdir streamingmq
go mod init programmingpercy/streamingmq
cd streamingmq
mkdir producer
mkdir consumer
touch producer/main.go
touch consumer/main.goBefore writing any code we need to make sure that we have a RabbitMQ instance that we can communicate with. I strongly recommend using Docker to quickly spin up one.
docker run -d --name rabbitmq -p 5672:5672 -p 15672:15672 rabbitmq:3.9-managementOnce that is running we can write a simple service inside producer/main.go which will create a Producer. It will create the Queue events and publish 1000 messages.
package main

import (
 "context"
 "encoding/json"
 "fmt"

 "github.com/google/uuid"
 amqp "github.com/rabbitmq/amqp091-go"
)
// Our struct that we will send
type Event struct {
 Name string
}

func main() {
 conn, err := amqp.Dial(fmt.Sprintf("amqp://%s:%s@%s/%s", "guest", "guest", "localhost:5672", ""))
 if err != nil {
  panic(err)
 }

 ch, err := conn.Channel()
 if err != nil {
  panic(err)
 }

 // Start the queue
 q, err := ch.QueueDeclare("events", true, false, false, true, amqp.Table{})
 if err != nil {
  panic(err)
 }
 // Publish 1000 Messages
 ctx := context.Background()
 for i := 0; i <= 1000; i++ {

  event := Event{
   Name: "test",
  }
  data, err := json.Marshal(event)
  if err != nil {
   panic(err)
  }

  err = ch.PublishWithContext(ctx, "", "events", false, false, amqp.Publishing{
   CorrelationId: uuid.NewString(),
   Body:          data,
  })
  if err != nil {
   panic(err)
  }
 }
 ch.Close()
 fmt.Println(q.Name)
}In a real-world application your correlationID should be traceable - Said Some Smart Sage
Running this amazing piece of software will print the name of the Queue, which is events , I won’t go into details regarding all the parameters we pass into QueueDeclare since that is covered in my RabbitMQ tutorial.
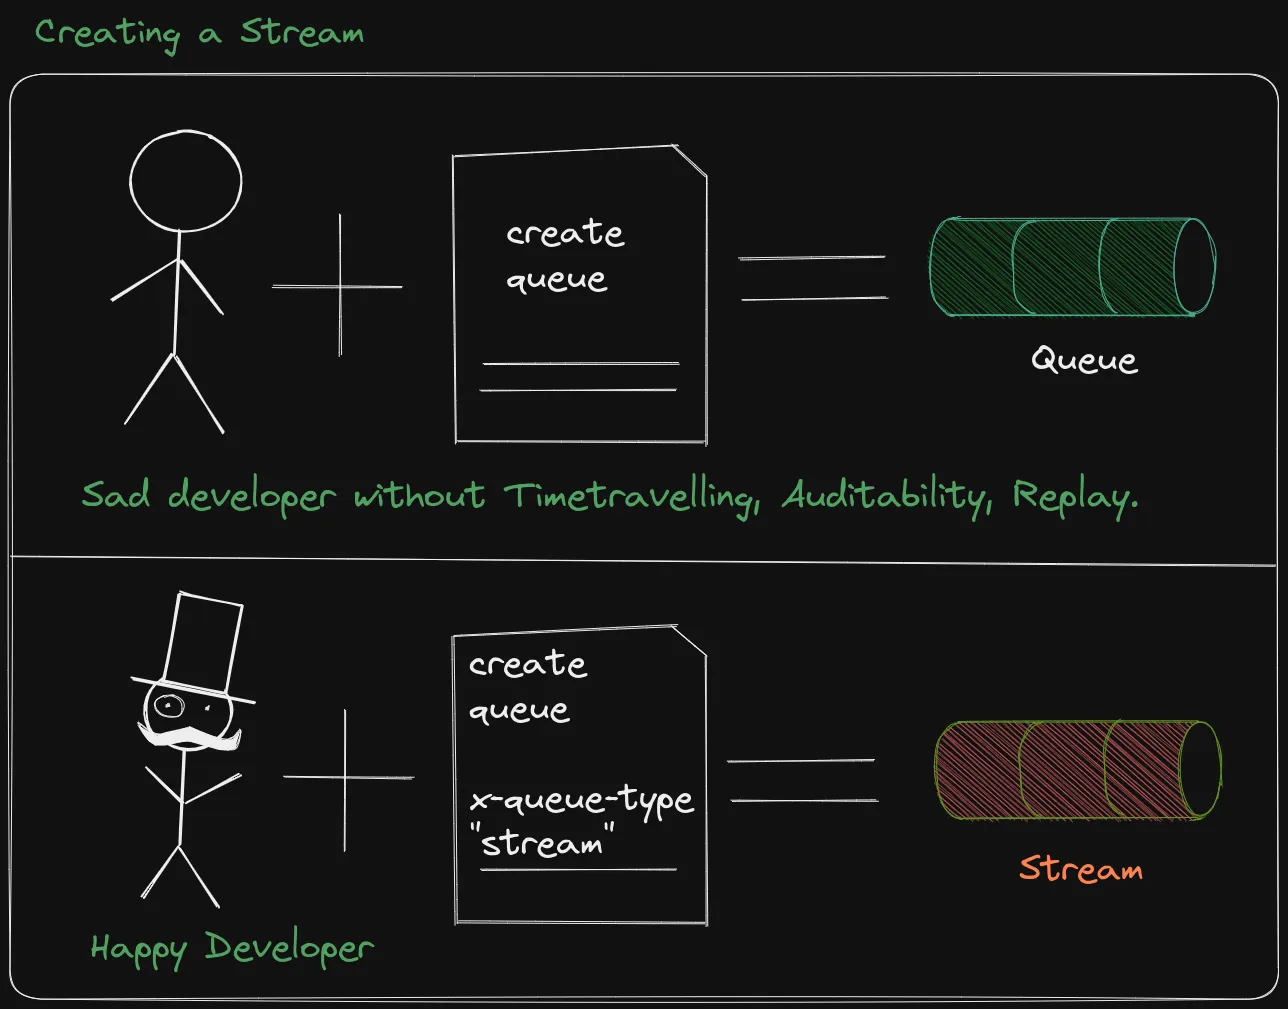
Remember I earlier stated that it’s almost Seamless to start working with a Stream? This is because we can use the same code to create a Stream, we simply need to add a few parameters to the amqp.Table{} to manage the Stream. We will be adding the x-queue-type parameter.
- x-queue-type - Used to specify which type of Queue we create, should be set to “stream”
// Start the Stream queue
q, err := ch.QueueDeclare("events", true, false, false, true, amqp.Table{
 "x-queue-type": "stream",
})Try rerunning the code go run main.go and you should see an error.
panic: Exception (504) Reason: "channel/connection is not open"That is because the first time we ran the program, we created the Queue as a regular queue. Let’s delete the queue and retry. You can delete a queue using the Admin Dashboard or Rabbitmqctl.
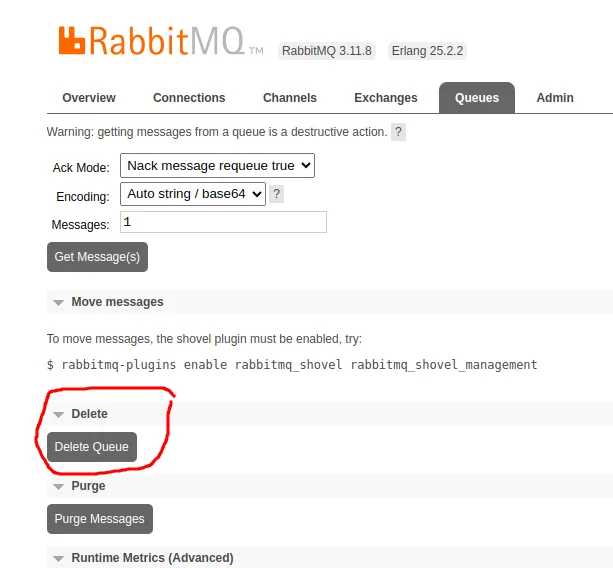
If you prefer the CLI, exec the delete command from the docker container.
docker exec -it rabbitmq rabbitmqctl delete_queue events
----------
Deleting queue 'events' on vhost '/' ...                                                                                │
Queue was successfully deleted with 1876 ready messages
You should see that the Queue is marked as a Stream.
Retention In Streams

When creating a Stream there are a few parameters/settings that are good to know of. Most of these settings are related to Retention which will be important. Remember a Stream will persist data until your disk space runs out, unless we specify some kind of retention. In RabbitMQ we can create Time-based or Size-based retentions.
If using HA mode, the Stream logs are replicated across nodes - RabbitMQDocs.
- x-stream-max-segment-size-bytes - Sets the MAX size for each “Segment” file. Events on the stream will be saved to disk on a log file. When it reaches a certain size it splits into a new file called a Segment.
- x-max-length-bytes - The maximum length of the Stream. When this is reached it will start removing the earlier segment files (Size-based).
- x-max-age - The age at which the stream should start removing events from the log. Valid units are Y, M, D, h, m, s. Etc, ”10s” to remove events more than 10 seconds old. (Time-based)
One really important thing to mention is that Retention is only triggered when the Segment file is full and the segment is changed. You cannot set the x-max-age to 10s and expect events more than 10 seconds old to be removed instantly. When the segment is changed any segment files with events that are all old will get deleted.
That’s why it’s important to set the x-stream-max-segment-size-bytes for both x-max-length-bytes and x-max-age to work as expected.
Let’s try setting the segment size and the max size of the stream.
Begin by removing the old Stream.
docker exec -it rabbitmq rabbitmqctl delete_queue eventsUpdate the producer/main.go to set the settings in the amqp.Table.
q, err := ch.QueueDeclare("events", true, false, false, true, amqp.Table{
  "x-queue-type":                    "stream",
  "x-stream-max-segment-size-bytes": 30000,  // 0.03 MB
  "x-max-length-bytes":              150000, // 0.15 MB
  // If you want to use Timebased, set the x-max-age
  // "x-max-age":                       "10s",
})We are setting the limits low for now. Just to make it much easier to test and view what’s going on.
Running the producer should create the stream and add 1001 events.
Jump into the docker container
docker exec -it rabbitmq /bin/bashWe are going to view the segment files on the RabbitMQ Instance so it becomes clear what’s going on with the Segments and sizes.
Any files stored in var/lib/rabbitmq/mnesia/rabbit/$ID/stream/ this folder will contain all your streams as directories. Inside those directories, you can see the Segment files.
# Open Terminal inside docker container
docker exec -it rabbitmq /bin/bash
# Print out folders in the streams folder
ls -alh /var/lib/rabbitmq/mnesia/rabbit@5ede5b7d4c95/stream/
ls -alh /var/lib/rabbitmq/mnesia/rabbit@5ede5b7d4c95/stream/__events_1704714517938147005/
total 100K
drwxr-xr-x 2 rabbitmq rabbitmq   12 Jan  9 08:16 .
drwxr-xr-x 3 rabbitmq rabbitmq    3 Jan  9 08:16 ..
-rw-r--r-- 1 rabbitmq rabbitmq  240 Jan  9 08:16 00000000000000000000.index
-rw-r--r-- 1 rabbitmq rabbitmq  32K Jan  9 08:16 00000000000000000000.segment
-rw-r--r-- 1 rabbitmq rabbitmq  211 Jan  9 08:16 00000000000000000250.index
-rw-r--r-- 1 rabbitmq rabbitmq  32K Jan  9 08:16 00000000000000000250.segment
-rw-r--r-- 1 rabbitmq rabbitmq  240 Jan  9 08:16 00000000000000000503.index
-rw-r--r-- 1 rabbitmq rabbitmq  31K Jan  9 08:16 00000000000000000503.segment
-rw-r--r-- 1 rabbitmq rabbitmq  356 Jan  9 08:16 00000000000000000753.index
-rw-r--r-- 1 rabbitmq rabbitmq  31K Jan  9 08:16 00000000000000000753.segment
-rw-r--r-- 1 rabbitmq rabbitmq   66 Jan  9 08:16 00000000000000000996.index
-rw-r--r-- 1 rabbitmq rabbitmq 1.2K Jan 9 08:16 00000000000000000996.segmentNotice the files called *.segment. You can view those files and see your events stored as a long log. The size of those matches the size we set, 0.03.
The first one is always named 0000000000000000.segment.
Counting the file sizes of the segments (32+32+31+31+1.2) leaves us at 127.2 kilobytes. So we are close to our 0.15 MB limit.
You can print the Streams event size by listing it.
rabbitmqctl list_queues name messages | grep "events"

events 1004Let’s run the producer once more to send out 1001 more messages. This time it will overflow our Retention rule of 0.15 MB and trigger the retention.
root@5ede5b7d4c95:/# ls -alh /var/lib/rabbitmq/mnesia/rabbit@5ede5b7d4c95/stream/__events_1704714517938147005/
total 100K
drwxr-xr-x 2 rabbitmq rabbitmq   12 Jan  9 08:33 .
drwxr-xr-x 3 rabbitmq rabbitmq    3 Jan  9 08:16 ..
-rw-r--r-- 1 rabbitmq rabbitmq  588 Jan  9 08:33 00000000000000000996.index
-rw-r--r-- 1 rabbitmq rabbitmq  31K Jan  9 08:33 00000000000000000996.segment
-rw-r--r-- 1 rabbitmq rabbitmq  153 Jan  9 08:33 00000000000000001233.index
-rw-r--r-- 1 rabbitmq rabbitmq  31K Jan  9 08:33 00000000000000001233.segment
-rw-r--r-- 1 rabbitmq rabbitmq  327 Jan  9 08:33 00000000000000001482.index
-rw-r--r-- 1 rabbitmq rabbitmq  31K Jan  9 08:33 00000000000000001482.segment
-rw-r--r-- 1 rabbitmq rabbitmq  414 Jan  9 08:33 00000000000000001728.index
-rw-r--r-- 1 rabbitmq rabbitmq  30K Jan  9 08:33 00000000000000001728.segment
-rw-r--r-- 1 rabbitmq rabbitmq  124 Jan  9 08:33 00000000000000001965.index
-rw-r--r-- 1 rabbitmq rabbitmq 5.8K Jan 9 08:33 00000000000000001965.segmentNotice that the first Segment is the segment that was the LAST segment in the previous LS we ran. This is because the size limit was overflowed and RabbitMQ started to delete old items. The old segments were deleted to maintain the disk space.
Printing the size of the stream will return about the same amount of invoices.
root@5ede5b7d4c95:/# rabbitmqctl list_queues name messages | grep "events"
events 1014Consuming Streams Core In Go
Since we have a Producer and a Stream. Let’s create a Consumer that can read the stream.
Consuming a Stream is super easy. We consume it the same way we would a regular Queue.
There are some things we need to know regarding the configurations
- A prefetch count is required otherwise your code will crash. This controls how many messages the Server sends before waiting for the consumer to Acknowledge the messages.
- Auto Acknowledge has to be False, otherwise, you cannot start a Consumer. Streams do not allow Auto Ack.
That said and done, open up consumer/main.go and connect to the stream.
package main

import (
 "fmt"

 amqp "github.com/rabbitmq/amqp091-go"
)

func main() {
 conn, err := amqp.Dial(fmt.Sprintf("amqp://%s:%s@%s/%s", "guest", "guest", "localhost:5672", ""))
 if err != nil {
  panic(err)
 }

 ch, err := conn.Channel()
 if err != nil {
  panic(err)
 }

 // Set prefetchCount to 50 to allow 50 messages before Acks are returned
 if err := ch.Qos(50, 0, false); err != nil {
  panic(err)
 }

 // Auto ACK has to be False, AutoAck = True will Crash dueue to it is no implemented in Streams
 stream, err := ch.Consume("events", "events_consumer", false, false, false, false, amqp.Table{})
 if err != nil {
  panic(err)
 }
 // Loop forever and read messages
 fmt.Println("Starting to consume")
 for event := range stream {
  fmt.Printf("Event: %s \n", event.CorrelationId)
  fmt.Printf("headers: %v \n", event.Headers)
  // This is your message payload in the event.Body as a []byte
  fmt.Printf("data: %v \n", string(event.Body))
  invoice.Ack(true)
 }
 ch.Close()
}The code connects to the stream and starts consuming it.
Go ahead and run the Consumer. You should see the “Starting to consume” print and then nothing.
Isn’t that strange? The stream has contained 1001 messages since we ran the publisher?
What if you try running the Publisher again? Your consumer should now spew out messages.
Event: 4137f26d-7f5d-4c03-a3f7-15893172259c
headers: map[x-stream-offset:1998]
data: {"Name":"test"}
Event: 2a170e12-42e6-4888-b8aa-2c6268250b84
headers: map[x-stream-offset:1999]
data: {"Name":"test"}
Event: 482724db-86b8-42f7-affc-469fe839ecc0
headers: map[x-stream-offset:2000]
data: {"Name":"test"}
Event: a8b16936-944f-4921-a1f2-c4c096a8cfe3
headers: map[x-stream-offset:2001]
data: {"Name":"test"}Now, you might wonder what the x-stream-offset is that is printed from the Headers.
It is an essential configuration to understand when working with Streams because it allows us to define which messages we want to consume.
By default the x-stream-offset is set to next which listens to any new messages on the stream. All the details about consumption settings are found on RabbitMQ.
There are a few options here.
- next- The default that listens on new messages
- first - The first message available in the Stream segments
- last - All messages starting from the last written Chunk to the Segment file.
- offset - Specify a starting Index where to start reading from
- timestamp - The Posix timestamp to start reading from,
- interval - A string that defines how long back from CURRENT TIME to start reading, same string format as the x-max-age.
Let’s try some settings out. We begin by setting an offset to 2000 to print any messages after the 2000 first events. This is very useful when you know what index to start from.
// Auto ACK has to be False, AutoAck = True will Crash dueue to it is no implemented in Streams
 stream, err := ch.Consume("events", "events_consumer", false, false, false, false, amqp.Table{
  "x-stream-offset": 2000,
})When you run this it will print any messages from the 2000th.
If you want to only see the few latest events you can use the last, which will return the latest written events only.
stream, err := ch.Consume("events", "events_consumer", false, false, false, false, amqp.Table{
  "x-stream-offset": "last",
})You should see a few messages being printed when running this.
If you want to time-travel or view all events since the last retention you can leverage “first”.
stream, err := ch.Consume("events", "events_consumer", false, false, false, false, amqp.Table{
  "x-stream-offset": "first",
})This should print all events.
Sometimes we might want to rewind time just a little bit. We can use an interval for that. To rewind an hour we can use “1h”. This will only show events from the current time and backward.
stream, err := ch.Consume("events", "events_consumer", false, false, false, false, amqp.Table{
  "x-stream-offset": "1h",
})Note that in our code we are using a for loop which causes our code to run forever.
All these options define a starting point. If we continue to read the stream new messages will ALSO appear. It is important to remember that this only serves as a starting point.
Using RabbitMQ Streams Plugin In Go
So far we have been using the Streams Core, which is what enables Streams to work in RabbitMQ over AMQP 0.9.1.
To get the most out of Stream we want to use the binary protocol that Stream Plugin uses. That will majorly increase performance.
To do that we need to activate the Stream plugin for RabbitMQ. It comes delivered by default in RabbitMQ but needs to be enabled.
By enabling the stream plugin we will be able to use the optimized protocol and use a few other features such as Super Streams. A full list can be found in the Docs.
We need to open up another port. The stream plugin uses 5552 by default. Let’s remove the old RabbitMQ instance restart it with the new port enabled and enable the streams plugin. We also need to add an environment variable which the Stream plugin requires, it’s the exposed host setting. We will expose the host as localhost, the setting is required for streams to work with the plugin.
docker container rm -f rabbitmq # Delete the container
# Run docker again, but add setting for rabbit mq stream
docker run -d --name rabbitmq -p 5552:5552 -p 5672:5672 -p 15672:15672 -e RABBITMQ_SERVER_ADDITIONAL_ERL_ARGS='-rabbitmq_stream advertised_host localhost -rabbit loopback_users "none"' rabbitmq:3.9-management

docker exec rabbitmq rabbitmq-plugins enable rabbitmq_stream # Enable Stream plugin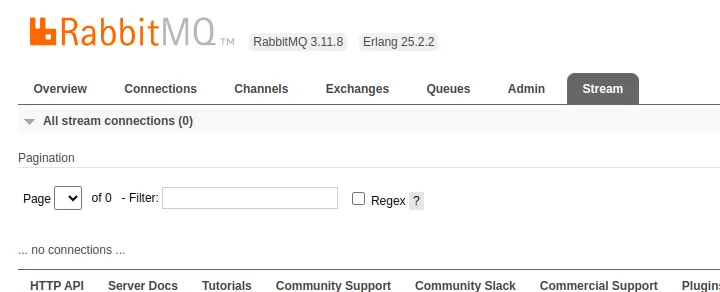
docker exec rabbitmq rabbitmq-plugins enable rabbitmq_stream_management # Enable UI to manage streamsIf you are using the RabbitMQ management UI you can view Streams in a new tab that should appear
Now, sadly we cannot continue using the Default AMQP library. RabbitMQ has a separate client to use the Stream Plugin.
Let’s create a producer_plugin folder that starts a producer using the Stream Plugin.
go get -u github.com/rabbitmq/rabbitmq-stream-go-client
mkdir producer_plugin
cd && producer_plugin
touch main.goWe will be doing the same thing as the previous producer, connect to the server, declare the stream and the retention rules, and send messages with a correlationID.
The next library only supports INT64 sizes so I will set the Segment to 1 MB and the Stream length to 2 MB, as a result, I will increase the amount of messages to 6000 so that we can reach the limit.
package main

import (
 "github.com/google/uuid"
 "github.com/rabbitmq/rabbitmq-stream-go-client/pkg/amqp"
 "github.com/rabbitmq/rabbitmq-stream-go-client/pkg/stream"
)

const (
 EVENTSTREAM = "events"
)

type Event struct {
  Name string
}

func main() {
 // Connect to the server on localhost
 env, err := stream.NewEnvironment(
  stream.NewEnvironmentOptions().
   SetHost("localhost").
   SetPort(5552).
   SetUser("guest").
   SetPassword("guest"))
 if err != nil {
  panic(err)
 }

 // Declare the Stream, the segment size and max bytes
 err = env.DeclareStream(EVENTSTREAM,
  stream.NewStreamOptions().
   SetMaxSegmentSizeBytes(stream.ByteCapacity{}.MB(1)).
   SetMaxLengthBytes(stream.ByteCapacity{}.MB(2)))
 if err != nil {
  panic(err)
 }

 // Start a new Producer
 producerOptions := stream.NewProducerOptions()
 producerOptions.SetProducerName("producer")
 producer, err := env.NewProducer(EVENTSTREAM, producerOptions)
 if err != nil {
  panic(err)
 }
 // Publish 6001 messages
 for i := 0; i <= 6001; i++ {

  event := Event{
   Name: "test",
  }
  data, err := json.Marshal(event)
  if err != nil {
   panic(err)
  }
  message := amqp.NewMessage(data)

  // Set the CorrelationID
  props := &amqp.MessageProperties{
   CorrelationID: uuid.NewString(),
  }
  message.Properties = props
  err = producer.Send(message)

  if err != nil {
   panic(err)
  }
 }

 producer.Close()
}It’s possible to BatchSend messages as well. It then accepts an array and sends them. The amqp.NewMessage returns a amqp.AMQP10 struct, and this struct implements the message.StreamMessage interface. If you have multiple messages to send as a batch you can do so by changing into this snippet.
// message.StreamMessage is a Interface that amqp.AMQP10 implements
 var messages []message.StreamMessage
 for i := 0; i <= 6001; i++ {
  event := Event{
   Name: "test",
  }
  data, err := json.Marshal(event)
  if err != nil {
   panic(err)
  }
  message := amqp.NewMessage(data)

  // Set the CorrelationID
  props := &amqp.MessageProperties{
   CorrelationID: uuid.NewString(),
  }
  message.Properties = props
  messages = append(messages, message)
 }
 // BatchSend allows us to send an array of messages
 if err = producer.BatchSend(messages); err != nil {
  panic(err)
}Remember Stream Core is the underlying stream implementation. You can view the segment files in the same way as before.
ls -alh /var/lib/rabbitmq/mnesia/rabbit@561eb6fe6c61/stream/__events_1704794983219464772/
total 542K
drwxr-xr-x 2 rabbitmq rabbitmq     6 Jan  9 10:17 .
drwxr-xr-x 3 rabbitmq rabbitmq     3 Jan  9 10:09 ..
-rw-r--r-- 1 rabbitmq rabbitmq  1.1K Jan  9 10:17 00000000000000000000.index
-rw-r--r-- 1 rabbitmq rabbitmq 1005K Jan  9 10:17 00000000000000000000.segment
-rw-r--r-- 1 rabbitmq rabbitmq   124 Jan  9 10:17 00000000000000012215.index
-rw-r--r-- 1 rabbitmq rabbitmq 66K Jan 9 10:17 00000000000000012215.segmentNotice that if you print a segment file they are now binary instead of clear text.
Consuming Streams Plugin In Go
At this point, we can start consuming the Stream using the Plugin.
This is a good time to mention that since we are using Stream Core in the underlying implementation. You can run the consumer/main.go again and see that you receive the new messages.
Yes, Stream Plugin and Stream Core can be used seamlessly together
We however want to use the Plugin SDK to leverage all fancy extra abilities.
Again, our consumer will be doing the same thing as our previous so you can view the differences.
Let’s create a consumer that accepts all messages from the stream using first.
mkdir consumer_plugin
cd consumer_plugin
touch main.gopackage main
import (
"fmt"
"time"
"github.com/rabbitmq/rabbitmq-stream-go-client/pkg/amqp"
"github.com/rabbitmq/rabbitmq-stream-go-client/pkg/stream"
)
const (
EVENTSTREAM = "events"
)
func main() {
// Connect to the server on localhost
env, err := stream.NewEnvironment(
stream.NewEnvironmentOptions().
SetHost("localhost").
SetPort(5552).
SetUser("guest").
SetPassword("guest"))
if err != nil {
panic(err)
}
// Create a Consumer, here we can confiugre our Offset using SetOffset
consumerOptions := stream.NewConsumerOptions().
SetConsumerName("consumer_1").
SetOffset(stream.OffsetSpecification{}.First())
// Starting the Consumer this way, It will apply messageHandler on each new message
consumer, err := env.NewConsumer(EVENTSTREAM, messageHandler, consumerOptions)
if err != nil {
panic(err)
}
// Sleep while we consume, in a regular app handle this as a regular goroutine with a context
time.Sleep(5 * time.Second)
consumer.Close()
}
// messageHandler is used to accept messages from the stream and apply business logic
func messageHandler(consumerContext stream.ConsumerContext, event *amqp.Message) {
fmt.Printf("Event: %s \n", event.Properties.CorrelationID)
fmt.Printf("data: %v \n", string(event.GetData()))
// Unmarshal data into your struct here
}If you run this you should see all messages being printed.
To change to accepting by Offset or Timestamp etc we can easily modify set parameters we pass into the SetOffset function.
// Create a Consumer
 consumerOptions := stream.NewConsumerOptions().
  SetConsumerName("consumer_1").
SetOffset(stream.OffsetSpecification{}.Offset(6000))I think this approach is nicer than the regular AMQP 0.9.1 Client since that allows us to pass in any values. I prefer this since it is very explicit about what we do.
Or if we want to grab the events from the last two hours.
twoHoursAgo := time.Now().Add(2 * time.Hour)
 consumerOptions := stream.NewConsumerOptions().
  SetConsumerName("consumer_1").
SetOffset(stream.OffsetSpecification{}.Timestamp(twoHoursAgo.Unix()))Try experimenting with different Offsets to get familiar with them.
SubEntries and Compression
At this time we know how to Publish and Consume streams. One thing I’d like to mention is Subentries and compression.
Subentries is a technique that allows us to wait for a small batch of messages before sending them over the wire. Each Subentry gets a “slot” in the outgoing network frame. This allows us to greatly increase throughput since we reduce the network traffic by a lot. It also enables us to use Compression to further reduce the network size.
Luckily, this is all handled by the Producer and the SDK. All we need to do is set a size for how many messages to squeeze together and a compression method.
// Publish 6001 messages
 //
 producerOptions := stream.NewProducerOptions()
 producerOptions.SetProducerName("producer")

 // Batch 100 events in the same Network Frame send, the SDK will handle everything else for us
 producerOptions.SetSubEntrySize(100)
producerOptions.SetCompression(stream.Compression{}.Gzip())If you add those options you are enabling gzip compression and telling the SDK to use subentries.
Subentries can increase throughput but also introduce some latency since we introduce a small wait for the subentry to fill up. There is also some latency in performing gzip and unzipping on the consumer.
To compare the differences let’s inspect the network traffic quickly. Before adding Subentry to my Producer, I will fire it off while recording my TCP traffic to the Docker interface on port 5552.
I will do the same thing after when I have subentry and compression enabled.
sudo tcpdump -i docker0 port 5552 -w rabbitmq.pcap
go run main.go
// Add Subentry and Compression and rerun
sudo tcpdump -i docker0 port 5552 -w rabbitmq_subentry.pcap
go run main.goWhen we have two files containing the network traffic we can inspect and view the difference.
You can print the files using -A -r with tcpdump.
tcpdump -A -r rabbitmq_subentry.pcap | more

07:37:14.035200 IP blackbox.47416 > 172.17.0.2.5552: Flags [P.], seq 4914:7178, ack 473, win 501, options [nop,nop,TS val 632942913 ecr 455897866], length 2264
E.      ...@.@............8......H.......a$.....
%..A.,s
...................^...d..!4...............y?..O........S.Z-.$G....'.....:2..}#...n...|&....n.T.....?..........#............UY..j..J..R .7.8A...................c.....c........z...E..
,....J..O.A...F.d..).[o...!.&3KT>.."...{..#....Zw.........w..!.^.`..B...=.?....]..T..i...       ..vZ..A..T...S..
...q6.....J:.......} ..j.W.@>.{M..+~AK.5.!.6.*.}.(.o.=.l...R......Y..v..>.Za.x...p..G, .......tZ..4....Vp...m.....>.....zq<d.d&..v.=.~.(=...A.#..Kq..,..(......0.......t..b     .h..<=.2............NR.....e..2.
_..,.8..DQ..{.........W&.{@.^.!1?4.71.d..G..`./..s....cJ.=[..w.......Fg/b..'-.e...... .....kJ...u...   ..k........'.P...T*.Y@....C.>.........U;...S)......h+.M}_..8B.`....!6]....b...................:..}...l
..J...V.`......{.....hq.[.V..l87..l..}LE.X.......9..Tb.....S....o'.#W4.H&.j...z.......<A!p...2......&o......G..... ..,;.__.....b......f!..T?L.R#e..6...!.
.3...].y...t.RN...1e....+t...j............tL....;.&,j[A^C`...K..=g1......z.F......@......w...zQ8.D......-~N...aEo<.......'$V.S.......?|.f.$^`[...!nG.RR.....-.....6.._.$fG-s..O./us..<AQ.H58..Sw...N6.QzC.~9...p
.?..u...........:.......D.....JC...........I...T.....i...
You can see that those payloads are indeed compressed.
Try printing the noncompressed pcap and you should see our events in clear text.
tcpdump -A -r rabbitmq.pcap | more

07:54:10.137870 IP blackbox.33676 > 172.17.0.2.5552: Flags [P.], seq 37640:60808, ack 700, win 501, options [nop,nop,TS val 633957144 ecr 456912097], length 23168
E.Z.q.@.@..h................I..r...........
%.k..;....$]........d......v....Q.Ss....5....@@@@@.$15ffe726-808c-4e8c-a022-e62107ee48aa@@@@@C.Su..{"Name":"test"}......v....Q.Ss....5....@@@@@.$dd006d08-01bd-4c1e-821f-c102f870e67c@@@@@C.Su..{"Name":"test"}.
.....v....Q.Ss....5....@@@@@.$e9b37aa9-0feb-413d-b85c-9e9fb73872bd@@@@@C.Su..{"Name":"test"}......v....Q.Ss....5....@@@@@.$d98ca05c-45be-47ec-b981-9896d68788a4@@@@@C.Su..{"Name":"test"}......v....Q.Ss....5...
.@@@@@.$639e4b67-454e-4d27-b36b-26ba7e1a72a8@@@@@C.Su..{"Name":"test"}......v....Q.Ss....5....@@@@@.$b8b63a3b-02e5-4ff7-8512-edd7dc18183f@@@@@C.Su..{"Name":"test"}......v....Q.Ss....5....@@@@@.$c6431699-83a8-
4To compare the total size of the files we can count all the length packages and see the difference.
tcpdump -r rabbitmq_subbatch.pcap | grep 'length' | awk '{sum += $NF} END {print sum}'
140528
tcpdump -r rabbitmq.pcap | grep 'length' | awk '{sum += $NF} END {print sum}'
610655Wow! Thats a big difference, should we not just always do it?
No, it comes with a cost sadly.
Doing subentries seems to be breaking deduplication from working as expected.
In the SDK code, you can view this
func (producer *Producer) assignPublishingID(message message.StreamMessage) int64 {
 sequence := message.GetPublishingId()
 // in case of sub entry the deduplication is disabled
 if !message.HasPublishingId() || producer.options.isSubEntriesBatching() {
  sequence = atomic.AddInt64(&producer.sequence, 1)
 }
 return sequence
}Let’s take a look at deduplication.
Deduplication
This is going to be a short chapter, but an important one.
Deduplication is a built-in feature in RabbitMQ to avoid sending the same message over and over. Notice how we can rerun our program and resend the same events indefinitely?
It is good practice to add a sequence number to messages to avoid events being resent across the system.
To do this is easy seeing as there are only two requirements
- The producer has to have a ProducerName set.
- The message has to be assigned a publishing ID before being sent.
We are already setting the producer name when we call
producerOptions.SetProducerName("producer")What we need to add is publishing message usage SetPublishingId on the messages. This ID should be an incrementing ID that represents a unique identifier for our messages.
for i := 0; i <= 6001; i++ {

  event := Event{
   Name: "test",
  }
  data, err := json.Marshal(event)
  if err != nil {
   panic(err)
  }
  message := amqp.NewMessage(data)
  // Set a publishing ID to avoid dupelicate events being sent
  message.SetPublishingId(int64(i))
.....Important to remember is that we cannot use subentry and deduplication at this time.
Disable the subentry and rerun the program and you should see that the events inside the stream do not increase after the first run. This is because the RabbitMQ Server is recognizing the publishing ID and not allowing it to be sent again.
Conclusion & Tips
Great, at this time we know how to use the Stream Core and the Stream Plugin.
Remember the Stream Plugin is much more performant than Stream Core but requires a few additional steps.
I do recommend when building a real-world example that you have the Payload entities in a shared library that the Publishers and Consumers can all import and use. This helps keep the Marshalling and Unmarshalling of the payloads clean. I highly recommend using Protobuf to define your events and use them over RabbitMQ. It would be the same thing that we did with our simple Event struct, but with the Proto-generated structs instead.
In this tutorial we do not cover Super Streams, this is because they are not yet implemented in the Go SDK. You can follow the progress on GitHub.
In this tutorial we covered
- What streams are in RabbitMQ
- Stream Core vs Stream Plugin
- How to use both in Go
- Subentries and Compression
- Deduplication
All code used in this tutorial can be found on my GitHub.
Appendix
Code used: https://github.com/percybolmer/rabbitmqstreams-go
Stream feature matrix: https://www.rabbitmq.com/stream-core-plugin-comparison.html
RabbitMQCTL: https://www.rabbitmq.com/rabbitmqctl.8.html
RabbitMQ Consumption: https://www.rabbitmq.com/streams.html#consuming
RabbitMQ Data safety: https://www.rabbitmq.com/streams.html#data-safety
SuperStreams: https://github.com/rabbitmq/rabbitmq-stream-go-client/issues/149
If you enjoyed my writing, please support future articles by buying me an Coffee