Deploying Smart Contracts to Binance Smart chain with Truffle
Deploying a Smart contract to testnet and mainnet using Truffle. Migrating in a easy way.
by Percy Bolmér, August 3, 2021

This is the fourth and last article in a series in where we are building a DApp from scratch with a custom-built BEP-20 Smart contract.
In this article, we will look at how to deploy the Smart Contract to the Binance testnet instead of our local Ganache instance.
Building a Decentralized Application With BEP-20 In Solidity — This article will help you understand the basics of Solidity
Creating a Inheritable Staking contract in Solidity — Second article in which we cover more advanced Solidity items and implement Staking and Rewarding
Using a Smart Contract In An Web Application — Third article of the series in which we learn how to connect to the Blockchain via an Web application using MetaMask
[Deploying Smart Contracts to Binance Smart Chain With Truffle] — Fourth and last article in which we learn how to deploy our Smart contract to the real networks
You can find the full code used from the previous parts here.
We will begin by updating the Truffle configuration in our truffle-config.js.
We will open up three networks so that we can deploy them to all three networks. The latest deployment information which the correct seeds to the networks can be found here. We will also need to use the truffle/hdwallet-provider which you have to download.
npm install @truffle/hdwallet-providerAfter that we need to uncomment the module.exports fields and add the following three networks.
const HDWalletProvider = require('@truffle/hdwallet-provider');
const fs = require('fs');
const mnemonic = fs.readFileSync(".secret").toString().trim();

module.exports = {
  networks: {
    development: {
      host: "127.0.0.1",     // Localhost (default: none)
      port: 8545,            // Standard BSC port (default: none)
      network_id: "*",       // Any network (default: none)
    },
    testnet: {
      provider: () => new HDWalletProvider(mnemonic, `https://data-seed-prebsc-1-s1.binance.org:8545`),
      network_id: 97,
      confirmations: 10,
      timeoutBlocks: 200,
      skipDryRun: true
    },
    bsc: {
      provider: () => new HDWalletProvider(mnemonic, `https://bsc-dataseed1.binance.org`),
      network_id: 56,
      confirmations: 10,
      timeoutBlocks: 200,
      skipDryRun: true
    },
  },

  // Set default mocha options here, use special reporters etc.
  mocha: {
    // timeout: 100000
  },

  // Configure your compilers
  compilers: {
    solc: {
      version: "0.8.4", // A version or constraint - Ex. "^0.5.0"
    }
  }
}Before this will work you need to notice that we are reading a file named .secret.
This file should contain only one thing, your mnemonic.
This is a list of words that are used to access your wallet. Think of it as a password, but long. You should have gotten the seed phrase when you created your account in MetaMask. But if you’ve forgotten it you can view it by following this link.
Deploying to TestNet
If you have pasted your mnemonic into the .secret file It’s time to try deploying the smart contract. We will begin deploying it to TestNet to see how easy it is to deploy. Now the reason to deploy to TestNet is that it will work like a test to see that the Smart contract works as expected.
The Testnet is a complete replica of the real Production network, so it is a great way to try everything out. Using it will allow us to also have a Development environment (Ganache), Test (Testnet), Production (real Binance smart chain).
Remember how we ran truffle migrate to deploy to Ganache?
The beautiful part here is, to deploy to Test or production we can use the same procedure, just add a — network flag to the command and specify what network to deploy to. Remember that to push to test and production you will have to pay gas.
truffle migrate --network testnetTry running the command to see what happens. If you are using a new MetaMask account as I have done in this series, you will see the following.
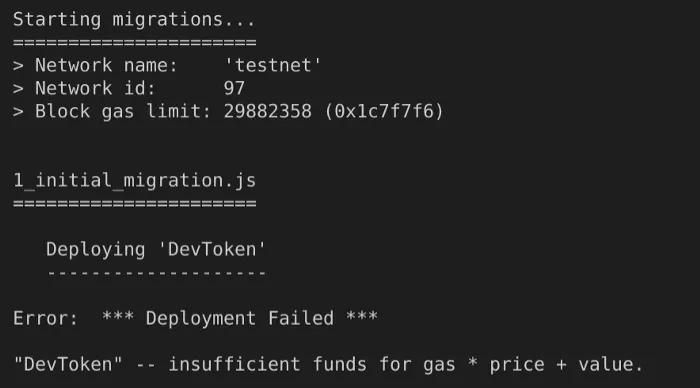
The reason is as I’ve repeated many times now, it costs to deploy a smart contract. Remember this if you push a smart contract to the real Binance smart chain, it will draw your money.
But I don’t to pay money to deploy to test! — Cheap developer
Luckily for us, the testnet has faucets that allow us to get free test Ethereum. Let’s connect MetaMask to the Testnet by adding yet another Network. The network is the official Binance Testnet. If you have forgotten how to add a Network, either go to article three of this series or read here.
The network data to use when adding a Custom RPC is the following
Network Name: Smart Chain — Testnet
New RPC URL: https://data-seed-prebsc-1-s1.binance.org:8545/
ChainID: 97
Symbol: BNB
Block Explorer URL: https://testnet.bscscan.com
After you have added that, grab your Account address by clicking the account in MetaMask.
Visit the official TestNet smart faucet which gives you tokens to use. Simply enter your address and press “ Give me BNB ”. Wait a few seconds and your account should be funded. You should now see that you have 1 BNB in MetaMask. Time to give the truffle migrate a new spin.
Note. If you have multiple accounts in MetaMask and have given the free tokens to something other than the first account you need to specify the account to use whilst migrating. Truffle will default to the first available account. Add the following inside your testnet config.
from: "0xyouraccount"Run the migrate command to testnet again with the account you have been given funding on.
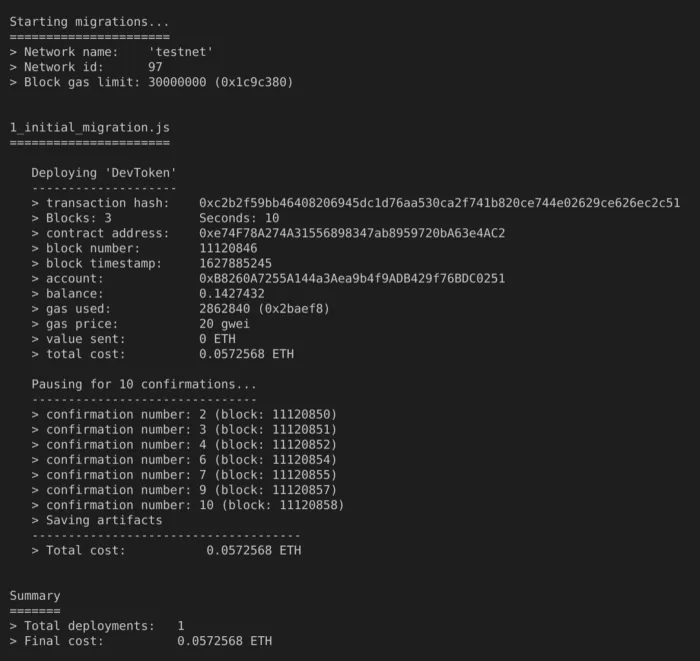
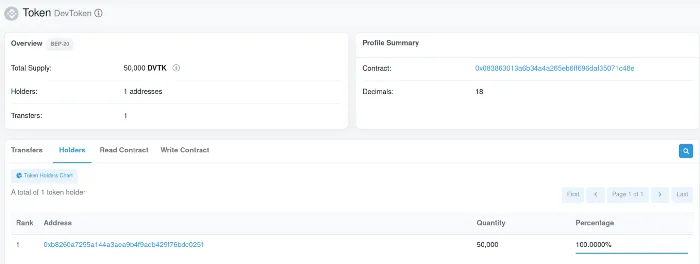
Congratulations, you have deployed to Testnet. You can copy the contract address.You can then search for it on the test network explorer. You can now add the Token to MetaMask to view your current balance of the account. Select “Add Token” And enter the requested information which should be the Contract address. To migrate to mainnet, simply change the network in the migrate command to the mainnet, but remember to have enough gas on your account.
Testing the DApp in the TestNet
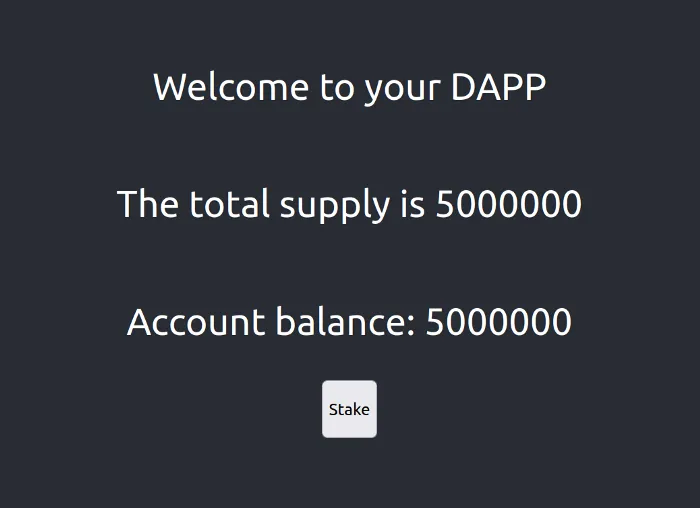
Let’s try the DApp we built in part 3 of the series and see if it works.
Go to the horrible hardcoded getContractAddress function located in App.js and replace the contract returned by it to match your smart contract address.
  // getContractAddress returns the address of the contract
  // hardcoded :)
  function getContractAddress() {
    // replace this to match your contract address
    return "0x083863013a6b34a4a265eb6ff696daf35071c48e";
}If you have selected TestNet network in MetaMask and your account, start up the DApp again using
npm startand visit localhost:3000.
View transactions and events in the Binance Testnet explorer.
Let’s perform a Stake and visit the testnet explorer to view the information just like we could do in Ganache. You should be prompted with a MetaMask request upon pressing the button.
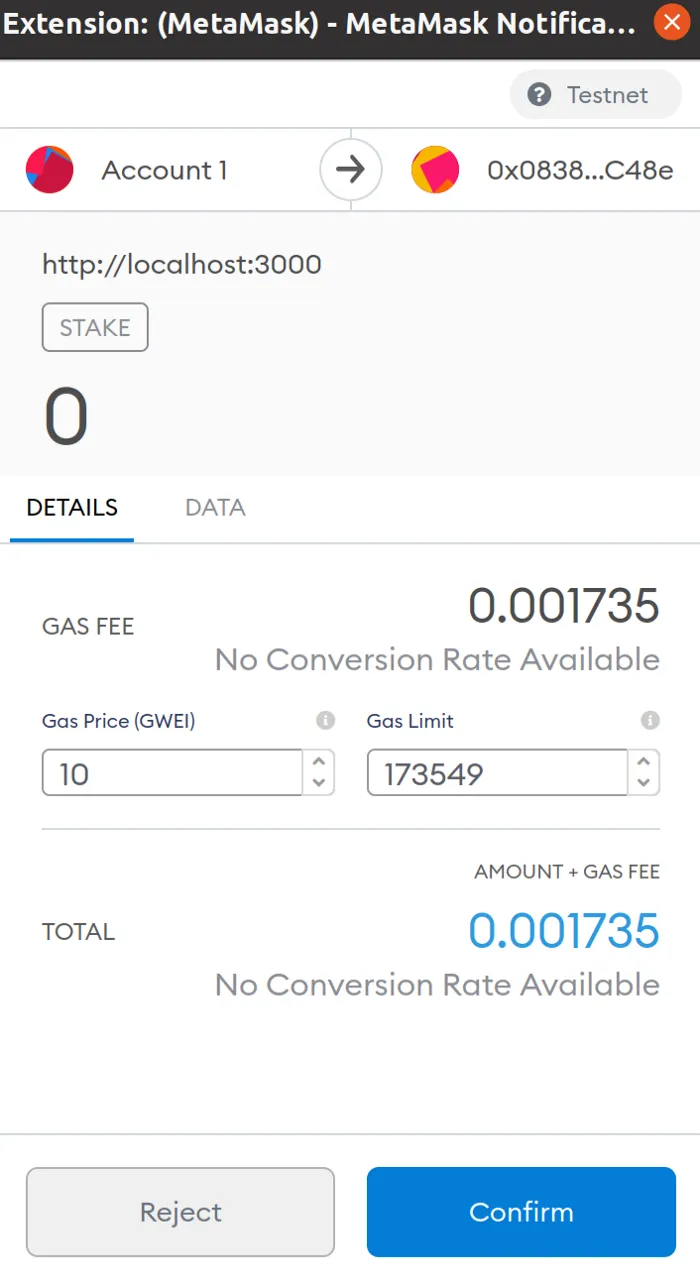
Now, wait for the MetaMask popup saying that the transaction was successful. When it comes, either click it to bring up the explorer or visit the explorer and search for the Tokens address.

This will bring you to the explorer where you can view all transactions that occur on the Smart contract, and also all the events.
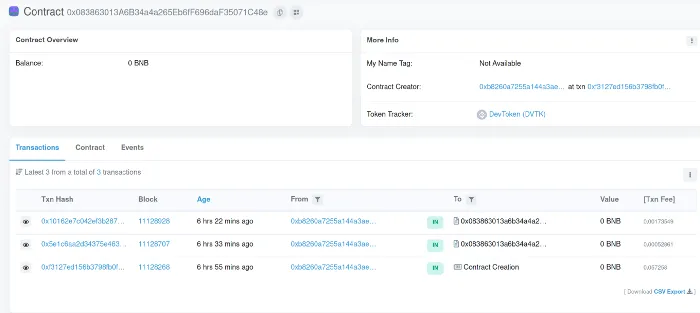
If you navigate to the Events tab you should also be able to see the Staked event that has been fired.
Conclusion
Congratulations! If you have followed all the parts of this series then you have now built your first DApp. In the series we have learned
- Basic Solidity
- Implemented a simple Staking mechanic
- Implemented a reward system
- A web UI to use and control the contract
- How to deploy to testnet and mainnet
Hopefully, you’ve learned something. And thank you for reading!
Feel free to comment or send me messages if there are any questions or feedback.
If you enjoyed my writing, please support future articles by buying me an Coffee