Using a Smart contract in an Web Application
Connect to a Smart Contract on the Binance / Ethereum block chain using Web3, React.
by Percy Bolmér, August 3, 2021

This is the third part of the series in which we have built a BEP20 smart contract in Solidity. We will now begin using the Smart contract in a web application, and see how we can push the contract to production.
Building a Decentralized Application With BEP-20 In Solidity — This article will help you understand the basics of Solidity
Creating a Inheritable Staking contract in Solidity — Second article in which we cover more advanced Solidity items and implement Staking and Rewarding
[Using a Smart Contract In An Web Application] — Third article of the series in which we learn how to connect to the Blockchain via an Web application using MetaMask
Deploying Smart Contracts to Binance Smart Chain With Truffle — Fourth and last article in which we learn how to deploy our Smart contract to the real networks
You can find the full code from the previous article here. We will now update and add a web application to run against the network.
Migrating the Smart contract to the Network
The first thing we need to do is to Migrate the written smart contract to the network. We will be using Ganache to host a local network, you may also use the real test network. Migrating means that the push the Smart contract onto the network. This will cost gas, so the account pushing the Smart contract will be required to have the proper amount of gas available.
We can use truffle to migrate to development, testnet, and even mainnet. Note that mainnet will cost real gas (that means real money).
We will cover testnet and mainnet later, for now, we will rely on Ganache to host the network.
If you haven’t read the first two articles, Building a Decentralized Application With BEP-20 In Solidity explains how to install Ganache. Make sure you have ganache up and running or the truffle will fail.
Migration is easy and can be performed by running the following command if you are located at the root of the codebase.
truffle migrateThe output should show you the account used, the gas cost, the actual Ethereum cost, etc.
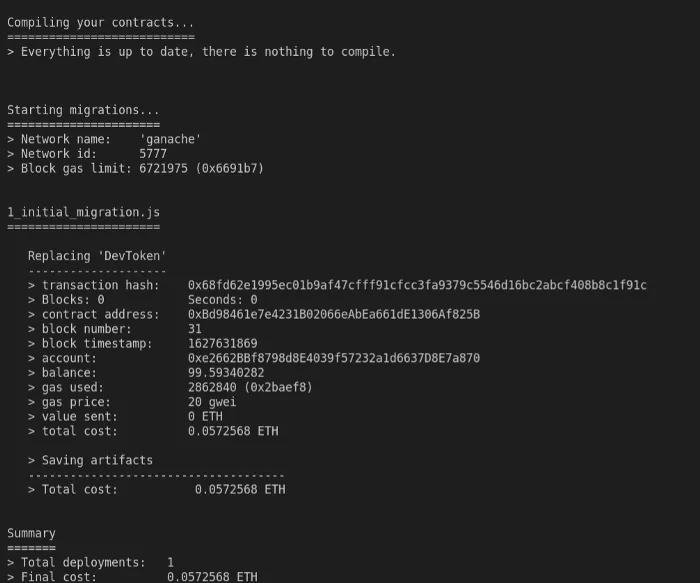
If compilation and migration were successful, you should see a new folder named build. This folder will contain JSON files, which explain the contracts. These files will be important later as they are used by the JavaScript client to understand the functions available.
Building the web application
In this article, we will use the web3-eth npm package to handle the network.
I will be using the react tool create-react-app to generate a template application I can use. I will name my application dapp since it will be a decentralized application. We will focus on the functionality in this application, and not the design. The design is up to future you.
create-react-app dappWe will be needing to also install the eth3 dependency, go inside the dapp application and run
npm install --save web3-ethIf you are new to React then you might want to start the application to see what it is running and how it looks like before moving on. Run npm start and visit localhost:3000.
npm startConnecting to blockchain network
We will begin connecting the application to the blockchain network upon loading. Open up src/App.js.
First, we need to import Web3 and also useEffect so that we can trigger the connection when the application loads. If you are unfamiliar with react, useEffect is a function that is triggered when the function is called, think of it like a function that should be run whenever your component is being loaded.
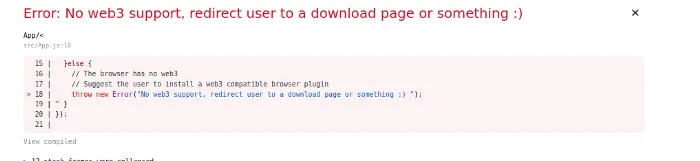
We will make a check if the Browser used has web3 support. This is needed to communicate with the blockchain network, and hence our smart contracts.
import logo from './logo.svg';
import './App.css';
// These imports are important
import React, { useState, useEffect } from 'react';
import Web3 from 'web3-eth'


function App() {

  // this will trigger whenever the App function is called, which index.js runs at startup
  useEffect(() => {
    // Here we check if there is web3 support
    if (typeof web3 !== 'undefined') {

    }else {
      // The browser has no web3
      // Suggest the user to install a web3 compatible browser plugin
      throw new Error("No web3 support, redirect user to a download page or something :) ");
    }
  });

  return (
    <div className="App">
      <header className="App-header">
        <p> Welcome to your DAPP application</p>
      </header>
    </div>
  );
}

export default App;Reload the website and you should now see this error message.
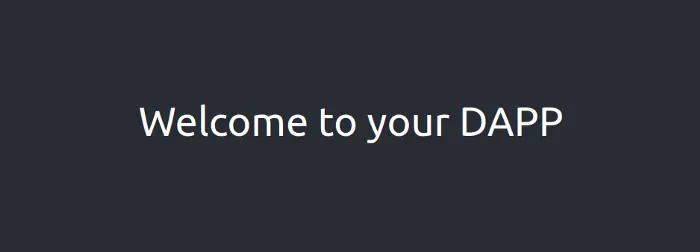
Let’s fix this by downloading and installing support for web3. I like MetaMask, which is available as a browser plugin and friendly to use.
When installing MetaMask it will guide you through the setup process. I won’t cover all the details, but you should select “Create a Wallet” and enter a secure password. Make sure you read about the Recovery phrase and Save it.
Once you have stepped through the setup, your browser should now be able to talk to the Ethereum blockchain.
Revisit localhost:3000 and you should now be presented with a welcoming message.
Now, we are not quite ready yet. We have only checked if the browser can run web3. However there are many web3 providers out there, and not only MetaMask. We will for now only support MetaMask, so let’s check if the provider is MetaMask. We will make this trigger automatically, but you usually have a Button, or a few buttons to support many providers.
If it is, we will grab the accounts found in the current MetaMask. We will use web3 to make a call to request accounts. This will prompt a popup from the MetaMask plugin asking to accept the connection.
We will also make sure to catch any errors, in case a user declines or if something goes wrong. In this DApp I will simply throw an error, but it shows you how.
  // this will trigger whenever the App function is called, which index.js runs at startup
  useEffect(() => {
    // Here we check if there is web3 support
    if (typeof web3 !== 'undefined') {
      window.web3 = new Web3(window.web3.currentProvider)
      // Check if its MetaMask that is installed
      if (window.web3.currentProvider.isMetaMask === true) {
        connectMetaMask();
      } else {
        // Another web3 provider, add support if you want
      }
    }else {
      // The browser has no web3
      // Suggest the user to install a web3 compatible browser plugin
      throw new Error("No web3 support, redirect user to a download page or something :) ");
    }
  }, []);
  // connectMetaMask is used to connect to MetaMask and ask permission to grab account information
  function connectMetaMask() {
    // We need to make the connection to MetaMask work.
    // Send Request for accounts and to connect to metamask.
    window.web3.requestAccounts()
    .then((result) => {
      // Whenever the user accepts this will trigger
      console.log(result)
    })
    .catch((error) => {
      // Handle errors, such as when a user does not accept
      throw new Error(error);
    });
};Visit the website and MetaMask should prompt you to allow the site to connect.
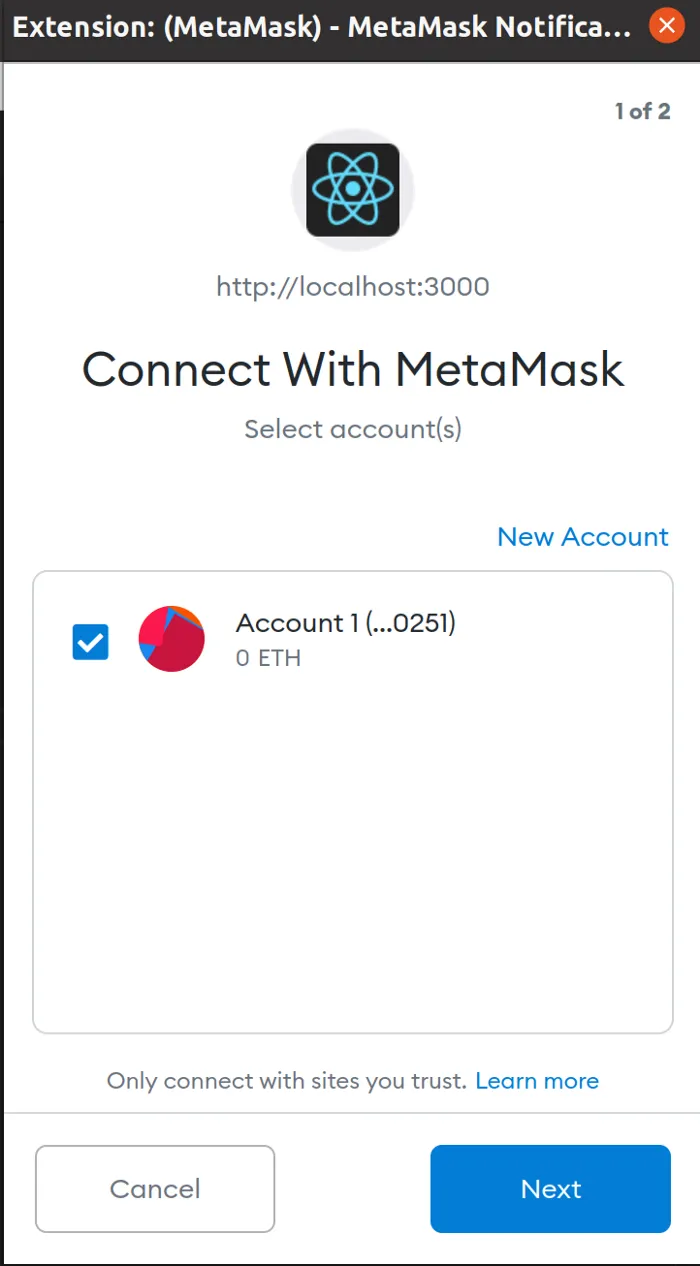
If you press Cancel you will see an error thrown, if you accept then you will have a connection configured. Right now we only print the accounts to the console, but we will change that in a bit.
Connecting to the correct network in MetaMask
Now that we are connected to MetaMask it’s time to see how we can connect to the network that is supposed to use. Let’s begin by adding our localhost network to the MetaMask as a network. Begin by opening MetaMask and select the networks dropdown.
Go to Custom RPC and enter the following values. If you have trouble finding consult the official documentation.
- URL to ganache network (In my case, HTTP://127.0.0.1:7545)
- Chain Code (1337) - MetaMask will tell you if it’s something else
You can see the currently used network in the top section of your MetaMask plugin. It should say the name of the network you just added so that it’s correct.
Network is the network that we send requests too, but we also have to keep track of our Accounts. You can have many Accounts on your MetaMask account. Now that we are using Ganache you can import the created accounts that holds all the Ethereum using a private key.
Open Ganache and go to the Accounts tab. In there you should see a image of a Key on the right most side. Press it to reveal the Accounts Private key. Copy that private key and go back to the MetaMask plugin. Click on the circle in the top to show all accounts and select Import Account, paste in the private key and you should have the Ganache test account available.
You will only see Ethereum for now, but you can add the Token that we are developing so we can see the accounts balance for that token.
If you have selected the correct account in MetaMask, select the Assets Tab and press the big Add Token button. It will require you to paste in the migrated contracts address which you can find either from the Output of Truffle migrate, or inside the Ganache Contracts tab.
Connecting to the smart contract in JavaScript
Now we need to create a client for the smart contract, and to do this we need the address of the Smart Contract and the ABI that was generated when we deployed the contract.
ABI is the standard way of describing a smart contract on the Ethereum blockchain. This is the JSON file you have for DevToken in the build folder. We use the ABI in web3 to know what functions are available.
I’ll create a function called getABI which fetches the data from DevToken.json. To be able to do this you need to copy the file from the build folder to the dapp/public folder.
cp build/DevToken.json dapp/public/ // getABI loads the ABI of the contract
// This is an async function so we can wait for it to finish executing
async function getABI(){
// DevToken.json should be placed inside the public folder so we can reach it
let ABI = "";
await fetch('./DevToken.json', {
headers: {
'Accept': 'application/json',
'Content-Type': 'application/json'
}
}).then((response) => {
// We have a Response, make sure its 200 or throw an error
if (response.status == 200) {
// This is actually also a promise so we need to chain it to grab data
return response.json();
} else {
throw new Error('Error fetching ABI');
}
}).then((data) => {
// We have the data now, set it using the state
ABI = data;
}).catch((error) => {
throw new Error(error);
});
return ABI;
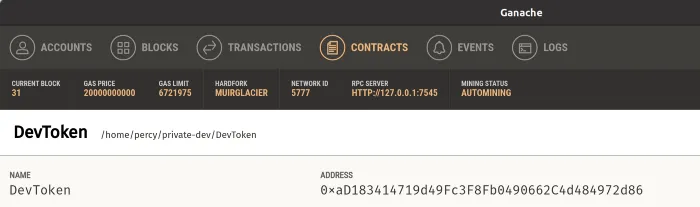
}Next up we need the address of the smart contract so we can connect to it. The address of the smart contract is located in the output of truffle migrate when you ran it. Otherwise, you can locate the address in Ganache under the Contracts tab.
Let’s make a simple function that returns that address to us.
  // getContractAddress returns the address of the contract
  // hardcoded :)
  function getContractAddress() {
    return "0xaD183414719d49Fc3F8Fb0490662C4d484972d86";
}If we tie these functions together we can create a function that connects to the smart contract. The web3 package we have imported can create a contract object from the ABI using the abi JSON as input together with the address.
We will assign the created contract object using a React state. Add the state creation at the top of the App function. Usually, all states are declared at the top of the function, and a Set function is also added.
function App() {
  // Adding our Devtoken state and a set function to assign it
const [devToken, setDevToken] = useState(0);Let’s put it all into a single function called connectToSelectedNetwork which will connect and set the devToken state for us.
  async function connectToSelectedNetwork() {
    // This will connect to the selected network inside MetaMask
    const web3 = new Web3(Web3.givenProvider);
    // Set the ABI of the Built contract so we can interact with it
    const abi = await getABI();
    const address = getContractAddress();

    // Make a new instance of the contract by giving the address and abi
    const devtoken = new web3.Contract(abi, address);
    // Set the state of the app by passing the contract so we can reach it from other places
    setDevToken(devtoken);
}You will also need to add the call to the connectToSelectedNetwork in the effect so it’s performed upon loading the page. This is my final snippet of the effect.
  // this will trigger whenever the App function is called, which index.js runs at startup
  useEffect(() => {
    // Here we check if there is web3 support
    if (typeof web3 !== 'undefined') {
      window.web3 = new Web3(window.web3.currentProvider)
      // Check if its MetaMask that is installed
      if (window.web3.currentProvider.isMetaMask === true) {
        connectMetaMask();
        connectToSelectedNetwork();
      } else {
        // Another web3 provider, add support if you want
      }
    }else {
      // The browser has no web3
      // Suggest the user to install a web3 compatible browser plugin
      throw new Error("No web3 support, redirect user to a download page or something :) ");
    }
}, []);Invoking smart contract functions from the webpage
We finally have the contract and have hooked up our account to it. It’s time to start invoking calls and see if we can leverage the blockchain contract.
Let’s begin simple, let’s grab the token’s total supply and the user account balance and stake summary. Since we want to show a profile for the visiting user.
First, we add a new state called accounts which will be used to store the accounts of the user.
  // accounts is the metamask accounts and setAccounts is used to assign them
const [accounts, setAccounts] = useState(0);We will begin by modifying the connectMetaMask function. In this function we request the user accounts already, we just need to save them in a state before moving on. Now let’s make sure we save the accounts instead of only printing them to the console.
  // connectMetaMask is used to connect to MetaMask and ask permission to grab account information
  function connectMetaMask() {
    // We need to make the connection to MetaMask work.
    // Send Request for accounts and to connect to metamask.
    window.web3.requestAccounts()
    .then((result) => {
      // Whenever the user accepts this will trigger
      setAccounts(result);
    })
    .catch((error) => {
      // Handle errors, such as when a user does not accept
      throw new Error(error);
    });
};Before moving on, I suggest putting a debugger after the connectToSelectedNetwork call has been executed. You can then explore the devToken contract that is created, which can help understand some of whats going on.
Inside the devToken object we can see all Events and Methods that are available. This can be useful when the application grows and your developing something real.
We will be invoking functions in two different ways, Asynchrounous and by callback. All the functions that are invoked are to be executed by the smart contract, and we don’t know when the result is coming back. So the executions will all return Promises. I won’t cover the details since that’s a too wide topic, but basically its a way to let us call a function whenever the response returns. Async means that we can use the await keyword instead, making it a lot easier to use, but with the drawback of blocking other executions until it’s done. Async can only be used if you use the keyword Async in the function decleration as in the example below.
  // getUserProfile will fetch account information from the block chain network
  async function getUserProfile() {
    // Let's grab the tokens total supply, the method is named the same as in the Solidity code, and add call() to execute it.
    // We will add the keyword await to let the code know that it should block until the reponse arrives.
    const devTokenSupply = await devToken.methods.totalSupply().call();
    console.log(devTokenSupply);
}To try it out, we will make sure getUserProfile gets called whenever the devToken contract is fully loaded. To implement this we will add yet another useEffect and subscribe to a new state called loaded. Whenever the loaded state gets updated we will reload the userinfo.
Add a new state call loaded first. Again, this should go at the top of the file
const [loaded, setLoaded] = useState(false);Let’s also create the useEffect that will take the loaded state as a trigger.
  useEffect(() => {
    // Only get profile if we are completly loaded
    if (loaded && (accounts !== 0)) {
      // get user info
      console.log(accounts);
      getUserProfile()
    } else {
    // dirty trick to trigger reload if something went wrong
      setTimeout(setLoaded(true), 500);
    }
    // This here subscribes to changes on the loaded and accounts state
}, [loaded, accounts]);Refresh and check your developer console and you should see the total supply printed.
The second way to call the function is to make the call and give a callback function. This function will be called whenever the response is retrieved. Using the call() method will actually return a promise, so we can use the same pattern as before to trigger a method of response. This has the benefit of not having to block all other executions during the delay. You will see the reason why I favor this pattern instead, it’s more code, but when using the testnet later you will notice that certain transactions can take some time. I’ll change the getUserProfile to use a callback instead. After you’ve changed, make sure to refresh and see that it is still printing the supply.
  // getUserProfile will fetch account information from the block chain network
  function getUserProfile() {
    // Let's grab the token total supply, the method is named the same as in the Solidity code, and add call() to execute it.
    // We can also get the response using a callback. I do recommend this method most times as we dont know how long the executions can take.
    devToken.methods.totalSupply().call()
      .then((result) => {
        console.log(result);
      })
      .catch((error) => {
        throw new Error(error);
      })
}We want to render the tokens total supply so let’s add a State called totalSupply and make getUserProfile set the supply instead of logging it to console. We will also update the HTML code to render the state.
const [totalSupply, setTotalSupply] = useState(0);Change the console.log inside getUserProfile to call the setter of totalSupply instead.
   devToken.methods.totalSupply().call()
      .then((result) => {
        setTotalSupply(result);
})Let’s update the return from the App function to also render the supply in the header. In a functional react app you can reference the state by using {} inside the html.
  return (
    <div className="App">
      <header className="App-header">
        <p> Welcome to your DAPP</p>
        <p>Token total supply is {totalSupply}</p>
      </header>

    </div>
  );
Right, now we know how to call a function that retrieves information. Let’s also add current account balance and stakes available before looking at transactions.
Begin with the two new states we will need.
const [accountBalance, setAccountBalance] = useState(0);
const [accountStakes, setAccountStakes] = useState({});
Next we will update the HTML to render the new states. We will only print the stakes to console log for now. We will also take the time to add a button for future stakes to be made, it wont work right now.
return (
    <div className="App">
      <header className="App-header">
        <p> Welcome to your DAPP</p>
        <p>The total supply is {totalSupply}</p>
        <p>Account balance: {accountBalance}</p>

        <button onClick={stake}><p>Stake</p></button>
      </header>

    </div>
);Now we will update getUserProfile to actually fetch all the data needed. Since each request basically looks the same, and I’m a big supporter of DRY, we will make a helper function which takes in the request to perform as a parameter. It will also accept the callback to apply on the response, and eventual arguments that should be passed to the blockchain.
  // getUserProfile will fetch account information from the block chain network
  async function getUserProfile() {
    // Let's grab the tokens total supply, the method is named the same as in the Solidity code, and add call() to execute it.
    // We can also get the response using a callback. I do recommend this method most times as we dont know how long the executions can take.
    call(devToken.methods.totalSupply, setTotalSupply);
    // balanceOf Requires input argument of the account to grab, so let's grab the first available account for now
    call(devToken.methods.balanceOf, setAccountBalance, accounts[0]);
    call(devToken.methods.hasStake, setAccountStakes, accounts[0]);

  }

  // call takes in a function to execute and runs a given callback on the response
  function call(func, callback, ...args) {
    // Trigger the function with the arguments
    func(...args).call()
    .then((result) => {
      // Apply given callback, this is our stateSetters
      callback(result);
    })
    .catch((error) => {
      throw new Error(error);
    })
}Reload the website and make sure it works properly.

Trigger transactions on the contract
Let’s try implementing a Stake button, we will not make a fancy render or UI, but a simple button that Stakes 1000 tokens when pressed.
Now we will implement the stake function which will be a hardcoded request to stake 1000 tokens on the current account.
You will notice that we will use another way of invoking the smart contract now, the reason might not be super clear at first. But whenever we trigger a function that does not alter the state of the blockchain, view modifiers etc, then we should use call. When we trigger new transactions and modify the state we should use send. You can read a more in-depth explanation here. One thing that has to be known as well is that each transaction costs GAS. Web3 comes with real nice method to estimate the gas cost which we can use before triggering the request.
  // stake will trigger a stake on the users behalf
  function stake() {
    // When we trigger Transactions we should use send instead of call
    // We should also calculate the GAS cost so we can apply the correct amount of gas
    devToken.methods.stake(1000).estimateGas({from: accounts[0]})
      .then((gas) => {
        // We now have the gas amount, we can now send the transaction
        devToken.methods.stake(1000).send({
          from: accounts[0],
          gas: gas
        });
        // Fake update of account by changing stake, Trigger a reload when transaction is done later
        setAccountBalance(accountBalance-1000);
      }).catch((error) => {
        throw new Error(error);
      });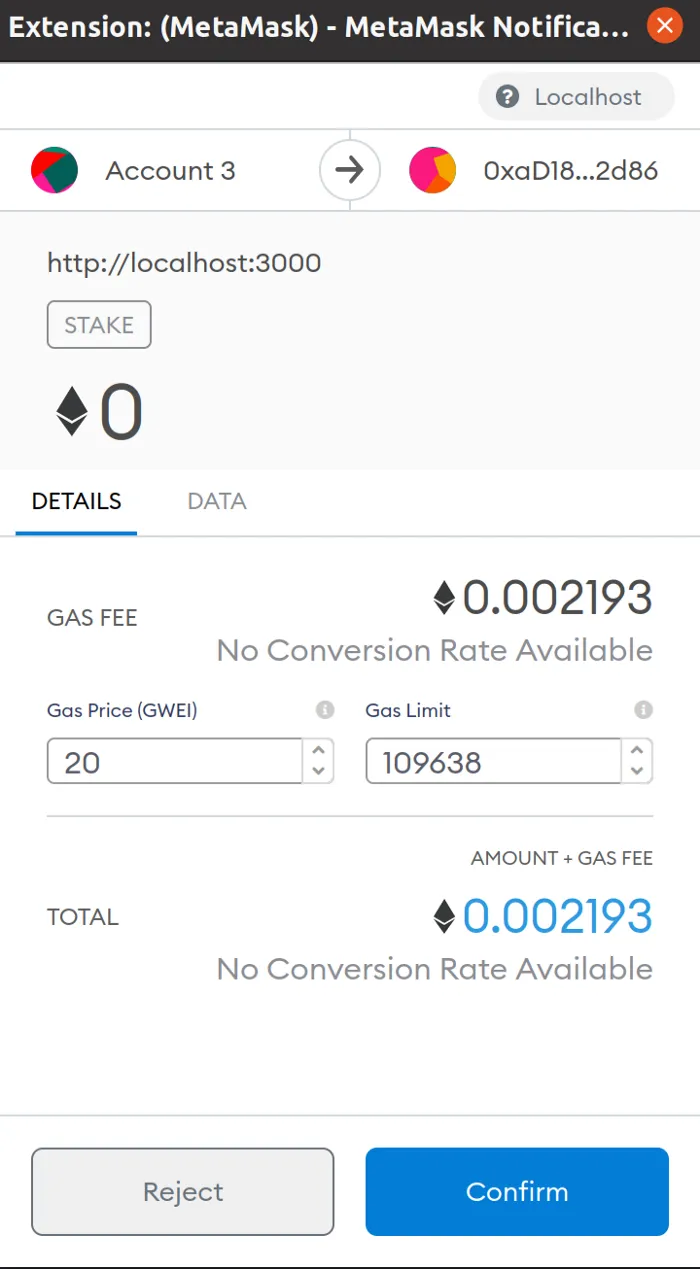
}Reload the website and press the stake button, If you have 0 tokens make sure you import an account from ganache and switch to that account. When you press the Stake button you should get a popup from MetaMask with information about the transaction and a reject or confirm button. Press Confirm and wait for it to complete.
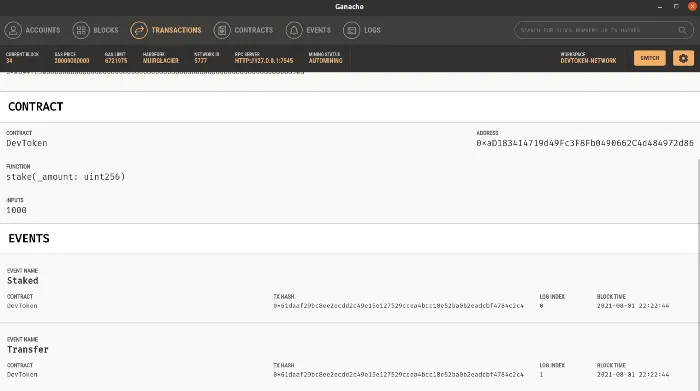
If you want too you can review the transaction in Ganache for more information. Go to the transactions window in ganache, find your transaction and press it to enter the details pane.
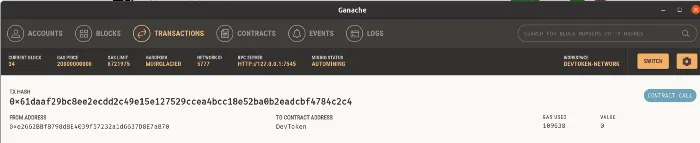
If you go into the details of the transaction you can see what method it was and the events it triggered. This is important since it will lead us into the next topic, Remember me saying Events are purely for logging in Solidity? Well, here is a extra nice thing, we can subscribe to Events. Let’s do that so we can properly update the Account balance when the Stake has been accepted.
Great, now we know how to use transactions. Feel free to try to add some other transaction, like Allowance or a simple transfer between accounts.
Subscribing to events on the blockchain
Let’s see how we can subscribe to certain events too listen for and act upon it.
The Contract we create by reading the ABI actually contains all available Events in a events field. So to subscribe we simply have to take that Event and register listeners on some available topics. We will do it in the effect that loads the user profile.
There are 4 available topics, from the documentation they are
on("data") returns Object : Fires on each incoming log with the log object as argument.
on("changed") returns Object: Fires on each log which was removed from the blockchain. The log will have the additional property “removed: true”.
on("error") returns Object: Fires when an error in the subscription occurs.
on("connected") returns String: Fires once after the subscription successfully connected. Returns the subscription id.
  useEffect(() => {
    // Only get profile if we are completly loaded
    if (loaded && (accounts !== 0)) {
      // get user info
      getUserProfile()
      // Subscribe to Stake events
      // Options allows us to specify filters so we dont grab all events, in this case we only select our current account in metamask
      let options = {
        filter: {
            address: [accounts[0]]
        },
      };
      // Our contract has a field called events which has all Available events.
      devToken.events.Staked(options)
      // data is when
      .on('data', event => console.log("Data: " , event))
      .on('changed', changed => console.log("Changed: ", changed))
      .on('error', err => console.log("Err: ", err))
      .on('connected', str => console.log("Conntected: ", str))
    } else {
      setTimeout(setLoaded(true), 500);
    }
    // This here subscribes to changes on the loaded state
}, [loaded, accounts, devToken]);It’s not harder than that to listen for the events. Make sure you filter correctly though. Try staking once and view the console for the result.
Conclusion
This concludes the third article. There are one more article in this series, you can find the full code I have in the DApp branch of my repository.
In this part we have covered the following topics
- Setup of the React application
- Learned how to connect MetaMask
- How to Call and Send transactions
- Listen on certain Events
The next article will cover how to deploy to the Binance test network and the main network.
I hope you enjoyed it, feel free to reach out if there are any questions.
If you enjoyed my writing, please support future articles by buying me an Coffee